Monthly Archives: September 2023

Drone Programming – Gesture Control

Once I did the face detection project, it made me easier to understand gesture recognition, you can do it too. It gives me more solid fundamentals to start with deep learning studying, I want to create my objection recognition model and have the drone fly with this. Before that, I like to try body detection and swap fly as my next project. OK, let’s see how we make this happen in our drone.

Basic Concept

  • Capture video frame from the drone
  • Use a hand detection tool to identify hands from the frame and identify the left hand.
  • Based on the hand-detected information (including wrist, finger, knuckles & phalanges) and the logic, we will achieve gesture control.

Understanding your hand

First of all, let’s understand our hands first… XD

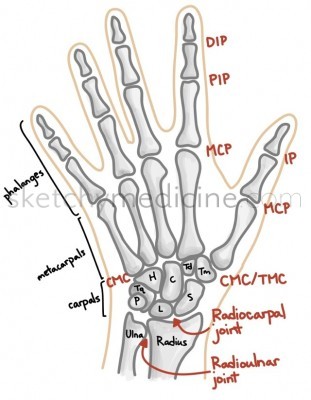
I got this picture from sketchymedicine.com, it contains a lot of medical sketches and detailed information, very cool website.

Program with MediaPipe

See below for the full program

from djitellopy import Tello
import cv2
import mediapipe as mp
import threading
import math
import logging
import time

# Assign tello to the Tello class and set the information to error only
tello = Tello()
tello.LOGGER.setLevel(logging.ERROR) #Ignore INFO from Tello
fly = False #For debuggin purpose

# Assign the MediaPipe hands detection solution to mpHands and define the confidence level
mpHands = mp.solutions.hands
hands = mpHands.Hands(min_detection_confidence=0.8, min_tracking_confidence=0.8)

# When we detect the hand, we can use mp.solution to plot the location and connection
mpDraw = mp.solutions.drawing_utils

def hand_detection(tello):

    while True:
        
        global gesture
        
        # Read the frame from Tello
        frame = tello.get_frame_read().frame
        frame = cv2.flip(frame, 1)
        
        # Call hands from MediaPipe Solution for the hand detction, need to ensure the frame is RGB
        result = hands.process(frame)
        
        # Read frame width & height instead of using fixed number 960 & 720
        frame_height = frame.shape[0]
        frame_width = frame.shape[1]
        my_hand = []
        
        if result.multi_hand_landmarks:
            for handlms, handside in zip(result.multi_hand_landmarks, result.multi_handedness):
                if handside.classification[0].label == 'Right': # We will skip the right hand information
                    continue
                        
                # With mp.solutions.drawing_utils, plot the landmark location and connect them with define style        
                mpDraw.draw_landmarks(frame, handlms, mpHands.HAND_CONNECTIONS,\
                                        mp.solutions.drawing_styles.get_default_hand_landmarks_style(),\
                                        mp.solutions.drawing_styles.get_default_hand_connections_style())          
               
                # Convert all the hand information from a ratio into actual position according to the frame size.
                for i, landmark in enumerate(handlms.landmark):
                    x = int(landmark.x * frame_width)
                    y = int(landmark.y * frame_height)
                    my_hand.append((x, y))
                                        
                # Capture all the landmarks position and distance into hand[]
                # wrist = 0       
                # thumb = 1 - 4
                # index = 5 - 8
                # middle = 9 - 12
                # ring = 13 - 16
                # little = 17 - 20
                
                # Setup left hand control with the pre-defined logic. 
                # Besides thumb, we use finger tip y position compare with knuckle y position as an indicator
                # Thumb use the x position as the comparison.
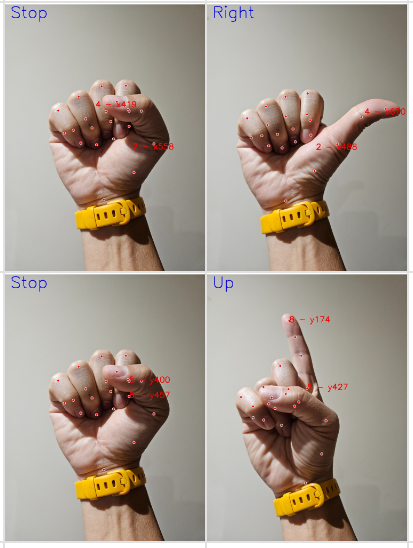
                
                # Stop, a fist
                # Land, open hand
                # Right, only thumb open
                # Left, only little finger open
                # Up, only index finger open
                # Down, both thumb and index finger open
                # Come, both index and middle fingger open
                # Away, both index, middle and ring finger open            
                finger_on = []
                if my_hand[4][0] > my_hand[2][0]:
                    finger_on.append(1)                     
                else:
                    finger_on.append(0) 
                for i in range(1,5):
                    if my_hand[4 + i*4][1] < my_hand[2 + i*4][1]: 
                        finger_on.append(1)
                    else:
                        finger_on.append(0)
                
                gesture = 'Unknown'        
                if sum(finger_on) == 0:
                    gesture = 'Stop'
                elif sum(finger_on) == 5:
                    gesture = 'Land'
                elif sum(finger_on) == 1:
                    if finger_on[0] == 1:
                        gesture = 'Right'
                    elif finger_on[4] == 1:
                        gesture = 'Left'
                    elif finger_on[1] == 1:
                        gesture = 'Up'
                elif sum(finger_on) == 2:
                    if finger_on[0] == finger_on[1] == 1:
                        gesture = 'Down'
                    elif finger_on[1] == finger_on[2] == 1:
                        gesture = 'Come'
                elif sum(finger_on) == 3 and finger_on[1] == finger_on[2] == finger_on[3] == 1:
                    gesture = 'Away'
                
        cv2.putText(frame, gesture, (10, 50), cv2.FONT_HERSHEY_SIMPLEX, 2, (255, 0, 0), 3)
        frame = cv2.cvtColor(frame, cv2.COLOR_BGR2RGB) 
        cv2.imshow('Tello Video Stream', frame)
        cv2.waitKey(1)
        if gesture == 'Landed':
            break      

########################
# Start of the program #
########################

# Connect to the drone via WIFI
tello.connect()

# Instrust Tello to start video stream and ensure first frame read
tello.streamon()

while True:
            frame = tello.get_frame_read().frame
            if frame is not None:
                break

# Start the hand detection thread when the drone is flying
gesture = 'Unknown'
video_thread = threading.Thread(target=hand_detection, args=(tello,), daemon=True)
video_thread.start()    

# Take off the drone
time.sleep(1)
if fly:
    tello.takeoff()
    tello.set_speed(10)
    time.sleep(2)
    tello.move_up(80)
    
while True:
    
    hV = dV = vV = rV = 0
    if gesture == 'Land':
        break
    elif gesture == 'Stop' or gesture == 'Unknown':
        hV = dV = vV = rV = 0
    elif gesture == 'Right':
        hV = -15
    elif gesture == 'Left':
        hV = 15
    elif gesture == 'Up':
        vV = 20
    elif gesture == 'Down':
        vV = -20
    elif gesture == 'Come':
        dV = 15
    elif gesture == 'Away':
        dV = -15
        
    tello.send_rc_control(hV, dV, vV, rV)

    
# Landing the drone
if fly: tello.land()
gesture = 'Landed'

# Stop the video stream
tello.streamoff()

# Show the battery level before ending the program
print("Battery :", tello.get_battery())
    
Python

Hand Detection

# Assign the MediaPipe hands detection solution to mpHands and define the confidence level
mpHands = mp.solutions.hands
hands = mpHands.Hands(min_detection_confidence=0.8, min_tracking_confidence=0.8)
Python

From MediaPipe, we are going to use MediaPipe Solution Hands for our hand detection, there are a few parameters that are important to us,

  • min_hand_detection_confidence – that’s the first step to identifying a hand in the single frame. At which score of detection is considered a success, the lower the number, the more detected objects can pass but the higher the chance of error. The higher the number, need a very high the score object, i.e. a very clear and precise hand image.
  • min_tracking_confidence – Once the hand is detected based on the min_hand_detection_confidence requirement, it will do the hand tracking with this number.

You can refer to the MediaPipe Official Website for more information. They also get a demonstration website for you to play with different models. However,

  def __init__(self,
               static_image_mode=False,
               max_num_hands=2,
               model_complexity=1,
               min_detection_confidence=0.5,
               min_tracking_confidence=0.5):
Python

I found that the documentation on the MediaPipe Official Website may not be updated, and min_hand_presence_confidence and running_mode no longer exist. What I checked from hands.py. It spent me 30 minutes playing with the demo and reading information to understand the difference between min_hand_detection_confidence and min_hand_presence_confidence.

gesture = 'Unknown'
video_thread = threading.Thread(target=hand_detection, args=(tello,), daemon=True)
video_thread.start()    
Python

Just like what we did in face detection, we need to run the hand detection function in a thread (parallel processing) to capture and analyze the hand position, updating a global variable – gesture, so that the drone movement control can take corresponding actions according to this.

# Read the frame from Tello
        frame = tello.get_frame_read().frame
        frame = cv2.flip(frame, 1)
        
        # Call hands from MediaPipe Solution for the hand detction, need to ensure the frame is RGB
        result = hands.process(frame)
Python

Get the latest frame from the drone and flip it from the camera point of view to our point of view. Then, process the frame with hands, it was predefined in the beginning – line #11. Once the hand detection is done, the following information will be stored in result, it will contain,

  • result.multi_handedness – ‘Left’ or ‘Right’ hand
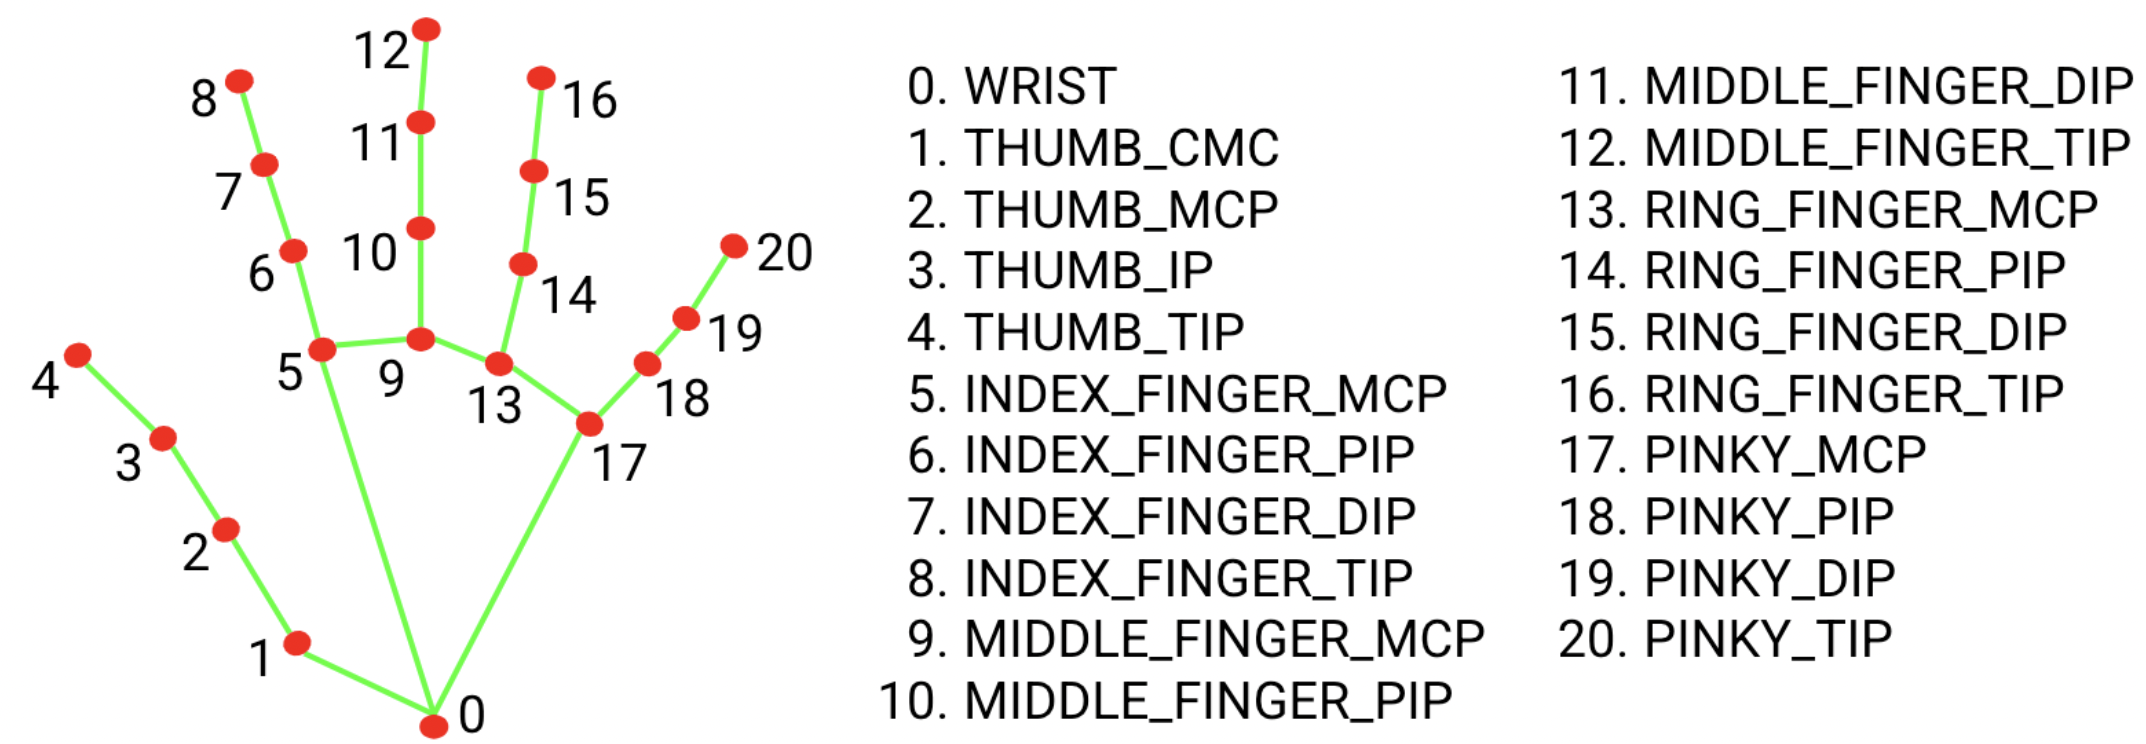
  • result.multi_hand_landmarks – an array containing 21 sets of data as show below, they call it landmarks, each landmark including the x, y & z position. But, the x and y coordinates are normalized to [0.0, 1.0] by the image width and height, respectively. The z coordinate represents the landmark depth, with the depth at the wrist being the origin.
  • result.multi_hand_world_landmarks – The 21 hand landmarks are also presented in world coordinates. Each landmark is composed of xy, and z, representing real-world 3D coordinates in meters with the origin at the hand’s geometric center.
        if result.multi_hand_landmarks:
            for handlms, handside in zip(result.multi_hand_landmarks, result.multi_handedness):
                if handside.classification[0].label == 'Right': # We will skip the right hand information
                    continue
Python

If hand(s) are detected, the result will contain the necessary data. Since we only need to use the left hand to control the drone, we will skip reading the Right hand data.

mpDraw = mp.solutions.drawing_utils
Python
                mpDraw.draw_landmarks(frame, handlms, mpHands.HAND_CONNECTIONS, mp.solutions.drawing_styles.get_default_hand_landmarks_style(), mp.solutions.drawing_styles.get_default_hand_connections_style())                            
Python

Then, we use the drawing_utils from MediaPipe to highlight the landmarks and connect them.

                # Convert all the hand information from a ratio into actual position according to the frame size.
                for i, landmark in enumerate(handlms.landmark):
                    x = int(landmark.x * frame_width)
                    y = int(landmark.y * frame_height)
                    my_hand.append((x, y))   
Python

Retreves result.multi_hand_landmarks x & y data and converts this into actual position to the frame size. Store into array my_hand for the gesture analysis.

Logic for different gestures – Finger open or close?

We just simply compare the y position of the fingertip (TIP) to the knuckle (MCP). For the thumb, we compare the x position of the fingertip (TIP) to the knuckle (MCP) as shown below,

When thumb is open, finger tip x is bigger then knuckle x. When the fingers are open, finger tip y is smaller than knuckle y.

                finger_on = []
                if my_hand[4][1] > my_hand[2][1]:
                    finger_on.append(1)                     
                else:
                    finger_on.append(0) 
                for i in range(1,5):
                    if my_hand[4 + i*4][3] > my_hand[2 + i*4][3]: 
                        finger_on.append(1)
                    else:
                        finger_on.append(0)
                
                gesture = 'Unknown'        
                if sum(finger_on) == 0:
                    gesture = 'Stop'
                elif sum(finger_on) == 5:
                    gesture = 'land'
                elif sum(finger_on) == 1:
                    if finger_on[0] == 1:
                        gesture = 'Right'
                    elif finger_on[4] == 1:
                        gesture = 'Left'
                    elif finger_on[1] == 1:
                        gesture = 'Up'
                elif sum(finger_on) == 2:
                    if finger_on[0] == finger_on[1] == 1:
                        gesture = 'Down'
                    elif finger_on[1] == finger_on[2] == 1:
                        gesture = 'Come'
                elif sum(finger_on) == 3 and finger_on[1] == finger_on[2] == finger_on[3] == 1:
                    gesture = 'Away'
Python

We compare each fingers one by one and record into array finger_on, 1 represent open and 0 represent to close. By mapping this to our target gesture,

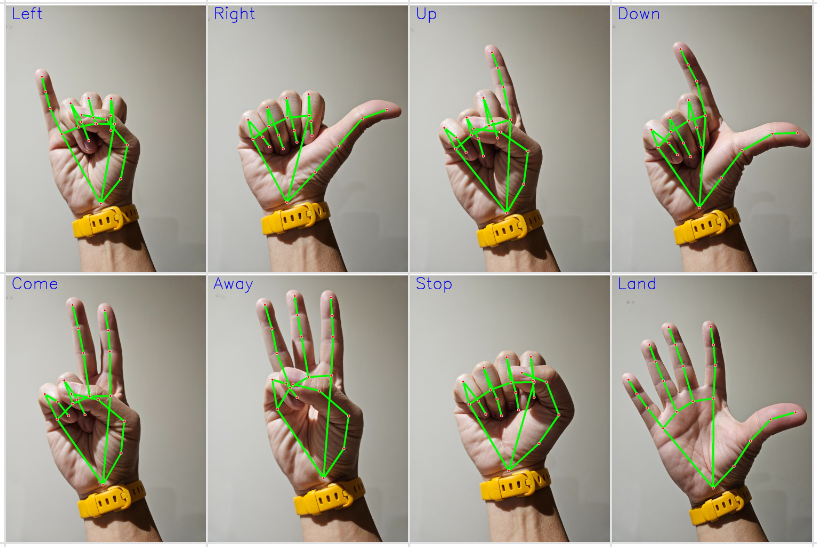
  • Left – finger_on = [0, 0, 0, 0, 1]
  • Right – finger_on = [1, 0, 0, 0, 0]
  • Up – finger_on = [0, 1, 0, 0, 0]
  • Down – finger_on = [1, 1, 0, 0, 0]
  • Come – finger_on = [0, 1, 1, 0, 0]
  • Away – finger_on = [0, 1, 1, 1, 0]
  • Stop – finger_on = [0, 0, 0, 0, 0]
  • Land – finger_on = [1, 1, 1, 1, 1]

Then, we use if/then loops to determinate variable gesture according to the finger_on result.

It may be fun if we use binary numbers to represent the above gesture determination.

Drone Movement Control

while True:
    
    hV = dV = vV = rV = 0
    if gesture == 'Land':
        break
    elif gesture == 'Stop' or gesture == 'Unknown':
        hV = dV = vV = rV = 0
    elif gesture == 'Right':
        hV = -15
    elif gesture == 'Left':
        hV = 15
    elif gesture == 'Up':
        vV = 20
    elif gesture == 'Down':
        vV = -20
    elif gesture == 'Come':
        dV = 15
    elif gesture == 'Away':
        dV = -15
        
    tello.send_rc_control(hV, dV, vV, rV)
Python

With the real-time global variable gesture from the hand_detection(), we use this variable to command the drone movement, with the SEND_RC_CONTROL command.

Horizontal-100 – 0 to move left0 – 100 to move right
Depth -100 – 0 to move backward0 – 100 to move forward
Vertial-100 – 0 to move down0 -100 to move up
Rotation-100 – 0 to rotate anti-clockwsie 0 – 100 to rotate clockwise
SEND_RC_CONTROL(Horizontal velocity, Depth velocity, Vertial velocity, Rotation velocity)

Unlike the Face Detection project, we used hV to control the Left and Right movement instead of rotation- rV. Oh.. the ‘Left/Right’ in the program is from the user’s point of view, but the drone camera view, is reversed.

That’s all for the project. It is quite straightforward and similar to the Face Detection. Please leave a comment for any inputs and comment. I am now studying how to do swarm flying with 3 Tello Edu, just cleaned up some roadblockers…

New Command – Follow

Just pop-up that I can add a ‘follow’ command, like what was doing for the face detection and tracking. I believe that we just need to copy & paste the code from the Face Detection project with some modifications.

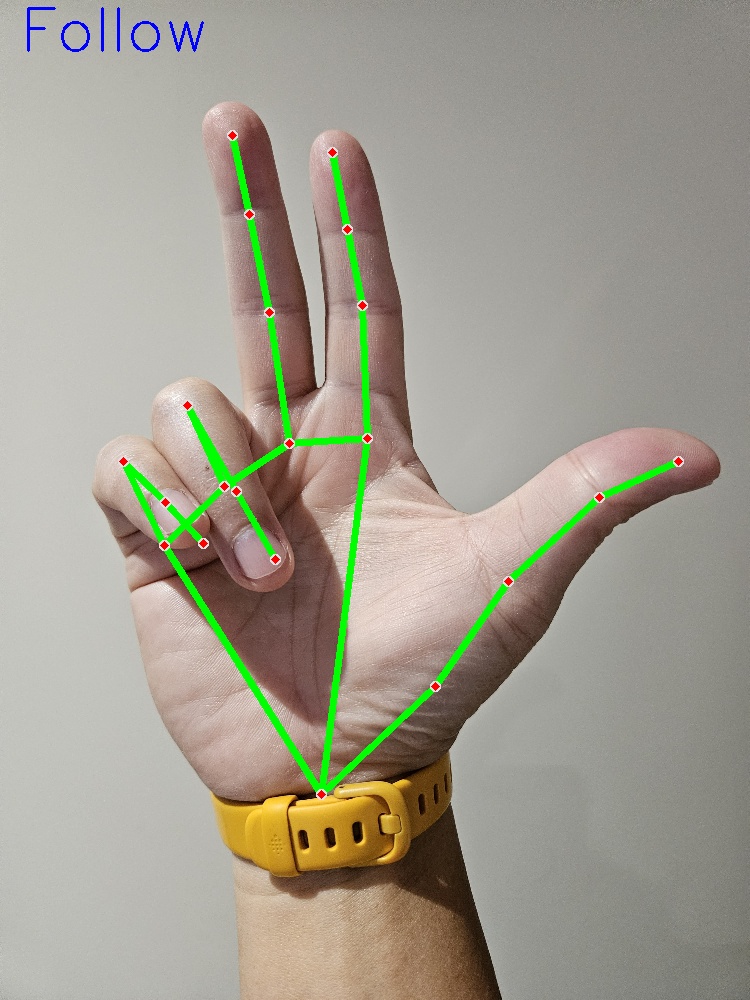
Above is the hand sign for ‘follow’, go ahead to modify the original code with belows,

        global gesture
        global hand_center # New line for hand follow
Python
                # New line for hand follow    
                elif sum(finger_on) == 3 and finger_on[0] == finger_on[1] == finger_on[2] == 1:
                    gesture = 'Follow'
                    
                    #Apply Shoelace formula to calculate the palm size
                    palm_vertexs = [0,1,2,5,9,13,17]
                    area = 0                    
                    for i in palm_vertexs:
                        x1, y1 = my_hand[i]
                        x2, y2 = my_hand[(i + 1) % 7]
                        area += (x1 * y2) - (x2 * y1)
                    area = 0.5 * abs(area)
                    
                    hand_center = my_hand[0][0], my_hand[0][1], area
Python
gesture = 'Unknown'
hand_center = 480, 360, 28000 # New line for hand follow
Python
    # New line for hand follow
    elif gesture == 'Follow':
        x, y, size = hand_center
    
        if x > 480:
            rV = -int((x - 480)/4.8)            
        elif x < 480:
            rV = +int((480 - x)/4.8)
        else:
            rV = 0
        
        if y > 360: 
            vV = -int((y - 360)/3.6)
        elif y < 360: 
            vV = int((360 - y)/3.6)
        else:
            vV = 0
            
        if size > 30000:
            dV = -15
        elif size < 26000:
            dV = 15
        else:
            dV = 0            
            
    tello.send_rc_control(hV, dV, vV, rV)
Python

That’s all!

Shoelace Formula

For the above codes, we use landmarks – 0, 1, 2, 5, 9, 13 & 17 to calculate the area of the palm, and this number determines how close the palm is to the drone, we target a range of 26000 – 30000. Then, we command it to fly toward or away from the hand, just similar to the face tracking in the last project.

But, what I want to highlight is the palm area calculation, it led me to learn about the Shoelace Formula, which is a very interesting and powerful formula. I don’t remember that I learned this before, maybe returned this to my teacher already 😎. Anyway, have a look at the below video, it’s worth watching and understanding the Shoelace Formula.

Drone Programming – Face Detection and Tracking

If I hadn’t tried, I never have known that doing face detection nowadays is such simple and easy. Even for a beginner like me, I can make it happen within a few hours… after I spent a few days learning and understanding the libraries. It is worth having a try, it will lead you to a new world and start to understand vision computing, deep learning, and AI development. Let’s take a look at what I did.

Basic Concept

  • Capture video frame from the drone
  • Use a face detection tool to identify the main face from the frame. Since we have not yet applied face recognition, we just picked the closet one as the main face.
  • Based on the face detected position (x, y) to move the drone and make the face at the center of the frame.

Program with CV2 model

See below for the full program

# Before you run this program, ensure to connect Tello with the WIFI

# Import Tello class from djitellopy library
from djitellopy import Tello

# Import additional library CV2 - OpenCV for image processing, threading for multi-tasking
import cv2
import threading
import time
import logging

# Assign tello to the Tello class and set the information to error only
tello = Tello()
tello.LOGGER.setLevel(logging.ERROR) #Ignore INFO from Tello
fly = True #For debuggin purpose

# Assign the pre-trained model - Haar Cascade classifier for CV2 face detection
face_cascade = cv2.CascadeClassifier(cv2.data.haarcascades + 'haarcascade_frontalface_default.xml')
eyes_cascade = cv2.CascadeClassifier(cv2.data.haarcascades + 'haarcascade_eye.xml') 

# def a video capture and display function
def face_detection(tello):

    while True:
        # Change the face_center to be global, any changes will be read globally
        global face_center
                
        # Read the frame from Tello and convert the color from BGR to RGB
        frame = tello.get_frame_read().frame
        frame = cv2.cvtColor(frame, cv2.COLOR_BGR2RGB)
        
        # Convert the image to grayscale for face detection
        gray = cv2.cvtColor(frame, cv2.COLOR_RGB2GRAY)

        # Perform face detection using the pre-train model - haarcascade_frontalface_default.xml
        faces = face_cascade.detectMultiScale(gray, scaleFactor=1.05, minNeighbors=10, minSize=(80, 80))
        
        
        # Based on CV2 result, find the largest detected face and the position    
        largest_area = 0
        largest_face = None
                
        for (x, y, w, h) in faces:
            face_area = w * h
            if face_area > largest_area:
                largest_area = face_area
                largest_face = (x, y, w, h)
        
        # Confirm there are two eyes detected inside the face           
        if largest_face is not None:
            eyes = eyes_cascade.detectMultiScale(gray) # Using the default parameters
            eye_count = 0
            for (ex, ey, _, _) in eyes:
                if ex - x < w and ey - y < h:
                    eye_count += 1
            if eye_count < 2:
                continue
            
        # Highlight the largest face with a box and show the coordinates             
            x, y, w, h = largest_face
            face_center = (x + w/2), (y + h/2), w
            cv2.rectangle(frame, (x, y), (x+w, y+h), (255, 0, 0), 2)
            position_text = f'Face : (x :{x}, y :{y}, w :{w}, h :{h})'
            center_text = f'{int(x + w/2)} , {int(y + h/2)}'
            rc_text = f'RC({hV}, {dV}, {vV}, {rV})'
            cv2.putText(frame, position_text, (x, y-10), cv2.FONT_HERSHEY_SIMPLEX, 0.5, (255, 0, 0), 2)
            cv2.putText(frame, center_text, (int(x + w/2), int(y + h/2)), cv2.FONT_HERSHEY_SIMPLEX, 0.5, (255, 0, 0), 2)
            cv2.putText(frame, rc_text, (20, 20), cv2.FONT_HERSHEY_SIMPLEX, 0.5, (0, 255, 0), 2)
        else:
            face_center = 480, 360, 200
        
        # Display the face detected image and check whether 'q' is bing pressed or not
        cv2.imshow('Tello Video Stream', frame)              
        if cv2.waitKey(1) & 0xFF == ord('q'):
            face_center = False
            break

########################
# Start of the program #
########################

# Connect to the drone via WIFI
tello.connect()

# Instrust Tello to start video stream and ensure first frame read
tello.streamon()

while True:
            frame = tello.get_frame_read().frame
            if frame is not None:
                break

# Start the face detection thread when the drone is flying
face_center = 480, 360, 200
hV = vV = dV = rV = 0
video_thread = threading.Thread(target=face_detection, args=(tello,), daemon=True)
video_thread.start()

# Take off the drone
time.sleep(1)
if fly:
    tello.takeoff()
    tello.set_speed(10)
    time.sleep(2)
    tello.move_up(80)

# Use RC Control to control the movement of the drone
# send_rc_control(left_right_velocity, forward_backward_velocity, up_down_velocity, yaw_velocity) from -100 to 100

while face_center != False:
    
    x, y, w = face_center

    if x > 530:
        rV = +30           
    elif x < 430:
        rV = -30
    else:
        rV = 0
    
    if y > 410: 
        vV = -20 
    elif y < 310: 
        vV = 20 
    else:
        vV = 0
        
    if w > 300:
        dV = -15
    elif w < 200:
        dV = 15
    else:
        dV = 0
    
    tello.send_rc_control(hV, dV, vV, rV)
      
# Landing the drone
if fly: tello.land()

# Stop the video stream
tello.streamoff()

# Show the battery level before ending the program
print("Battery :", tello.get_battery())
Python

If you installed the DJITELLOPY package, CV2 is being installed as well. Otherwise, you need to do this with – PIP install djitellpy.

Face Detection

face_cascade = cv2.CascadeClassifier(cv2.data.haarcascades + 'haarcascade_frontalface_default.xml')
Python

Besides face detection, CV2 provides different models to support different purposes. All of them are already downloaded when you install the CV2 package. For face detection, we use haarcascade_frontalface_default.xml.

face_center = 480, 360, 200
hV = vV = dV = rV = 0
video_thread = threading.Thread(target=face_detection, args=(tello,), daemon=True)
video_thread.start()
Python

The program structure is very similar to the video-capturing project. We need to run the face detection function in a thread (parallel processing) to capture and analyze the face position, updating a global variable – face_center, so that the drone movement control can take corresponding actions.

        frame = tello.get_frame_read().frame
        frame = cv2.cvtColor(frame, cv2.COLOR_BGR2RGB)
        
        # Convert the image to grayscale for face detection
        gray = cv2.cvtColor(frame, cv2.COLOR_RGB2GRAY)

        # Perform face detection using the pre-train model - haarcascade_frontalface_default.xml
        faces = face_cascade.detectMultiScale(gray, scaleFactor=1.05, minNeighbors=10, minSize=(80, 80))
Python

Referring to the last project, we use get_frame_read() to get the latest frame from Tello’s camera. As we mentioned before, CV2 processes image data in BGR format but the image feed from Tello’s camera is in RGB format, the ‘R’ & ‘G’ are mis-mapped. We need to convert this into ‘RGB’ for a correct display. Then, we also need to create an image in grayscale because CV2 performs face detection in grayscale.

We use detectMultiScale to perform face detection based on the face_cascade setup and the grayscale image, the result will be stored in faces. There are three inputs to alter the detection result. Be short,

  • scaleFactor – controls the resizing of the image at each step to detect objects of different sizes. The higher the number, the faster the progress but more chance of missing faces.
  • minNeighbors – controls the sensitivity of the detector by requiring a certain number of overlapping detections to consider a region as a positive detection. Lower the number, more sensitive to potential detections, potentially resulting in more detections but also more false positives.
  • minSize – minimum size of the face detected, very straightforward
        largest_area = 0
        largest_face = None
                
        for (x, y, w, h) in faces:
            face_area = w * h
            if face_area > largest_area:
                largest_area = face_area
                largest_face = (x, y, w, h)
Python

Once the face detection is done, face position and sizes will be returned to the array variable faces, len of faces representing how many faces are detected and each faces[] contains the detected position x, position y, width, and height. We are using a for loop to read the x, y, w & h and identify the largest face as we mentioned before.

vvv Small tool to understanding Scale Factor and Min Neighbour vvv

# import the opencv library
import cv2
  
# Load the pre-trained Haar Cascade classifier for face detection
face_cascade = cv2.CascadeClassifier(cv2.data.haarcascades + 'haarcascade_frontalface_default.xml')
  
scale_factor = 1.1
min_neighbors = 10
      
while(True):
  
    frame = cv2.imread("people.jpg")
    
    # Convert the image to grayscale for face detection
    gray = cv2.cvtColor(frame, cv2.COLOR_BGR2GRAY)

    # Perform face detection
    faces = face_cascade.detectMultiScale(gray, scaleFactor=scale_factor, minNeighbors=min_neighbors, minSize=(100, 100))
    biggest_face = [0, 0, 0, 0]
    
    # Draw rectangles around the detected faces
    for i, (x, y, w, h) in enumerate(faces):
        cv2.rectangle(frame, (x, y), (x+w, y+h), (255, 0, 0), 2)
        position_text = f'Face {i+1}: (x :{x}, y :{y}, w :{w}, h :{h})'
        center_text = f'{int(x + w/2)} , {int(y + h/2)}'
        cv2.putText(frame, position_text, (x, y-10), cv2.FONT_HERSHEY_SIMPLEX, 0.5, (255, 0, 0), 2)
        cv2.putText(frame, center_text, (int(x + w/2), int(y + h/2)), cv2.FONT_HERSHEY_SIMPLEX, 0.5, (255, 0, 0), 2)
           
    cv2.putText(frame, f'scaleFactor = {scale_factor}, minNeighbors = {min_neighbors}', (10, 10), cv2.FONT_HERSHEY_SIMPLEX, 0.5, (0, 255, 0), 2)        
        
    # Display the resulting frame
    cv2.imshow('People', frame)
      
    # q - quit
    # a/s - add or reduce scale factor by 0.05
    # z/x - add or reduce min neighors by 1
    # desired button of your choice
    key = cv2.waitKey(0)
    if key == ord('q'):
        break
    elif key == ord('a') and scale_factor > 1.05:
        scale_factor = round(scale_factor - 0.05, 2)
    elif key == ord('s'):
        scale_factor = round(scale_factor + 0.05, 2)
    elif key == ord('z') and min_neighbors > 1:
        min_neighbors -= 1
    elif key == ord('x'):
        min_neighbors += 1
    
# Destroy all the windows
cv2.destroyAllWindows()
Python

To better understand the above parameters, I also wrote a small tool to alter Scale Factor (with a & s key) and Min Neighbour (with z & x key), you can have a try with different photos.

Eyes Detection

When we developed the program with face detection only, we found that there was a chance to have ‘fault detection’ no ever what parameters we tried, which would interfere with our result and induce a ‘ghost’ face. We had added eye detection to ensure a face with eyes is correctly detected, it can greatly improve the detection result.

eyes_cascade = cv2.CascadeClassifier(cv2.data.haarcascades + 'haarcascade_eye.xml') 
Python

Assigns haarcascade_eye.xml to eyes_cascade for eye detection.

        if largest_face is not None:
            eyes = eyes_cascade.detectMultiScale(gray) # Using the default parameters
            eye_count = 0
            for (ex, ey, _, _) in eyes:
                if ex - x < w and ey - y < h:
                    eye_count += 1
            if eye_count < 2:
                continue
Python

If the largest face is detected, we will do an eye detection to confirm the largest face with two eyes. Same as face detection, eye position, and size will be returned to the array of variable eyes. We need to compare that there are at least two eyes in the face box. Our logic is very simple, ensure that the eyes x & y position are within the face box, eye_x (ex) minus face_x (x) should be smaller than the width (w) and eye_y (ey) minus face_y (y) should be smaller than the height (h). Why at least two eyes? because it includes potential fault eye detection within the face box.

Face Position

        if largest_face is not None:
            eyes = eyes_cascade.detectMultiScale(gray) # Using the default parameters
            eye_count = 0
            for (ex, ey, _, _) in eyes:
                if ex - x < w and ey - y < h:
                    eye_count += 1
            if eye_count < 2:
                continue
            
        # Highlight the largest face with a box and show the coordinates             
            x, y, w, h = largest_face
            face_center = (x + w/2), (y + h/2), w
            cv2.rectangle(frame, (x, y), (x+w, y+h), (255, 0, 0), 2)
            position_text = f'Face : (x :{x}, y :{y}, w :{w}, h :{h})'
            center_text = f'{int(x + w/2)} , {int(y + h/2)}'
            rc_text = f'RC({hV}, {dV}, {vV}, {rV})'
            cv2.putText(frame, position_text, (x, y-10), cv2.FONT_HERSHEY_SIMPLEX, 0.5, (255, 0, 0), 2)
            cv2.putText(frame, center_text, (int(x + w/2), int(y + h/2)), cv2.FONT_HERSHEY_SIMPLEX, 0.5, (255, 0, 0), 2)
            cv2.putText(frame, rc_text, (20, 20), cv2.FONT_HERSHEY_SIMPLEX, 0.5, (0, 255, 0), 2)
        else:
            face_center = 480, 360, 200
Python

Once we confirm the largest face with eyes, we will get the face_center position ((x + w/2), (y + h/2)) and w for the drone movement. Since we are running the face_detection() in parallel, we make the face_center variable global, so that the drone can get the data in real-time and adjust the position. Then, we highlight the face with a blue box, the face position, and the drone movement (RC – we explain later) in the video for user information. If there is no face detected, the face_center will keep as 480, 360, 200.

Drone Movement Control

We target to position the largest face in the center of the camera. The resolution of Tello’s camera is 960 x 720, i.e. face center is (480, 360). It is not practical to position to a point, so we defined an area (480 +/- 50, 360 +/- 50).

With the real time face_center data from the face_detection(), we compare this with the box above.

  • if x > 530, we need to rotate the drone to right (view from the drone), i.e. clockwise
  • if x < 430, we need to rotate the drone to left (view from the drone, i.e anti-clockwise
  • if within the box, no movement is needed
  • if y > 410, we need to move up the drone
  • if y < 310, we need to move down the drone
  • if within the box, no movement is needed

Besides the x & y position, we also control how close the drone is to our face. We use the w (width) to make the judgment, we control the face size width between 300 – 200.

  • if w > 300, it too close, we need to move the drone away, i.e. backward
  • if w < 200, it too far, we need to move the drone closer, i.e. forward
  • if within the range, no movement is needed

DJITELLOPY SEND_RC_CONTROL

In our first project, we move the drone by using commands like move_up(), move_down(), rotate_clockwise(), etc.. Since this is a once-a-time command, the drone will be moving step by step, and also min. 20cm a time. The result will be lagging and unsmooth.

So, we use SEND_RC_CONTROL to control the drone movement. For RC_SEND_CONTROL, it can set the velocity of the drone in four dimensions a time.

* Left/Right is from drone’s view

Horizontal-100 – 0 to move left0 – 100 to move right
Depth -100 – 0 to move backward0 – 100 to move forward
Vertial-100 – 0 to move down0 -100 to move up
Rotation-100 – 0 to rotate anti-clockwsie 0 – 100 to rotate clockwise
SEND_RC_CONTROL(Horizontal velocity, Depth velocity, Vertial velocity, Rotation velocity)
# Use RC Control to control the movement of the drone
# send_rc_control(left_right_velocity, forward_backward_velocity, up_down_velocity, yaw_velocity) from -100 to 100

while face_center != False:
    
    x, y, w = face_center

    if x > 530:
        rV = +30           
    elif x < 430:
        rV = -30
    else:
        rV = 0
    
    if y > 410: 
        vV = -20 
    elif y < 310: 
        vV = 20 
    else:
        vV = 0
        
    if w > 300:
        dV = -15
    elif w < 200:
        dV = 15
    else:
        dV = 0
    
    tello.send_rc_control(hV, dV, vV, rV)
Python

As a result, we have the code above,

  • hV – Horizontal Velocity
  • dV – Depth Velocity
  • vV – Vertial Velocity
  • rV – Rotation Velocity

Since doing rotation is a better approach to adjusting the horizontal position, we used rV instead of hV. Once we send the velocity number to the drone, it will keep moving in the direction according to the velocity until the next change. So, the drone is flying smoothly to the face position and achieves face tracking.

That’s simple, right?

Face Detection with MediaPipe model?

Besides using CV2. haarcascade_frontalface_default.xml, we have tried to use the MediaPipe.blaze_face_short_range.tflite. We supposed the face detection good is better because it is a deep learning based model. And yes, it is better in accuracy and response. See below comparison,

However, blaze_face_short_range.tflite is a lightweight model for detecting single or multiple faces within selfie-like images from a smartphone camera or webcam. The model is optimized for front-facing phone camera images at short range. The result for our project is not ideal since it cannot detect a long-range face when I moved away from the drone, we will re-test this when the full-range blaze face is released.

See below for the full code with MediaPipe.

# Before you run this program, ensure to connect Tello with the WIFI

# Import Tello class from djitellopy library
from djitellopy import Tello

# Import additional library CV2 - OpenCV for image processing, threading for multi-tasking
# Import MediaPIPE for the face detection
import cv2
import threading
import time
import logging
import mediapipe as mp
from mediapipe.tasks import python
from mediapipe.tasks.python import vision

# Assign tello to the Tello class and set the information to error only
tello = Tello()
tello.LOGGER.setLevel(logging.ERROR) #Ignore INFO from Tello
fly = True #For debuggin purpose

# Upload the pre-trained model and setup the Face Detection Option for MediaPIPE
base_options = python.BaseOptions(model_asset_path='blaze_face_short_range.tflite')
options = vision.FaceDetectorOptions(base_options=base_options, min_detection_confidence = 0.8, min_suppression_threshold = 0.3)
detector = vision.FaceDetector.create_from_options(options)
  
# def a video capture and display function
def face_detection(tello):

    while True:
        # Change the face_center to be global, any changes will be read globally
        global face_center      
        
        # Read the frame from Tello and convert the color from BGR to RGB
        frame = tello.get_frame_read().frame
        frame = cv2.cvtColor(frame, cv2.COLOR_BGR2RGB)
        image = mp.Image(image_format = mp.ImageFormat.SRGB, data = frame)
        
        # Perform face detection using the pre-train model - blaze_face_short_range.tflite
        detection_result = detector.detect(image)
        
        # Based on the MediaPIPE result, find the largest detected face and the position    
        largest_area = 0
        largest_face = None
        
        #faces = len(face_position.detections)
        #if faces > 0:
        for face_position in detection_result.detections:
            x = face_position.bounding_box.origin_x
            y = face_position.bounding_box.origin_y
            w = face_position.bounding_box.width
            h = face_position.bounding_box.height
            face_area = w * h
            if face_area > largest_area:
                largest_area = face_area
                largest_face = (x, y, w, h)
        
        # Highlight the largest face with a box and show the coordinates        
        if largest_face is not None:
            x, y, w, h = largest_face
            face_center = (x + w/2), (y + h/2), w
            
            cv2.rectangle(frame, (x, y), (x+w, y+h), (255, 0, 0), 2)
            position_text = f'Face : (x :{x}, y :{y}, w :{w}, h :{h})'
            center_text = f'{int(x + w/2)} , {int(y + h/2)}'
            rc_text = f'RC({hV}, {dV}, {vV}, {rV})'
            cv2.putText(frame, position_text, (x, y-10), cv2.FONT_HERSHEY_SIMPLEX, 0.5, (255, 0, 0), 2)
            cv2.putText(frame, center_text, (int(x + w/2), int(y + h/2)), cv2.FONT_HERSHEY_SIMPLEX, 0.5, (255, 0, 0), 2)
            cv2.putText(frame, rc_text, (20, 20), cv2.FONT_HERSHEY_SIMPLEX, 0.5, (255, 0, 0), 2)
        else:
            face_center = 480, 360, 200
        
        # Display the face detected image and check whether 'q' is bing pressed or not
        cv2.imshow('Tello Video Stream', frame)              
        if cv2.waitKey(1) & 0xFF == ord('q'):
            face_center = False
            break

########################
# Start of the program #
########################

# Connect to the drone via WIFI
tello.connect()

# Instrust Tello to start video stream and ensure first frame read
tello.streamon()
while True:
            frame = tello.get_frame_read().frame
            if frame is not None:
                break

# Start the face detection thread when the drone is flying
face_center = 480, 360, 200
hV = vV = dV = rV = 0
video_thread = threading.Thread(target=face_detection, args=(tello,), daemon=True)
video_thread.start()

# Take off the drone
time.sleep(1)
if fly:
    tello.takeoff()
    tello.set_speed(10)
    time.sleep(2)
    tello.move_up(80)

# Use RC Control to control the movement of the drone
# send_rc_control(left_right_velocity, forward_backward_velocity, up_down_velocity, yaw_velocity) from -100 to 100
while face_center != False:
    
    x, y, w = face_center

    if x > 530:
        rV = +30           
    elif x < 430:
        rV = -30
    else:
        rV = 0
    
    if y > 410: 
        vV = -20 
    elif y < 310: 
        vV = 20 
    else:
        vV = 0
        
    if w > 250:
        dV = -15
    elif w < 150:
        dV = 15
    else:
        dV = 0
    
    tello.send_rc_control(hV, dV, vV, rV)
      
# Landing the drone
if fly: tello.land()

# Stop the video stream
tello.streamoff()

# Show the battery level before ending the program
print("Battery :", tello.get_battery())
Python

PID?

Thanks to Hacky from TelloPilots gave me the idea of PID, I started to study and am going to add this to the face detection project. To be frank, I got a failed mark and needed to redo the exam for the Feedback Control System when I was in college. However, I found it very important and useful when working… you may not know how useful what you were learning when you were a student. (sad..)

So, I need to do some revise first. See below for a basic PID concept,

As a result, I still have no clue how to implement PID into my program but change the speed from a constant value to a variable that varies according to the distance to the center. The result is much better and I can target the exact center (480,360) instead of a +/-50 box (480 +/- 50, 360 +/- 50), you can replace the following codes.

    if x > 480:
        rV = int((x - 480)/4.8)            
    elif x < 480:
        rV = -int((480 - x)/4.8)
    else:
        rV = 0
    
    if y > 360: 
        vV = -int((y - 360)/3.6)
    elif y < 360: 
        vV = int((360 - y)/3.6)
    else:
        vV = 0
Python

For safety reasons, I don’t implement this to the ‘Come’ and ‘Away’ speeds. I will keep studying how to implement the PID or you can give me an idea how to achieve this. Please leave me comment.