That’s the latest game working by Alex sololy. It was held in Mar’2021, not yet completed, but still lot of efforts and fun. Take a look and extend his work, and then share your work with me.
Just click the link below to see and edit the sources code in Microsoft MakeCode Arcade
When we built the factory, we thought that the EV3 Home (Scratch base) can support two bricks. However, no ever how much information we read, it is not what we expected. We were trying to modify factory by adding additional color sensor, so that we can use two separated program to control this, we really don’t want to deal with EV3-G (LabView) even it support EV3 daisy chain. Finally, we decided to go for EV3dev and it opened our eyes.
Go ahead to try EV3DEV2, Python is easy if you already know Scratch based programming. Don’t hesitating, start from PyBricks, the official one.
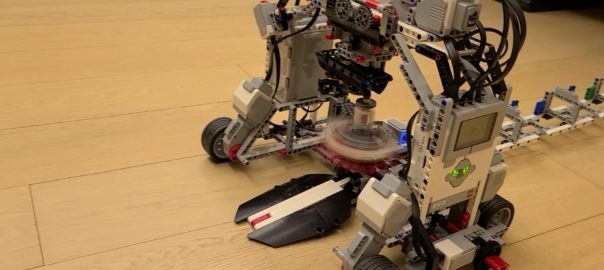
Features of the factory
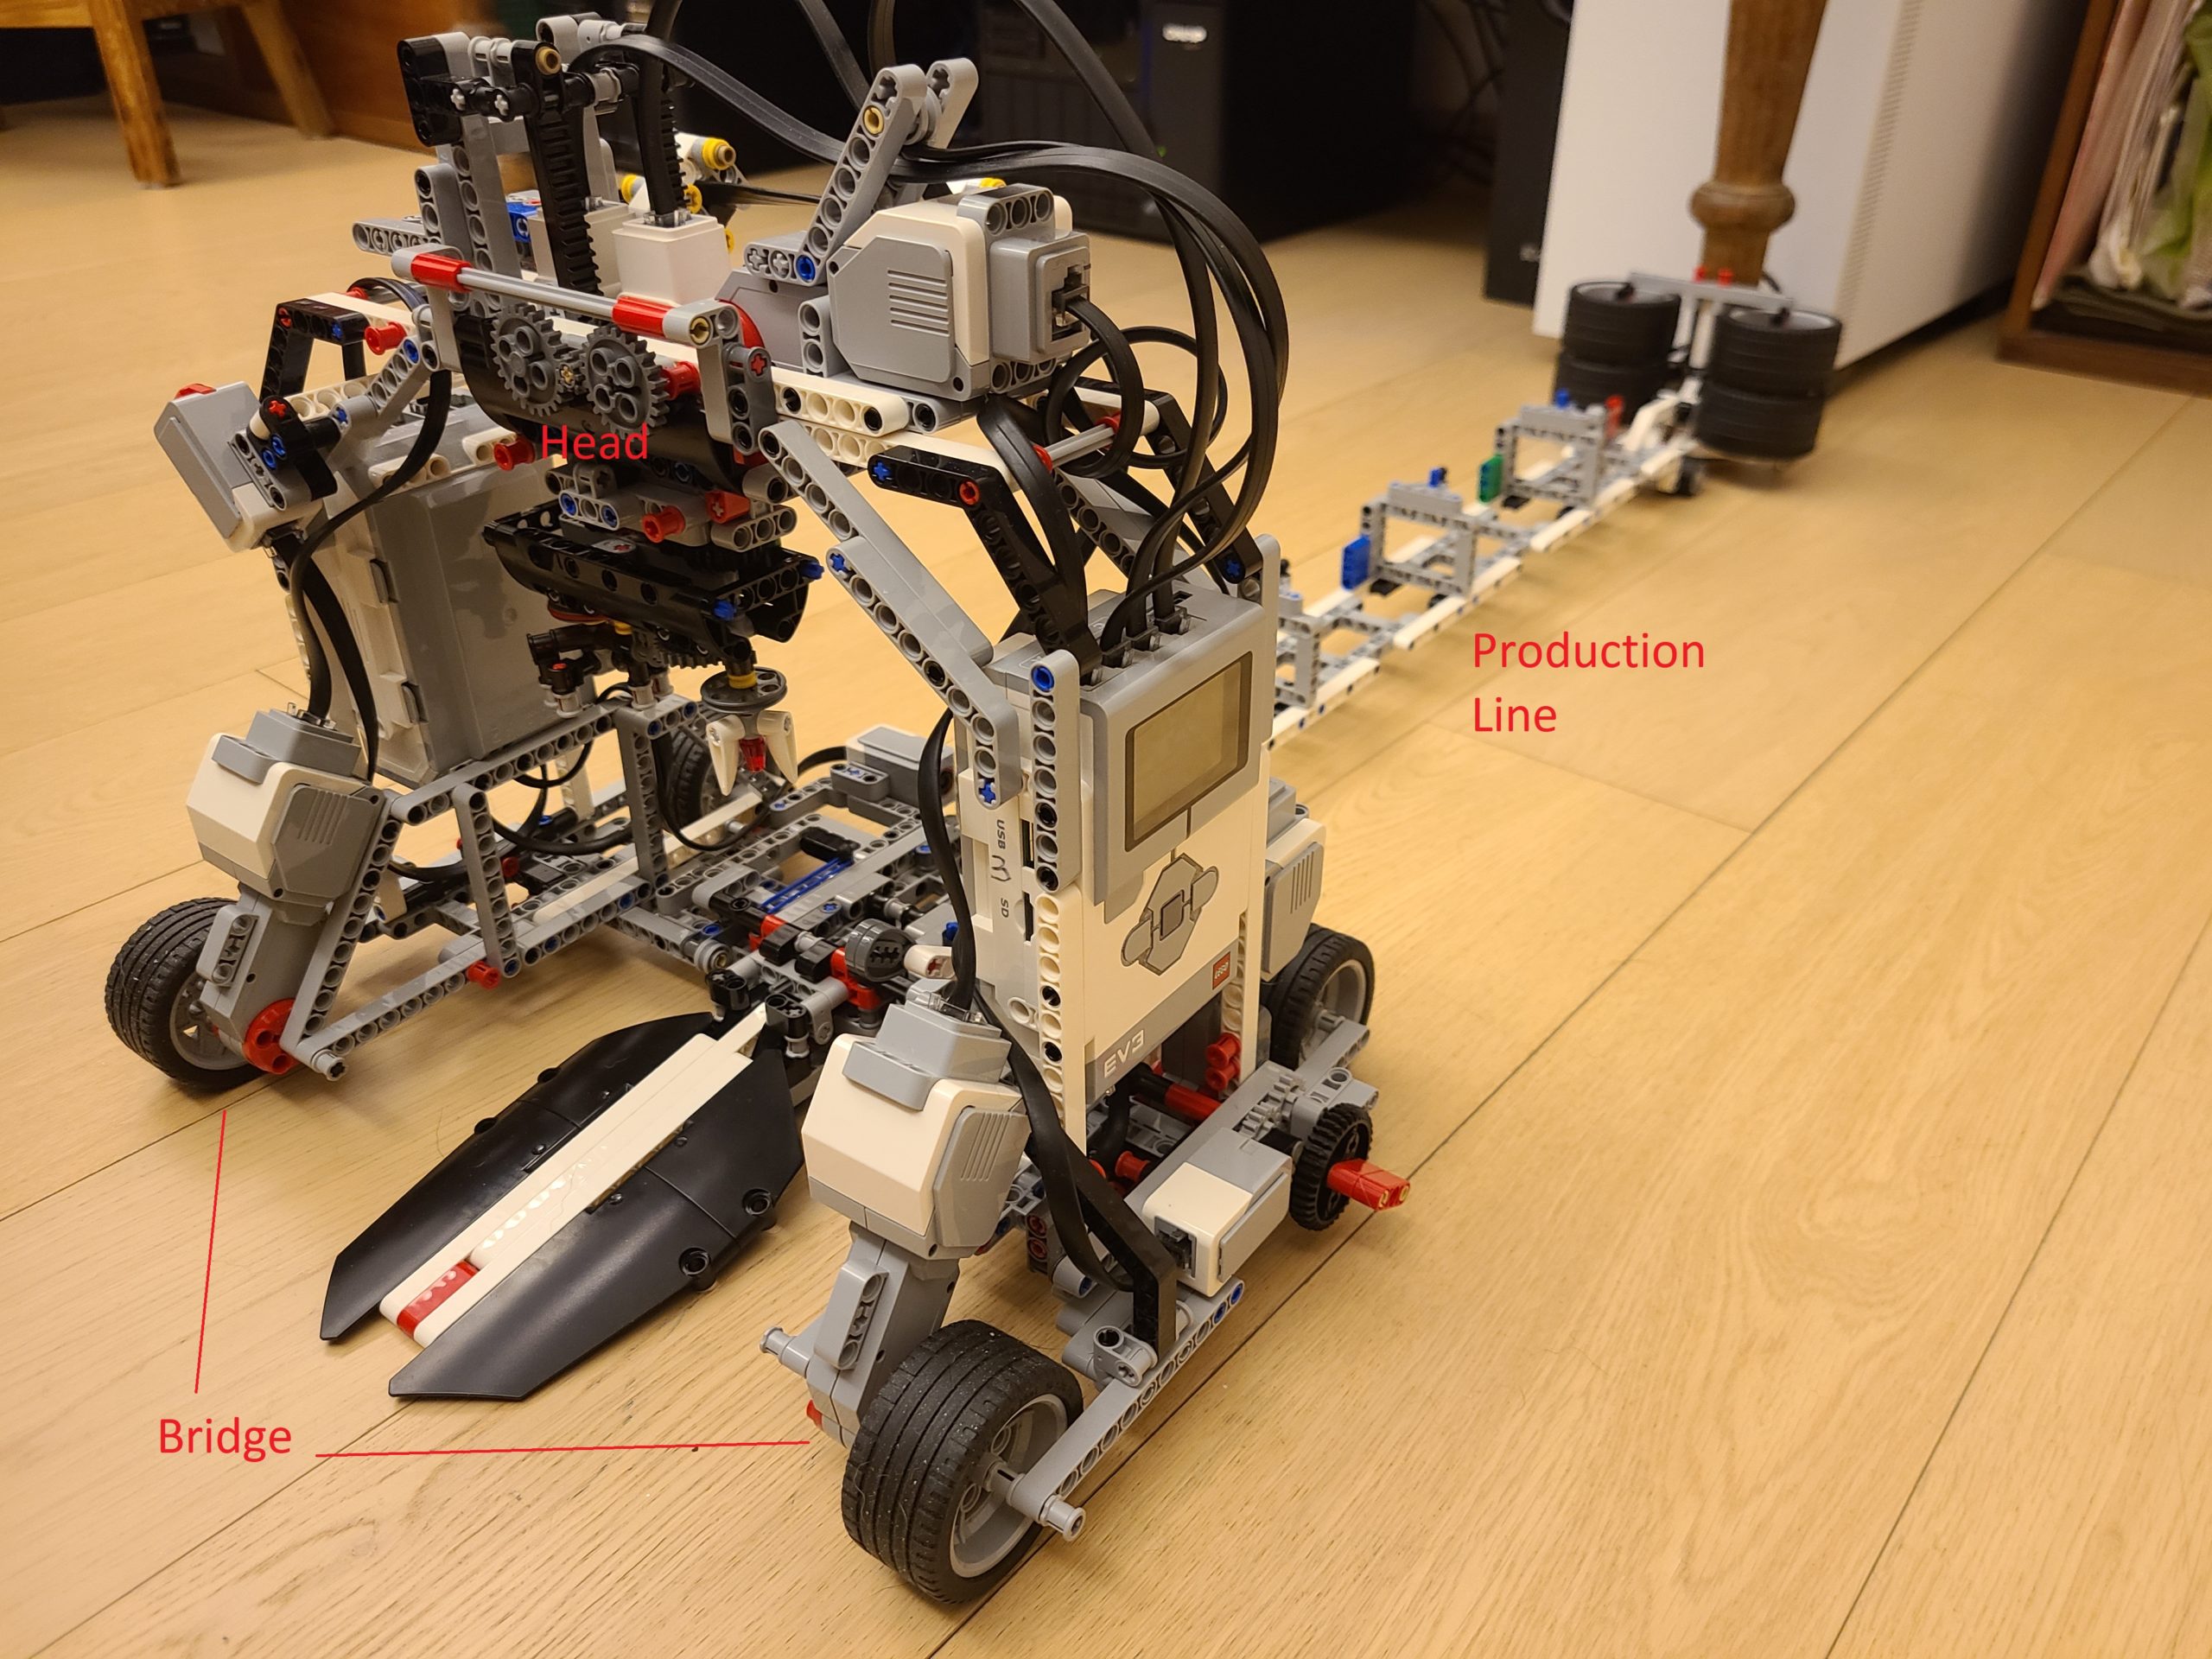
Head control – The first function is moving the head up and down getting the spinner parts. The second function is switching the tool for the head, one is to pickup the spinner parts and place it on the spinner holder, the other one is the spinning tool which will spin the finished product.
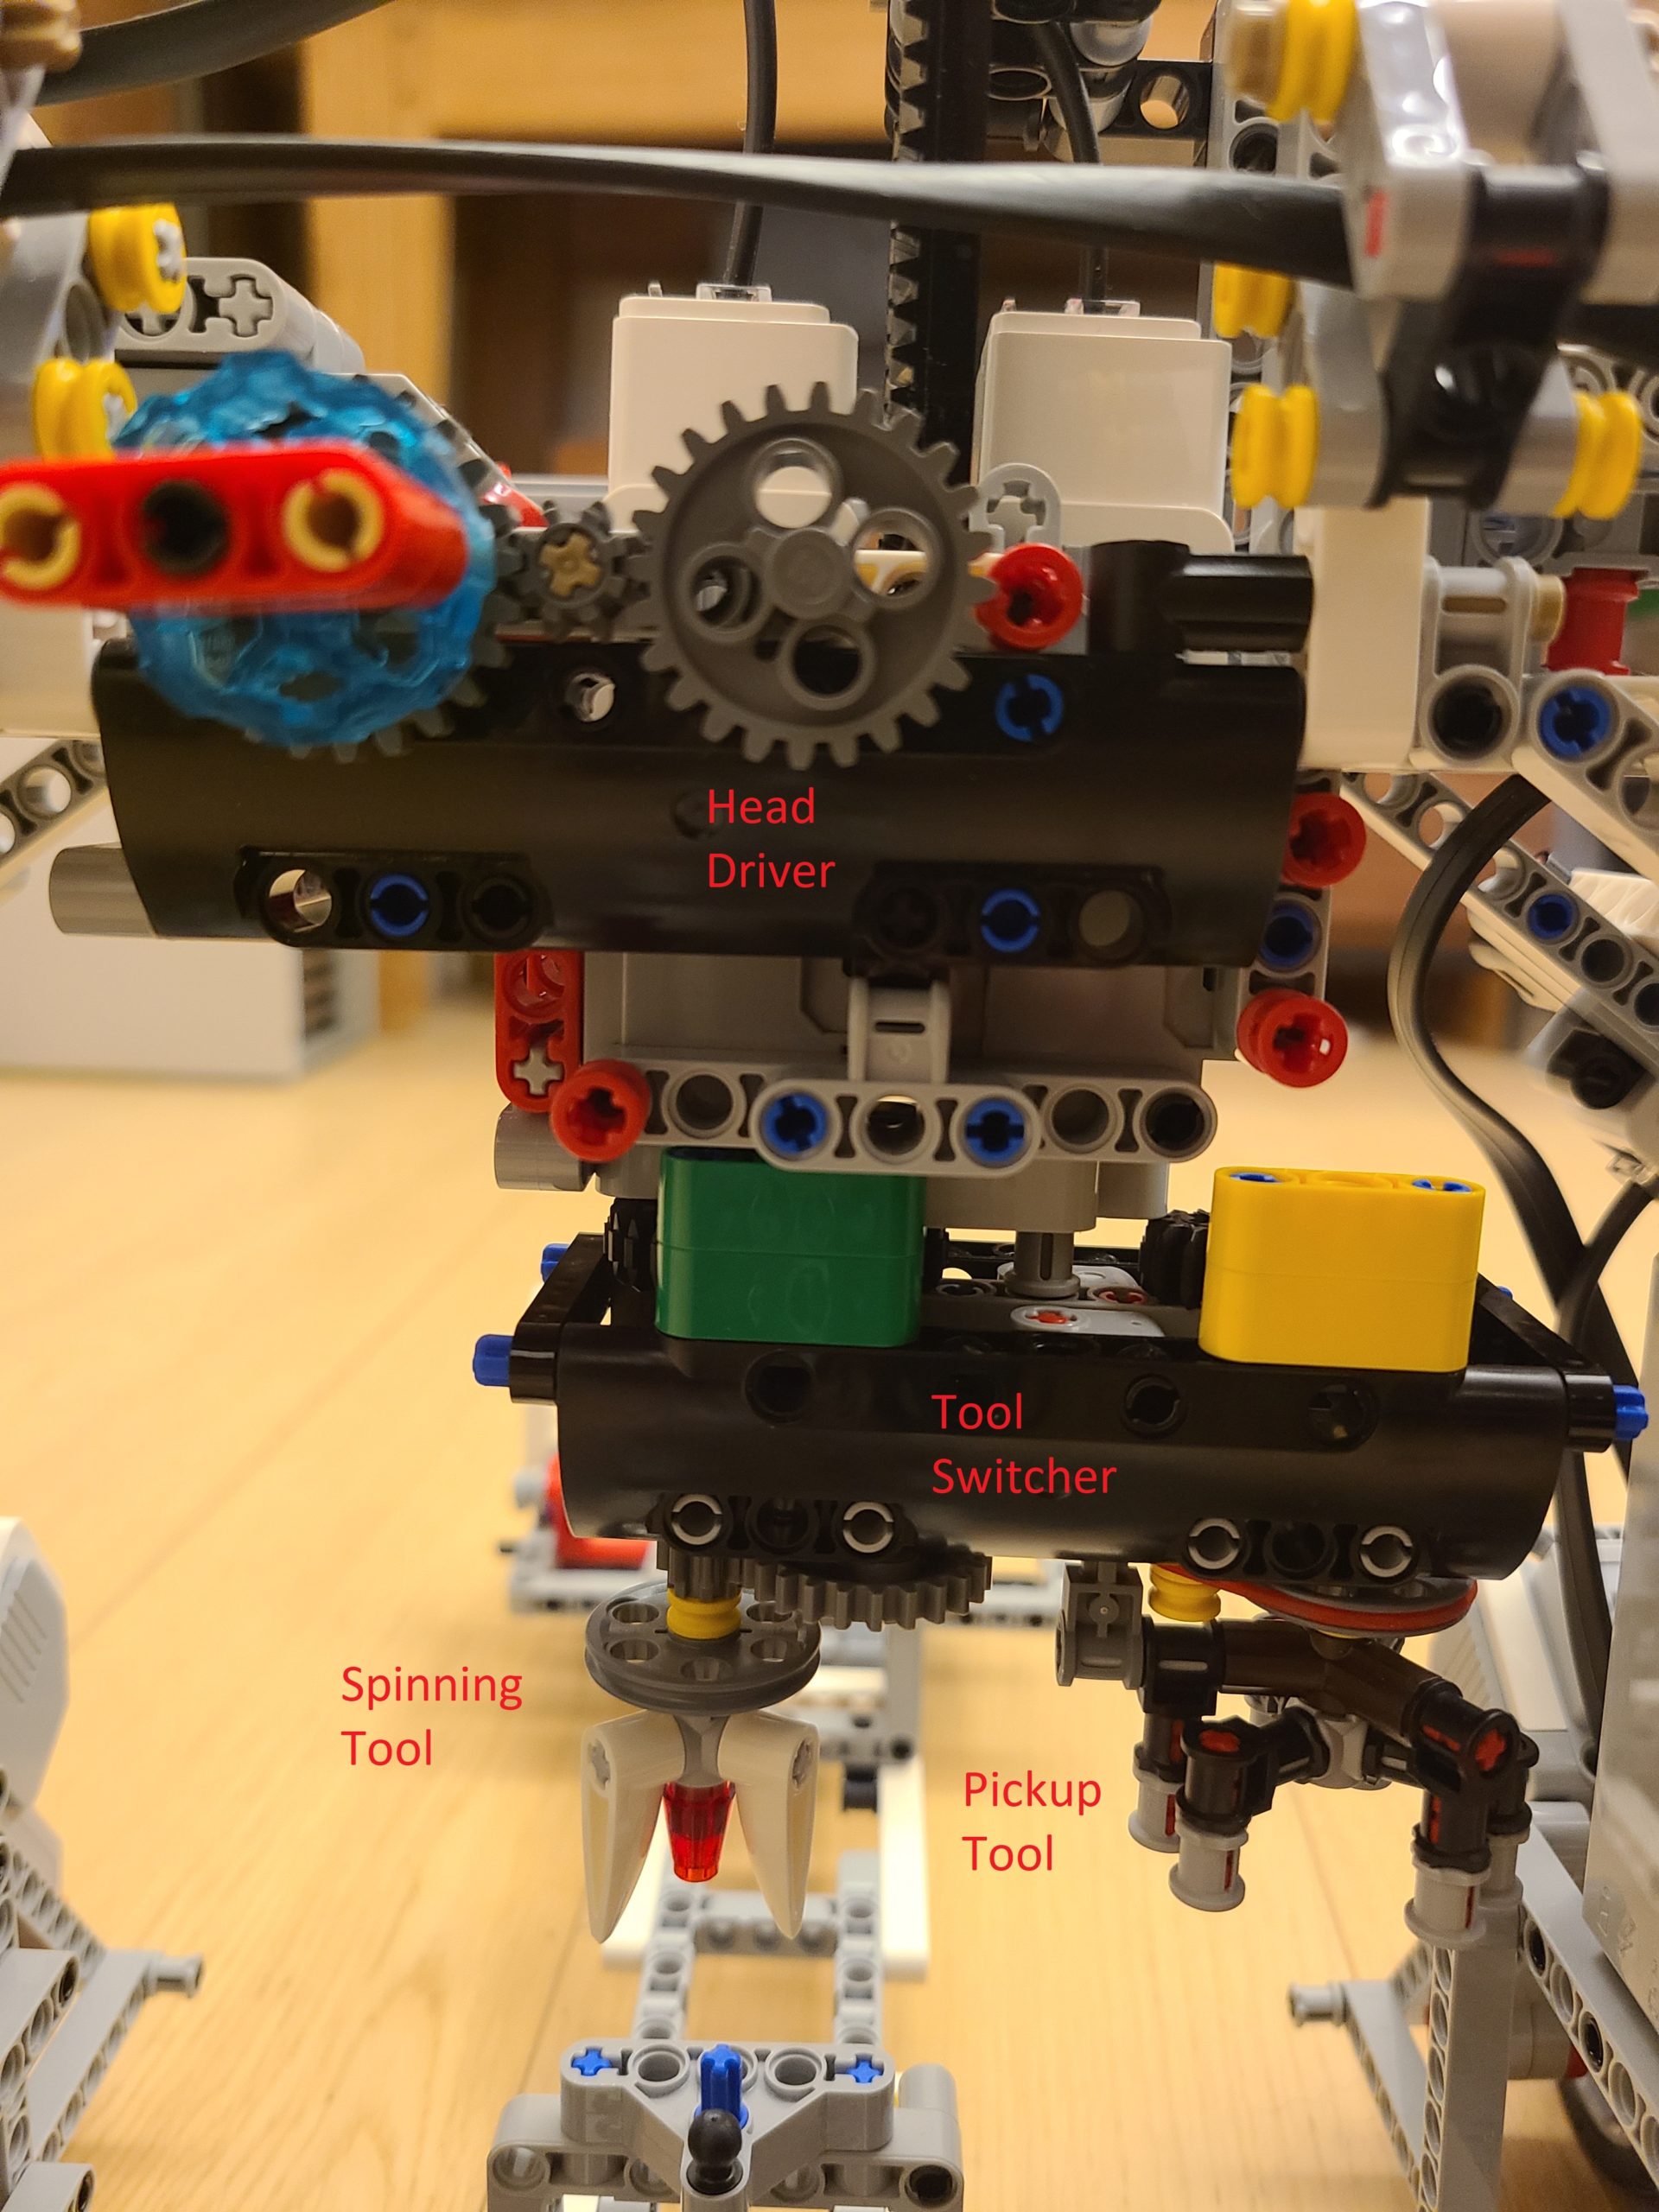
Color Sensor – This Color sensor is used for detecting the color, so that we can make the bridge go in the sequence you picked. For example, if you pick blue, green, yellow, and red, then the bridge will go in the order you have picked. We have also changed the color tags location, so that it will be easier to program the movement part and pickup the spinner part right at the spot where the bridge stops. The original design by LEGO will make it harder because you have to calculate how far the bridge need to travel after detecting the color tag. But, it is easier for operator to identify the part position.
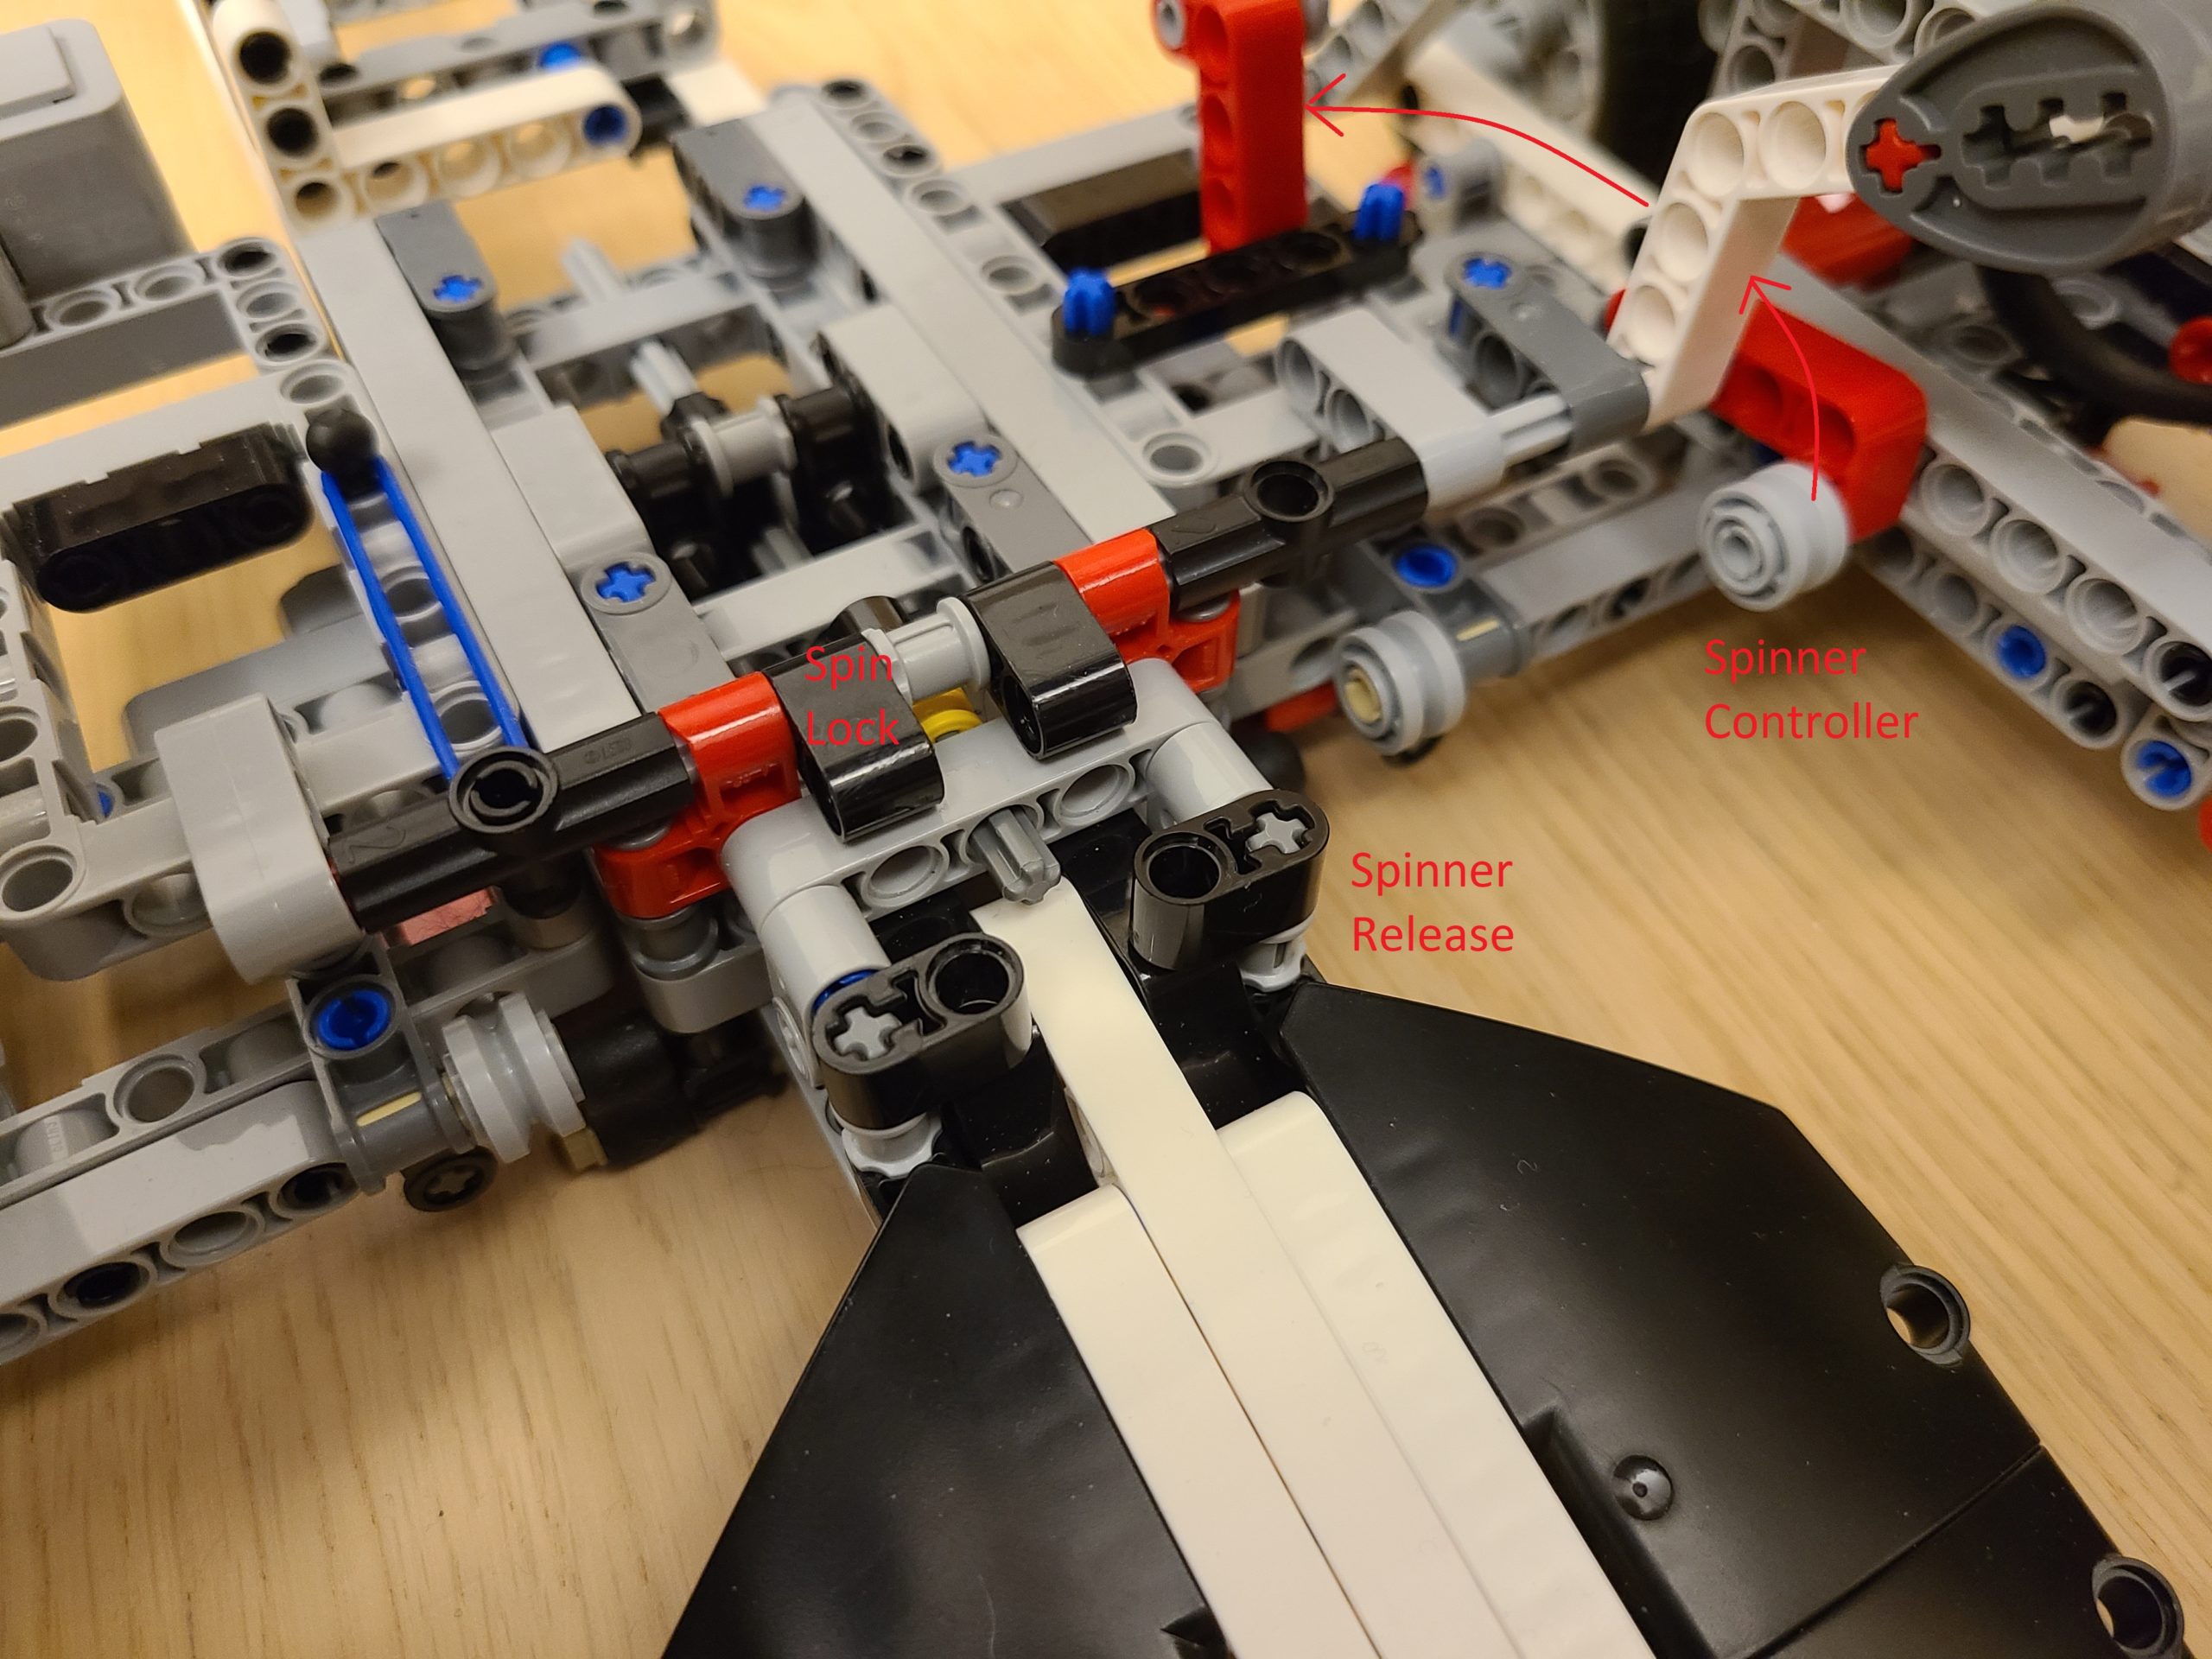
Spinner control – This is used to release the spinner after it was spun and it also controls the spin lock which lets the spinner lock it in place prior it can be spun. It works by using the motor to turn the red handle up to unlock the spin lock and let it spin. The second step is turning the handle to it’s maximum to release the spinner after it is spun.
However, we made some improvement by moving the bridge ahead to push the handle to maximum instead of using the spinner control. So that the spinner will not hit the the bridge wheels.
Calibration
The Bridge
def bridge_position():
    bridge_move(-180)

    while True:
        if rail_color_detect() == 1:
            bridge_move(0)
            ev3.speaker.beep()
            ev3.speaker.beep()
            break
    bridge_move(180) # Prepare a position to call for head calibration
    wait(600)
    bridge_move(0)
    mbox.send('Calibration')
    mbox.wait()
    bridge_move(-180)
    while True:
        if rail_color_detect() == 1:
            bridge_move(0)
            ev3.speaker.beep()
            ev3.speaker.beep()
            break
The Head
def calibration():
    # Height Control Calibration, max. drive = -526, best pickup position = -490
    height_control.dc(10)
    height_control.run_until_stalled(500,Stop.HOLD,50)
    height_control.reset_angle(0)

    # Switch tool : 200 is spinning tool 0 is pickup tool
    # Use 300 to hold the spinner, -300 to release, i.e. pickup tool
    switch_tools.run_until_stalled(-100,Stop.HOLD)
    spinning_tool.run_angle(500,-300,Stop.HOLD)
In the bridge program we made the bridge go back to the first color which is white (we added white ourselves), when the color sensor detects white, it will stop the bridge and move half a step forward whilst communicating with another program that controls the head. When the head received a message saying “calibration” the program will call the calibration program that we have defined as a function. In the function “calibration” we made the height of the head reset to the max which we made it go up to the top, after resetting the height of the head, we switched the tool back to the pickup tool, then we reset the pickup tool by opening the claw so that it can pick up the spinner. Then, the bridge will return the zero position, i.e. the white tag.
How does the program work?
It is not difficult to create the program from moving the bridge, control the head. However, it took us hours to fine tune all the parameters and settings.
Communication
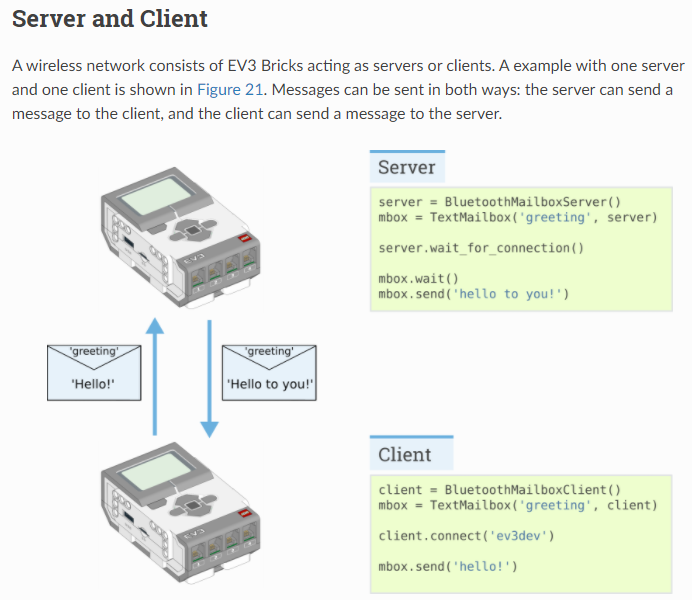
Since this factory using two EV3 Bricks. Using EV3-G (LabView) can support Daisy Chain, i.e. one program to control multiple devices. However, we don’t want to deal with EV3-G anymore and EV3 Classroom just support one device. So, we go for EV3DEV, we pair two EV3 Bricks via Bluetooth and communicate by messaging each others. You can refer to these link for EV3DEV Bluetooth messaging.
Color Detection
# Define the functions
def rail_color_detect():# 1 - White, 2 - Yellow, 3 - Blue, 4 - Green, 5 - Red, 0 - unstable, 99 - others
    for i in range(0,300):
        if i == 0:
            first_color = rail_detector.color()
        if rail_detector.color() != first_color:
            return 0
    if first_color == Color.WHITE:
        return 1
    if first_color == Color.YELLOW:
        return 2
    if first_color == Color.BLUE:
        return 3
    if first_color == Color.GREEN:
        return 4
    if first_color == Color.RED:
        return 5
    return 99
When we developed the program, we found that LEGO color sensor is running unstable, it would provide incorrect color (i.e. noise) occasionally and make our program actioning wrongly. To fix the color sensor misjudgment, we created a color detect function to detect the color 300 times. If all 300 detections are the same, then we can confirm the color detect correctly and return the color code – 1. White, 2. Yellow, 3. Blue, 4. Green and 5. Red. For wrong color detect, it will be 0. 99 for others.
The Bridge
# Start of the main program
ev3.speaker.beep()
bridge_position()

ev3.speaker.set_volume(100)
ev3.speaker.say("Scan the color now")
color_seq = []
color_selection()

ev3.speaker.beep()

for i in range(0,4):
    bridge_move(180)

    while True:
        if rail_color_detect() == color_seq[i]:
            bridge_move(0)
            mbox.send('Pickup')
            mbox.wait()

            bridge_move(-180)
            while True:
                if rail_color_detect() == 1:
                    bridge_move(0)
                    break

            mbox.send('Release')
            mbox.wait()
            break

mbox.send('Spin')
mbox.wait()
bridge_move(1500)
wait(1000)
bridge_move(0)
mbox.send('All Done')
In this program we reset the bridge to the starting point at “the white tag”, then we scan the color sequence that we want to pickup the spinner part in. The next part we make the bridge go to the color tag in the sequence, then call the head to pickup the spinner part. After it picks up the spinner part, the head will send a message back to the bridge and it will go back to the first tag “white” and again calls the head to releases the spinner part. These steps will be repeated until last part is placed.
The Head
while True:
    mbox.wait()
    message = mbox.read()
    if message == 'Calibration':
        calibration()
    if message == 'Pickup':
        pickup_parts()
    if message == 'Release':
        release_parts()
    if message == 'Spin':
        spin_spinner()
    if message == 'All Done':
        break
    mbox.send('Done')
The head receive a message from the bridge, if the message matches one of the defined message, it will do the corresponding function, such as Pickup – pickup the spinner part. Once the action is done, a message ‘Done’ will send back to the head to confirm that it’s finished.
In this function we made the head go down, adjust the pickup tool angle, release the part , then go up. Why do we need to adjust the tool angle? It is because when the bridge moves on the rail, the vibration will tilt the spinner holder a bit and causing the positioning to be wrong for the part placement, so we adjust the tool angle to compensate this.
Start the spinner and release it
def spin_spinner():
    switch_tools.run_until_stalled(1000)
    switch_tools.hold()
    height_control.run_angle(50,-130,Stop.HOLD,wait=False)

    for i in range(0,6):
        spinning_tool.run_angle(100,-30)
        spinning_tool.run_angle(100, 30)

    release_tool.run_angle(500,170)
    switch_tools.stop()
    spinning_tool.dc(-100) # Must rotate in Clockwise Direction, otherwise the head will be mis-aligned
    wait(5000)
    height_control.run_angle(1500,130,Stop.HOLD,wait=True)
    # release_tool.run_angle(1500,60)
    mbox.send('Move!')
    spinning_tool.dc(0)
It switch the tool switcher to the spinning tool. Then we make the head go down to a height that is considerable for the spinner to spin perfectly. While the head goes down the spinning tool will turn left & right for 10 times ( this is for locking in the angle so we get a better spinning angle). After the spinning tool locks on the spinner, it will spin in 1500 rotation per seconds for 5 seconds, then the bridge will move back quickly. When the bridge move back it will trigger the spinner controller to release the spinner. Originally, the spinner controller should be trigger by the handle. However, the spinner will hit the bridge wheel and failed the mission. So, we move the bridge front to avoid it.
Build instruction and the program
We created the program from scratch without referring any example, you can download from below.
We tried the water level sensor today and using a RGB to indicate different water level, let us show you how to do this.
How does water level sensor work
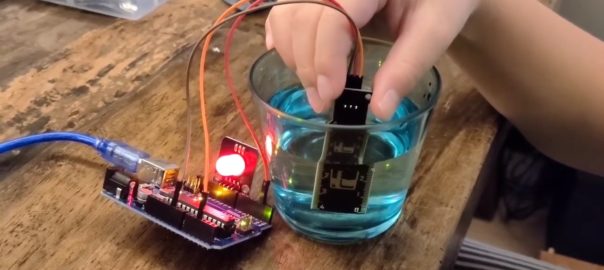
When we use the water level sensor, we need to connect to 5V, GND and Signal to the Arduino board. It contains ten copper strips in the sensor area that are actually connected to the 5V and signal, they interlace to each others. When we immerse the sensor into water (or solution), it induces conductivity, i.e. current. The more the sensor immerse into the water, the higher conductivity will be resulted. It gives a higher signal back to the analog input in the Arduino board or what board you are using.
Measurement and calibration
Since the water level senor will give the signal in an analog number, but not the actual water level. We need to correlate the analog number to the water level. For example, when we immerse the water sensor into 20mm of the water it will give a signal of 600. So, we wrote a function to measure the analog number for each water level we need.
void calibration(){
  int i;

  digitalWrite(2,HIGH);

  for (i=0;i<=4;i++){
    Serial.print("put your sensor in the '");
    Serial.print(i);
    Serial.print("' mark");
    delay(2000);
    water_mark[i] = analogRead(A2);
    Serial.print(" ");
    Serial.println(water_mark[i]);

  }

  Serial.println("Calibration Complete");
  delay(3000);
}
We created a function – calibration() to record the analog number for each different water levels, we defined an array water_mark[] to record them. We needed to record 4 different levels, using a for loop to read the levels one by one from analogRead(A2) as we connected the water level sensor to analog input pin – A2. We also used the Serial.print to communicate with the user so that the user knows where he has to put the water level sensor in order for the program to read the water level accurately.
Then, we used the information from the calibration() function to define which water level we use to make the RGB light change. When we call this function – RGB_water_sensor(int vol), we need to provide the existing water level value. It will put into variable vol and compare with different water_mark[] we captured in the calibration() function. If vol (the existing water level) below the water_mark[1], it will be no display. If vol between water_mark[1] and water_mark[2], the color is white. It will be green when between water_mark[2] and water_mark[3]. Then, will be blue and red colors for between 3 & 4 and over 4.
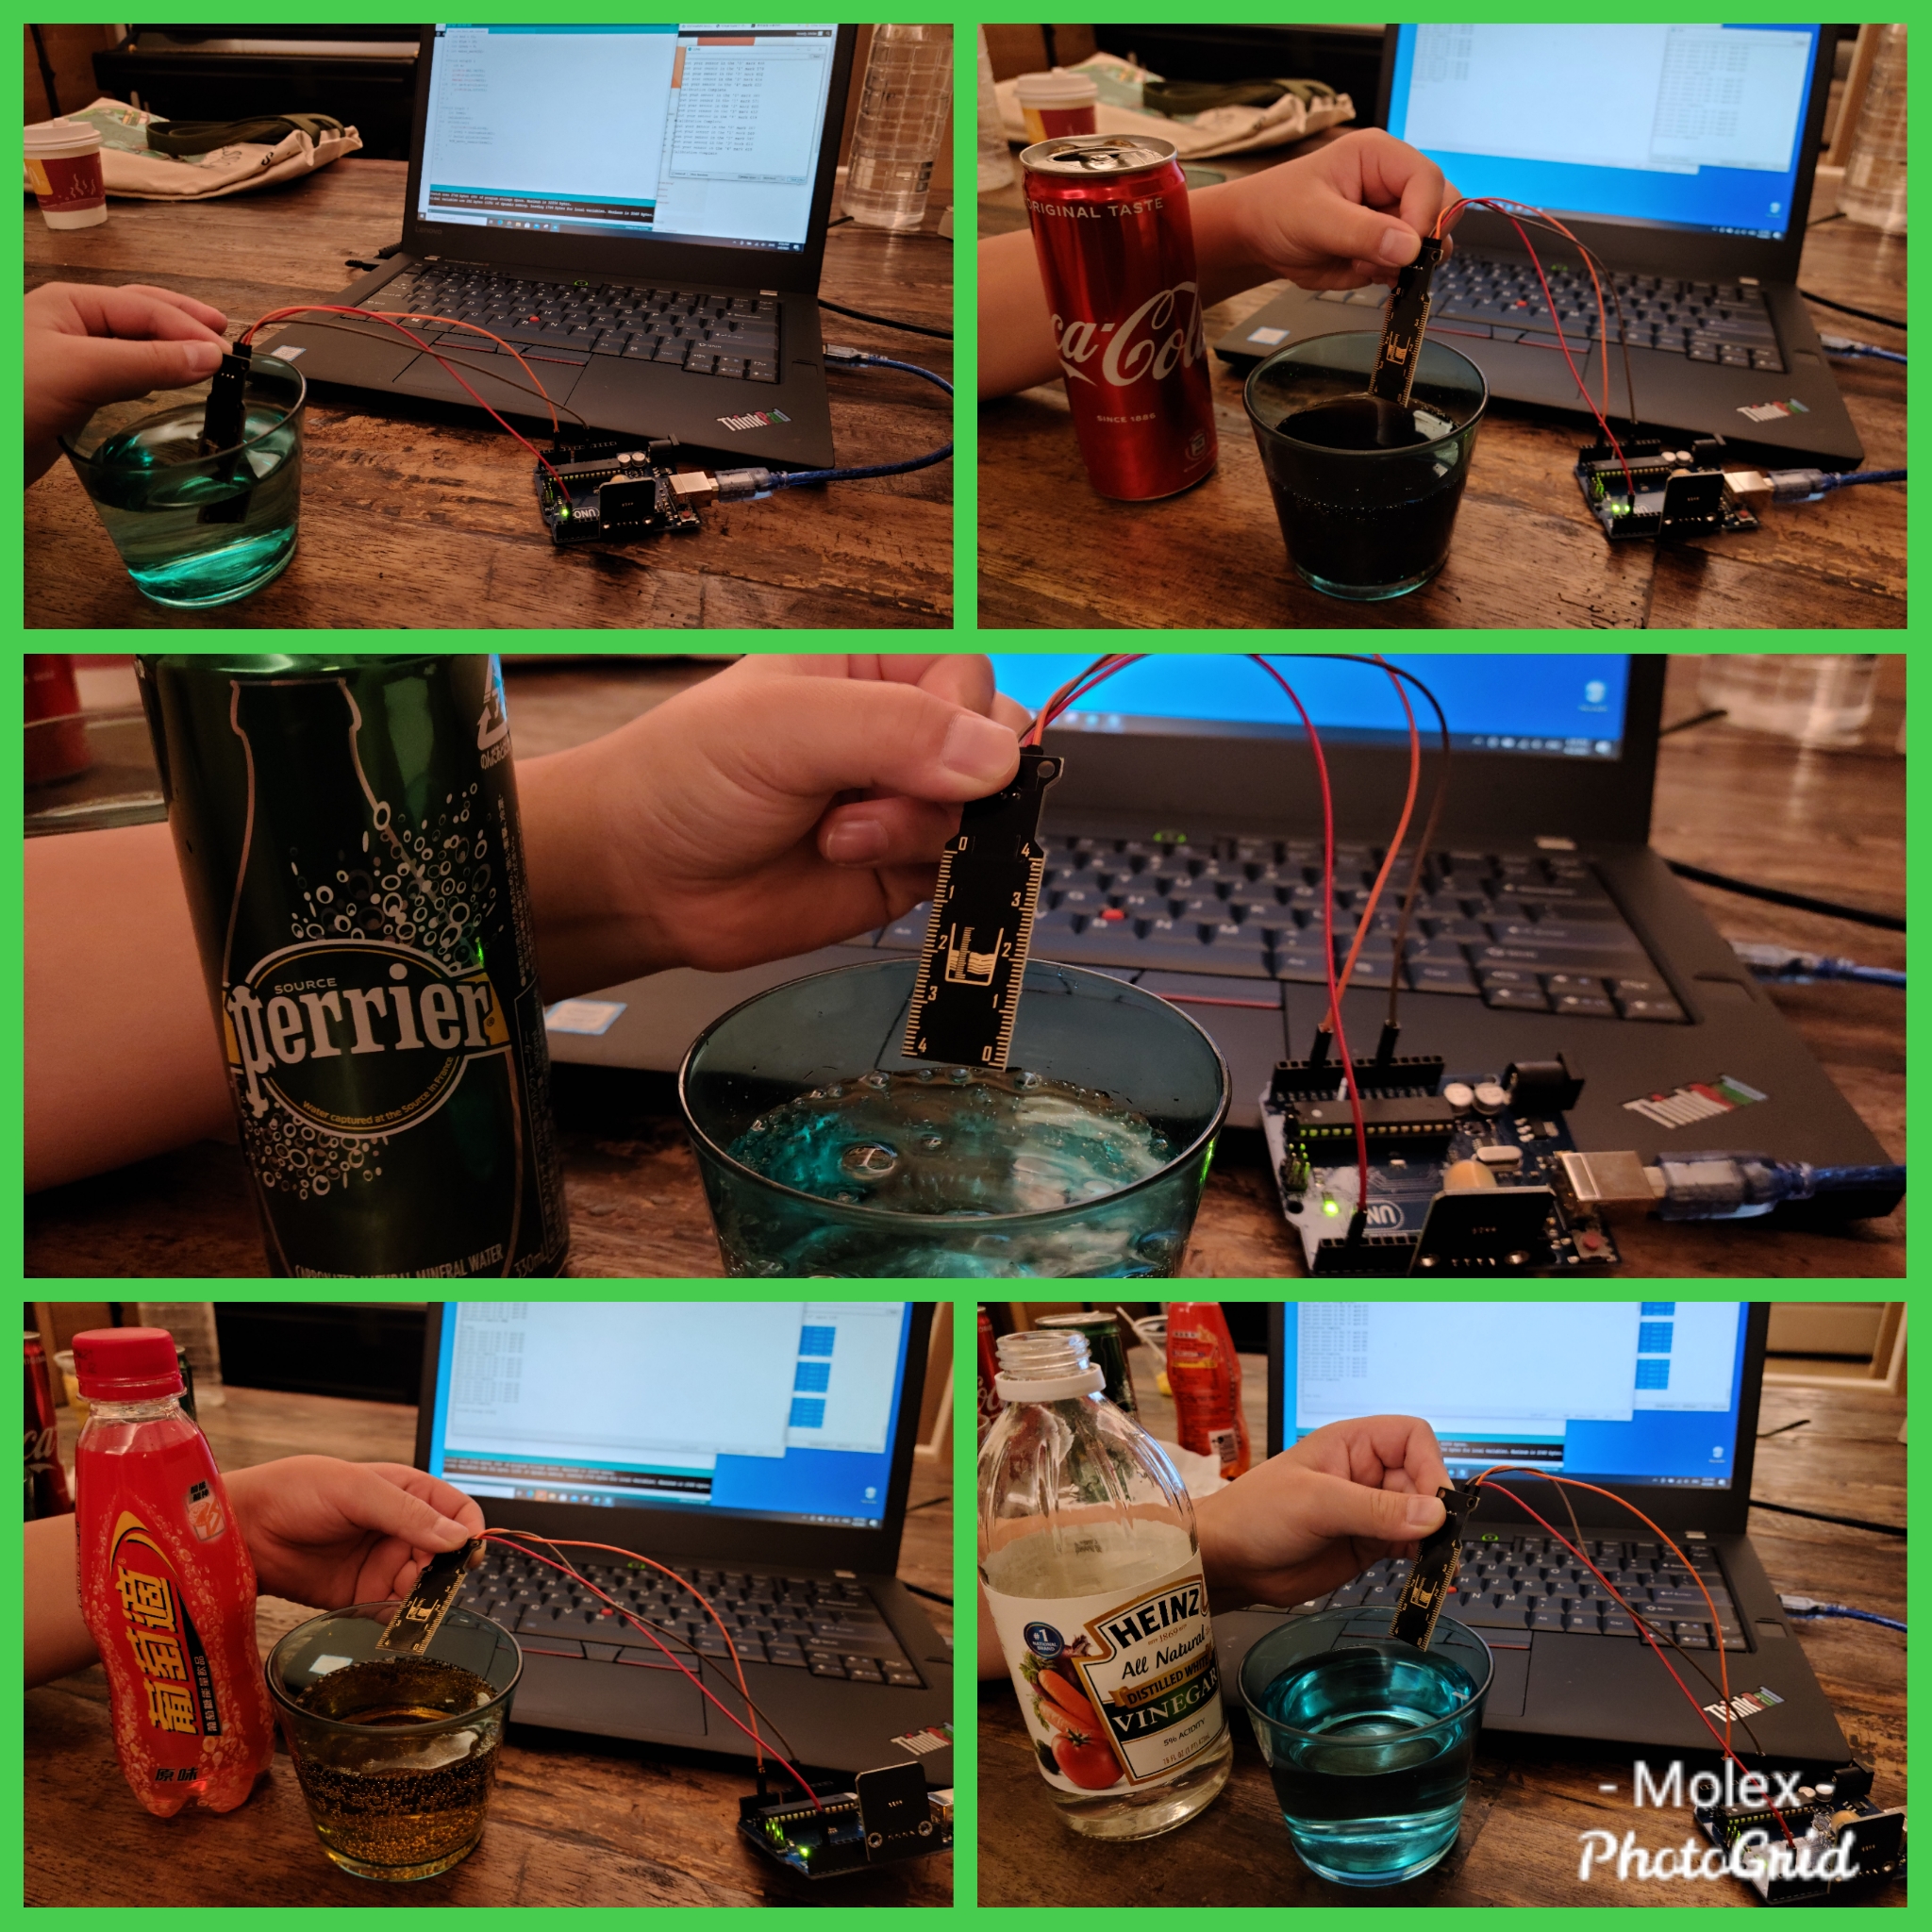
We conducted a small experiment by comparing the measuring value between Water, Coca Cola, Perrier, Energy Drink and Vinegar, took 10 set data of each and compared the average value. Do you know which one get the best conductivity?
Water
Coke Cola
Perrier
Lucozade
Vinegar
5mm
454
543
467
552
562
20mm
597
571
532
580
606
40mm
618
584
551
589
640
Conductitivity
2
4
5
3
1
We thought that Lucozade has the best conductivity because it is ‘energy drink’. However, based on the experiment, the best liquid conductivity level is vinegar, and the Perrier is the worst. It is because vinegar contains acid ions but surprised us that Perrier is the worst, it should contain minerals which help conductivity. Moreover, what we observed is that when we put water in the 5mm mark of the water sensor it is the lowest conductivity out of all the liquid we used.
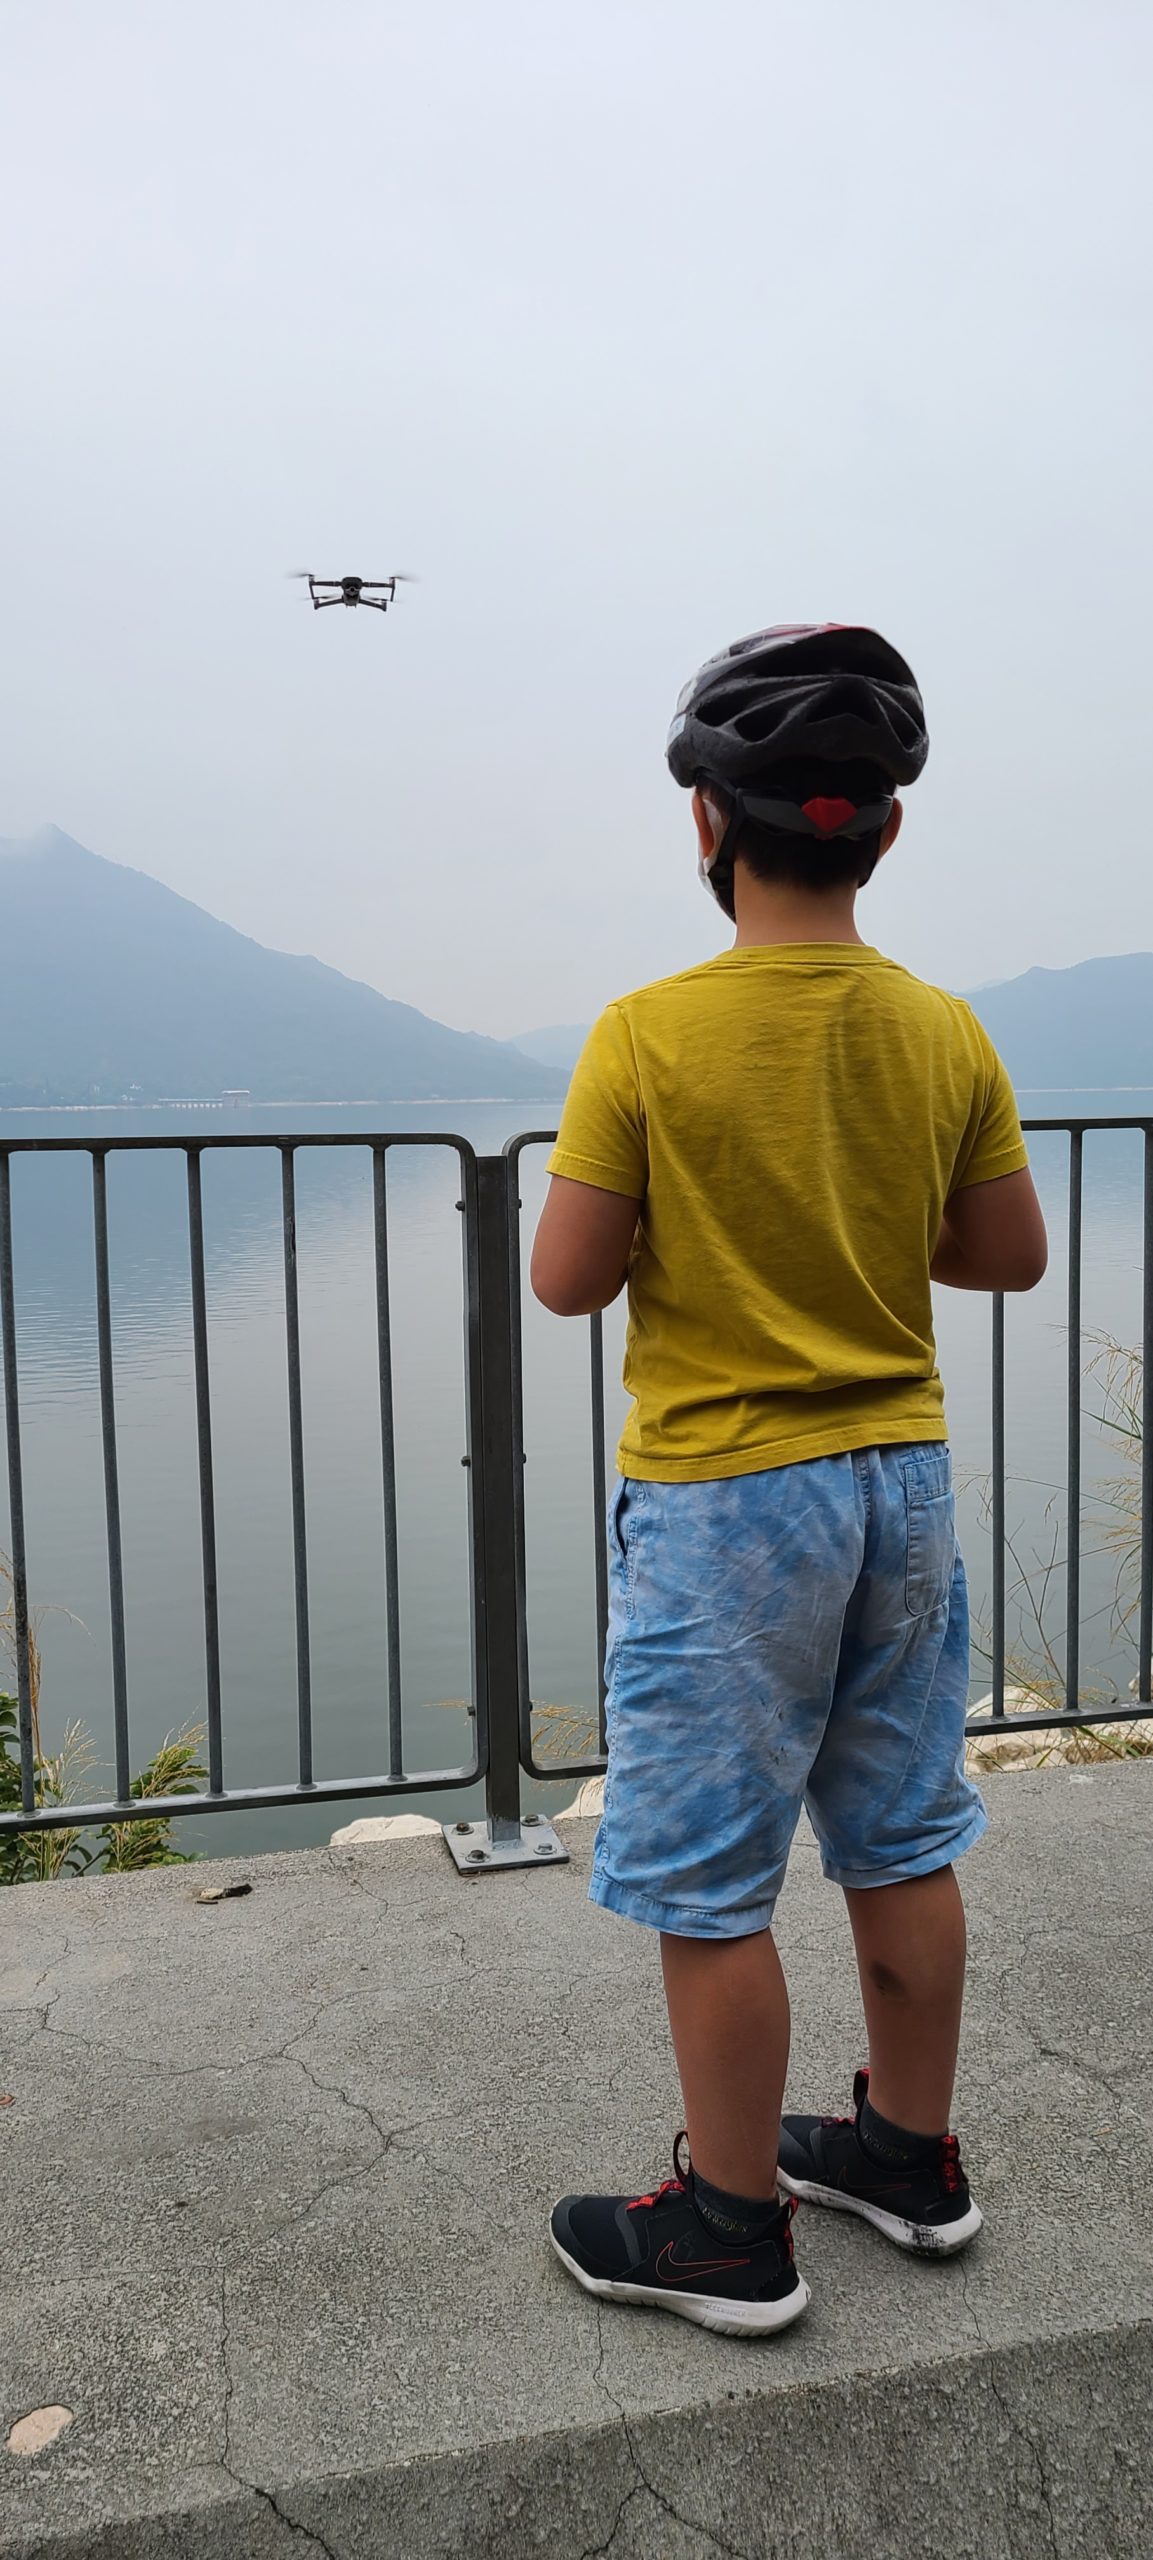
Hi my name is Alex. I’m 12 years old and studying in Malvern College HK. I like doing sports such as basketball, football, swimming, wake surf, surfing, snorkeling, cycling and running. In the past few years I played triathlon and it was really tough. Currently, my favorite sport is basketball because it is fast. I started to have interest in programming when I was 6 years old because I found it very interesting by moving things around and making them different to try out new things. My first ever program was making my name in Scratch and when I touch it the mouse it will move and change color. I also like playing drones because I like watching the view.
My first time playing the drone. I was scared that the drone would drop into the lake downs there if I accidentally crash something in the air.
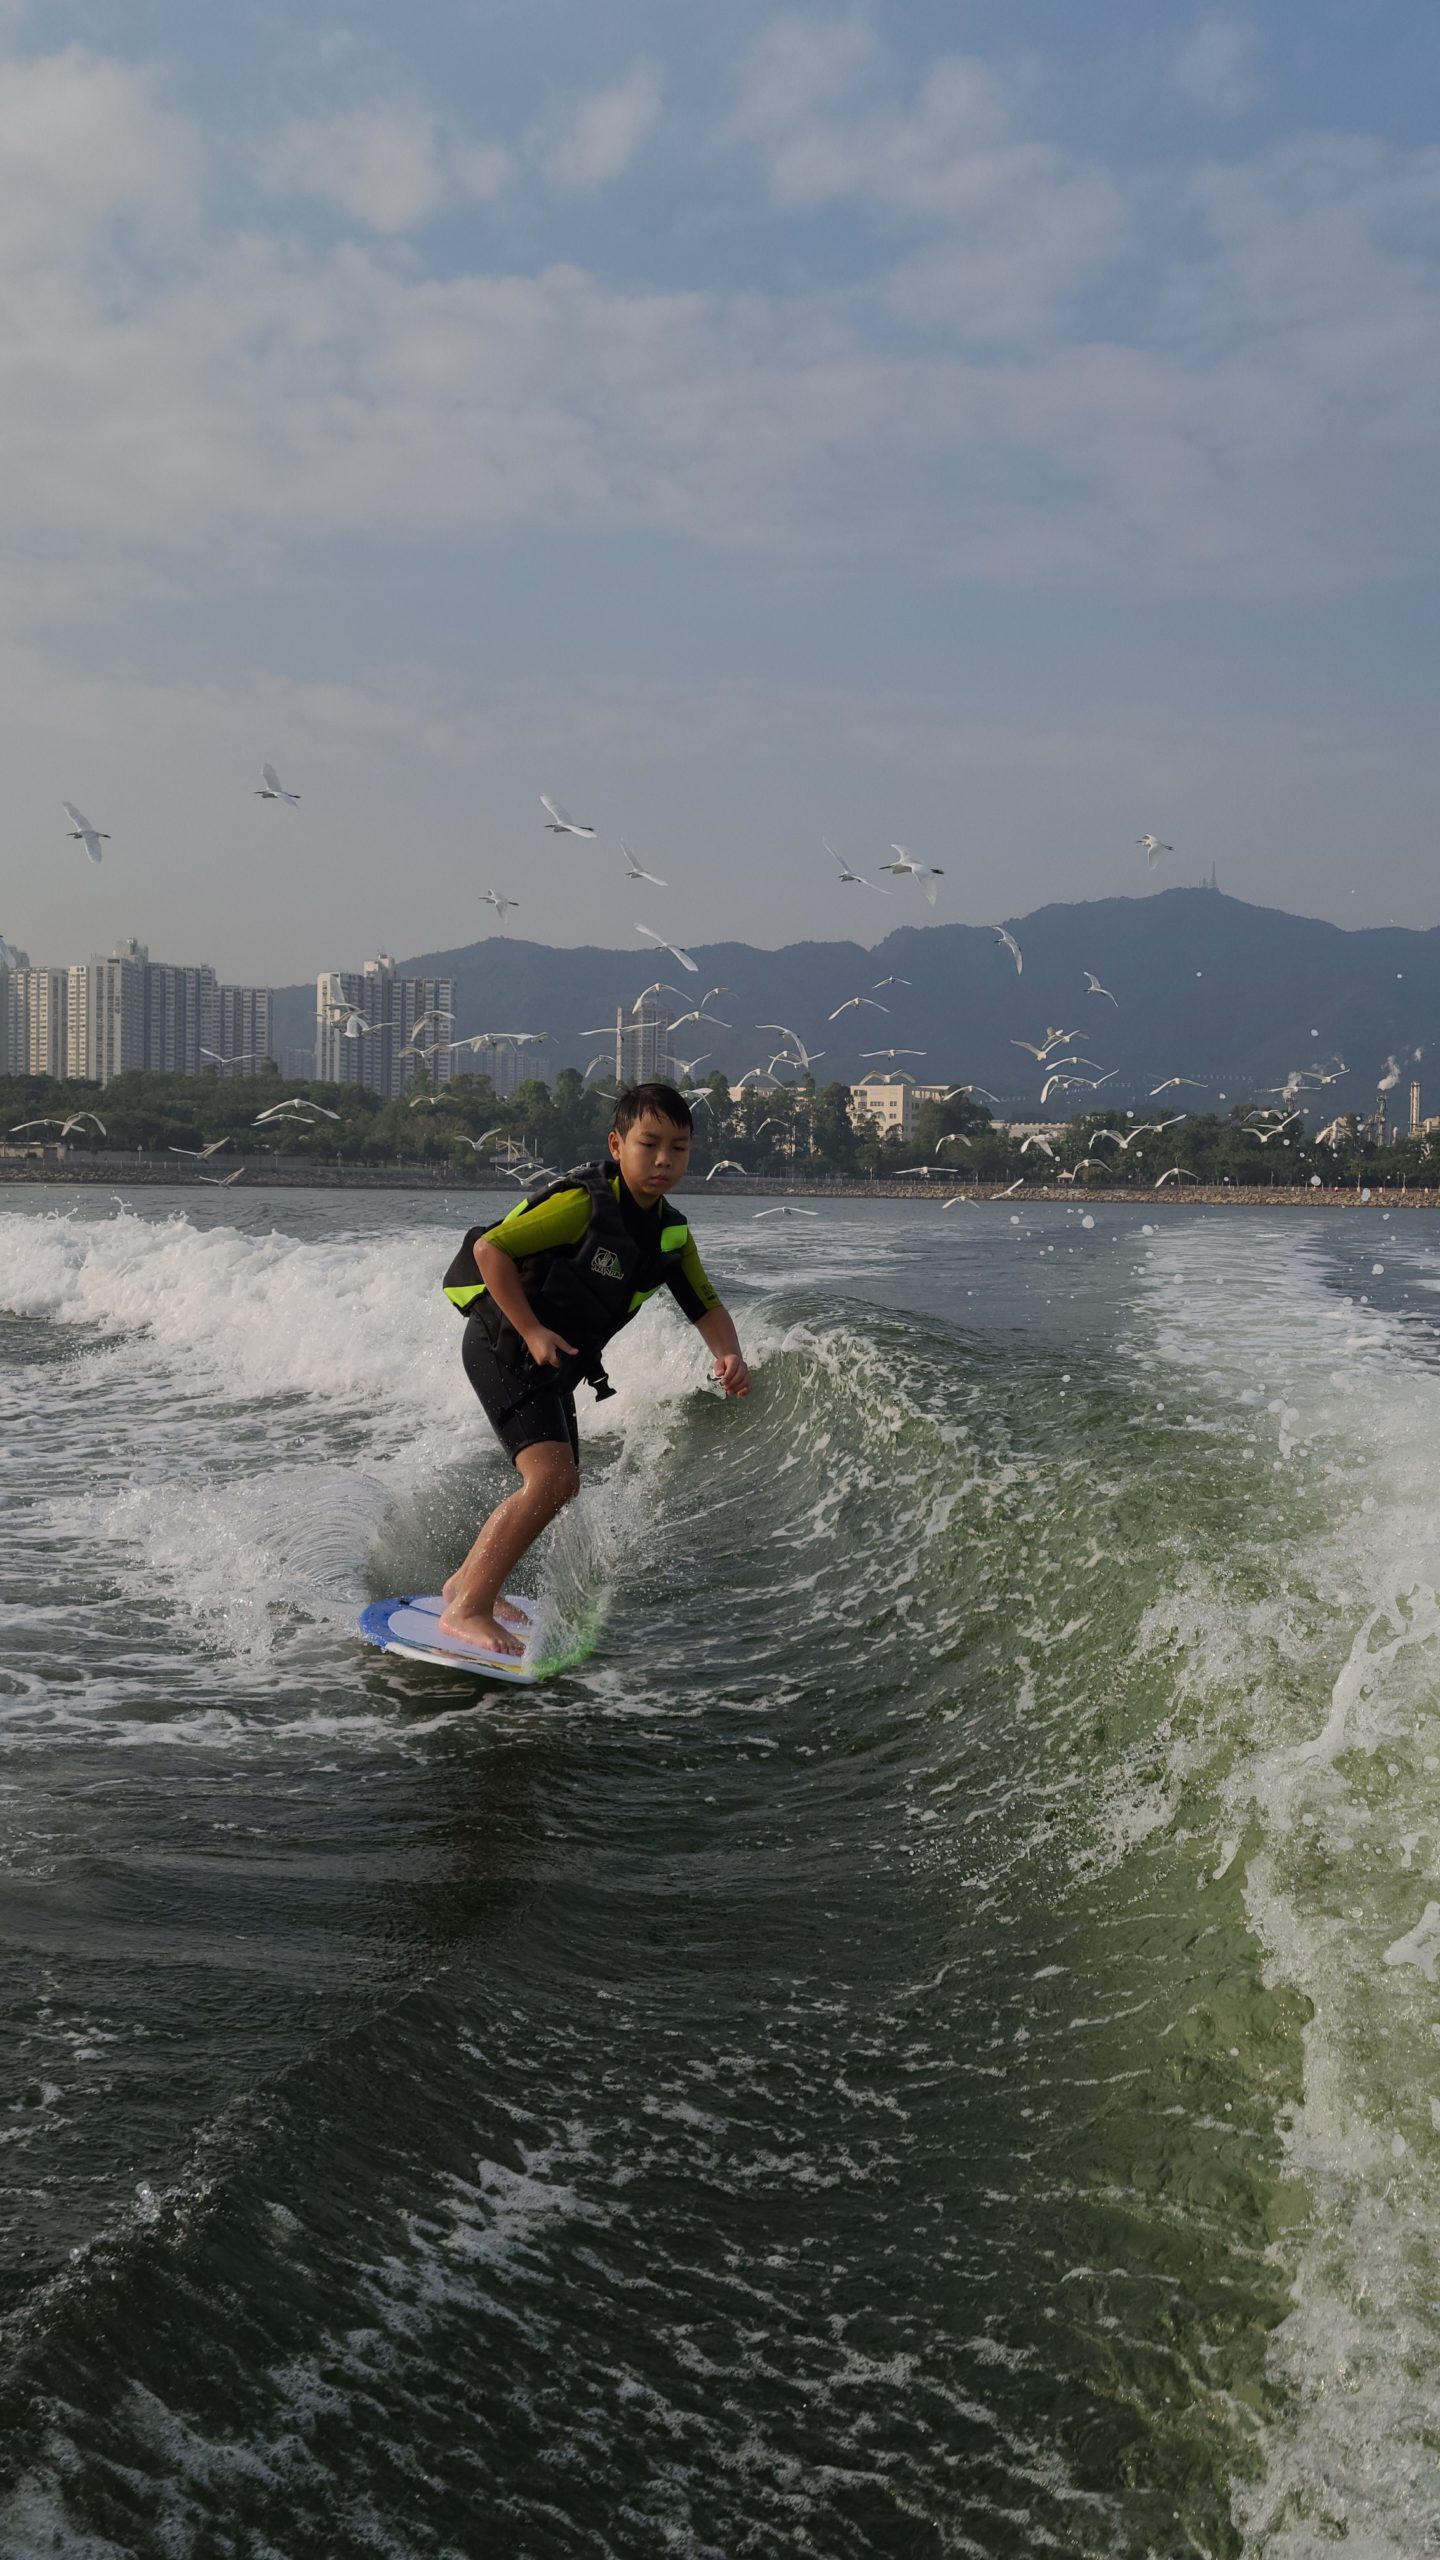
In this picture I am playing wake surf with hundred of birds chasing me, I tried to do 360 spinning but I could almost succeed in doing it, I can do ollie and carving, i.e. going up the wave and back down.
I played Triathlon for 2 years and it was very tough. I liked it because I can challenge my limit every time and see if I did better in the race every time.
No ever what, they like video game the MOST, LOL – Adam
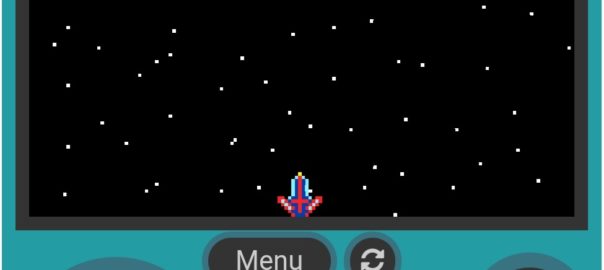
In this game you control the dog to get the ball. Once you get the ball, a man will be chasing you, you have to shoot it in the basketball hoop as soon as possible. If the man touches you three times, you will be game over. For the points you gain by shooting balls, you can buy skins, extra lives, and infinity balls from the shop.
Just click the link below to see and edit the sources code in Microsoft MakeCode Arcade
I created this game in 10 days when I first learnt MakeCode Arcade. This platform is really fun and easy to create a Arcade games you like, I will show you how to make this!
I will buy you lunch if you can score more than 1200.. 🙂
How does the program work?
Monster Movement
Here is the monster movement control, I made the monster going down zig-zag. The monster moves to the right border, then go down one line and go back to the left border and go down. Repeat the movement until it touches the player or when it get shot.
I made a variable to check if the monster is killed or not. If the monster is not killed, it will continue the movement. When the monster is killed or hit the player, it will spawn somewhere in line 1 to 3.
I also give a point bonus, when the monster goes more downward, it will give more points to the player.
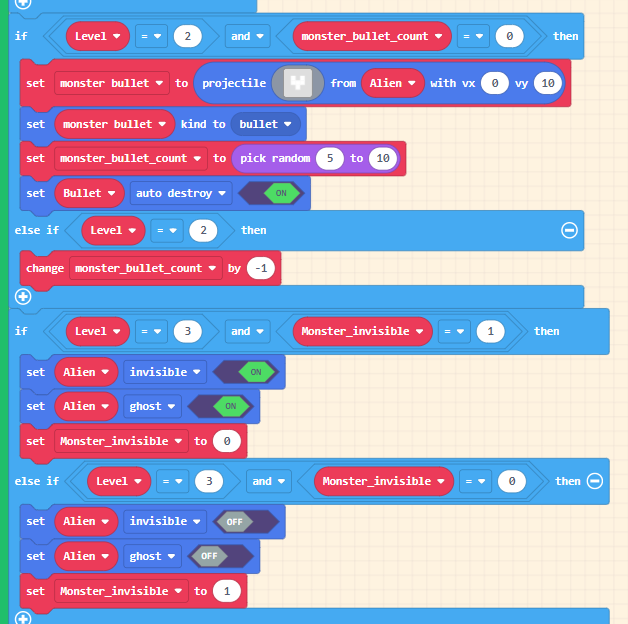
Levels Manager
I made levels by using different variables , so that monster have different behavior at every level.
For level 2, I make the monster to shoot bullet.
For level 3, I make the monster become hard to hit by making it invisible and appear every step.
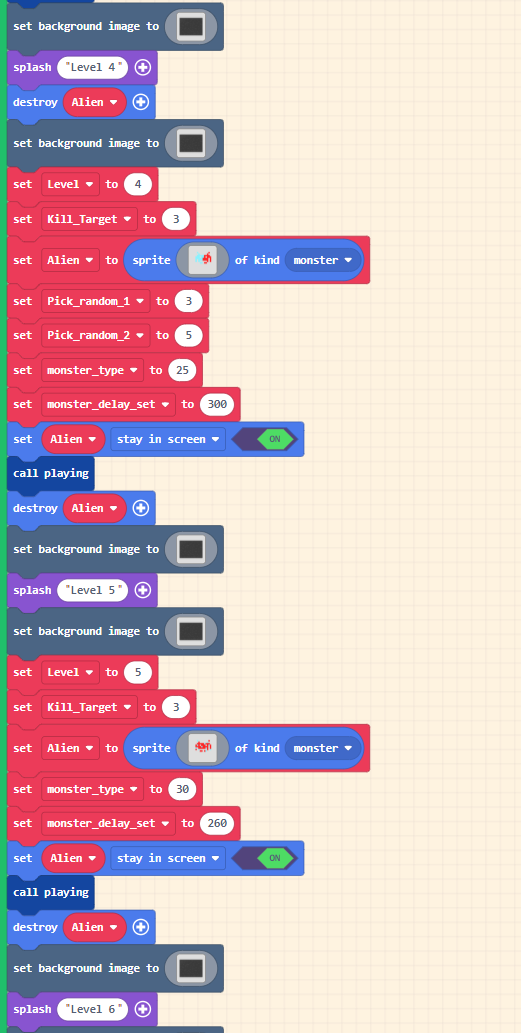
Level Definer
For this level definer, you need to set the variable to the number that you need for each level. For example of level 5,
‘Kill_Target’ is the number of monster you have to kill to advance to the next level
‘monster_invisible’ to tell whether the monster will be invisible or not.
Set ‘Alien’ to different monster type.
‘monster_type’ is how much score you get from hit the monster.
‘monster_delay_set’ the shorter you set it the faster the monster moves.
Before calling the function ‘playing’ to start the level manager, I also have to turn on the monster stay in screen or else it will bug the game and you will never see the monster.
I also reserved a function to change the background for each level, but I am too lazy to create the background and keep them all the same… XD
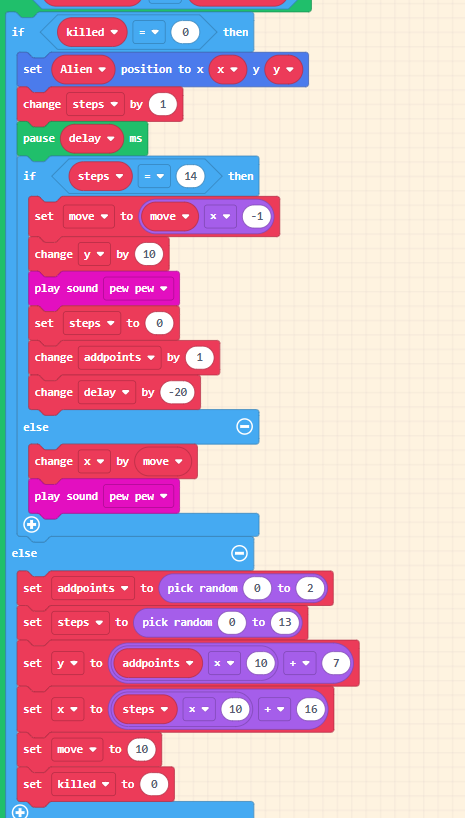
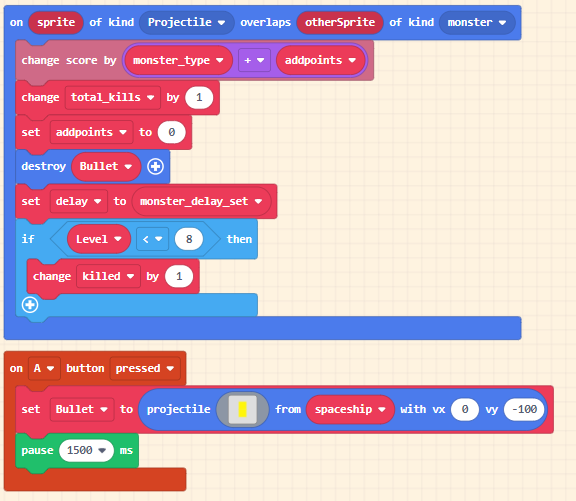
Point System
When press ‘A’ button, the spaceship will shoot a bullet up, i.e. -y is upside. If the bullet hits the monster, it will add points according to the ‘monster_type’ I defined in level definer as well as how low the monster go down. Then, make the variable ‘killed’ to one so that the function will do the monster reset in the level manager.
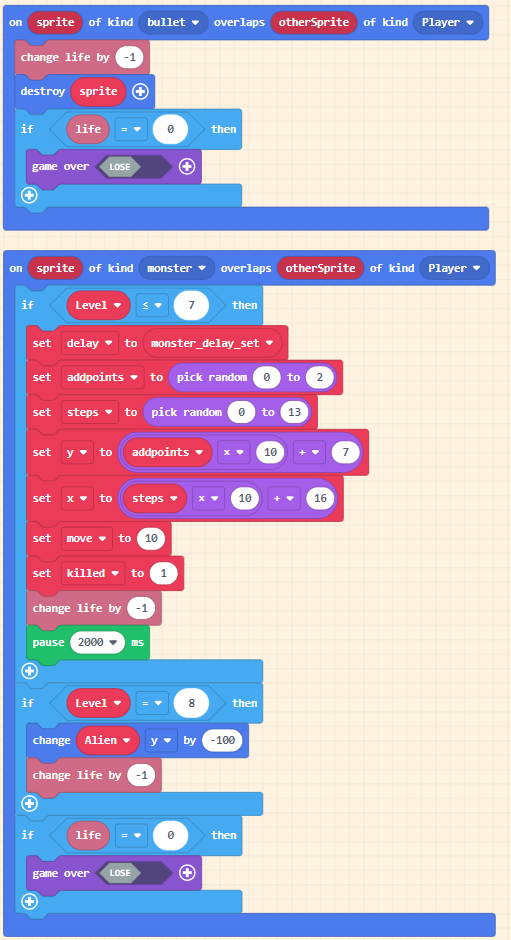
Attacked by Monster!
When the monster’s bullet hit the spaceship, you will minus a life. Then, will destroy the bullet, so that it will not double hit the spaceship.
When the monster hit the spaceship you will also minus a life and this time the monster will go back to the top at line 1-3. If it is level 8, the monster will go back at once, so that it will not double hit the spaceship.
If you got hit by the monster or shot by it 3 times you will game over.