Computing Age #21
Computing Age #22
Computing Age #23
Computing Age #24
Computing Age #25
Computing Age #26
Computing Age #27
Computing Age #28
Computing Age #29
Computing Age #30
With Alex’s introduction, my first time to play Advent of Code, it’s a lot of fun. Login to this website recall me my good old date of running my BBS – Beta Version BBS. As I am not professional enough, just try to solve daily quiz with basic Python coding and try not using external libraries, I would like to share my coding logic with you.
Merry Christmas and Happy New Year!!
2025 All the best!
https://adventofcode.com/2024/day/6
Part 1
input = open("Day 7 - input.txt", "r")
result = 0
for a in input:
    target, v = a.strip().split(': ')
    target = int(target)
    values = v.split(' ')
    values = list(map(int,values))

    s_formula = ''
    for i in range(len(values)-1):
        s_formula += '('
    s_formula += str(values[0])
    formula = s_formula

    for i in range(2**(len(values)-1)):
        b = bin(i)[2:].zfill(len(values)-1)
        operator = ''
        for digit in b:
            if digit == '1':
                operator += '*'
            else:
                operator += '+'

        for j in range(len(values)-1):
            formula += operator[j]+str(values[j+1])+')'

        if eval(formula) == target:
            result += target
            break

        formula = s_formula

print(result)Highlight
For this quiz, I am trying to use eval() to calucalte the formula when store in string. Since eval() is taking multiple (*) the first priority, I added ‘()’ for each operator, e.g. ((81+40)*27), so that it can be always evaluated left-to-right. Then, I was using the numbers of operators required and convert this into binary, i.e. 00, 01, 10, 11, and mapped this into ++, +*, *+, **. Finally, joinned the bracket, numbers and operator together as a string and calculate the result with eval().
** When I did part 2, I found myself overthinking again, I didn’t need to add bracket and using eval(). But anyway, it was a good example to share. Please check part two for how I simplified this.
03-07 : Get the target and values from the file line by line.
09-13 : Determine how many ‘(‘ bracket in the beginning and combine with the first number as a s_formula.
15-22 : Base on the number of numbers to determine how many operators need, convert this into current bit of binarry (line #16). Then, mapped 0 to ‘+’ and 1 to ‘*’
24-25 : Joinned the rest numbers with the operator and the closing bracket.
27-28 : Used eval() to calculate the string and compare with the target result
Part 2
input = open("Day 7 - input.txt", "r")
result = 0
for a in input:
    target, v = a.strip().split(': ')
    target = int(target)
    values = v.split(' ')
    values = list(map(int,values))

    for i in range(3**(len(values)-1)):
        ternary = ""
        d = i
        if d == 0:
            ternary = '0'
        while d > 0:
            ternary = str(d % 3) + ternary
            d //= 3

        t = ternary.zfill(len(values)-1)
        operator = ''
        for digit in t:
            if digit == '2':
                operator += 'X'
            elif digit == '1':
                operator += '*'
            else:
                operator += '+'

        formula = values[0]
        for j in range(len(values)-1):
            if operator[j] == '+':
                formula += values[j+1]
            elif operator[j] == '*':
                formula *= values[j+1]
            else:
                formula *= 10**len(str(values)) + values[j+1]

        if formula == target:
            result += target
            break

print(result)Highlight
Same concept as part 1, but change binary to ternary (3 based) and used the operators pattern (i.e. array) to complete the calculations instead of adding bracket and solving with eval().
09-26 : Same concept as part 1 but used ternary for ‘+’, ‘*’ & ‘H’ (concatenation), i.e. 021221 is +H*HH+. Used % & // to convert a decimal into ternary.
28-35 : Since I already defined the operators pattern, we just started from the first numeber with the corresponding operator with the next number to calculate the result. If the operator is ‘H’, just combined two numbers at line #35.
https://adventofcode.com/2024/day/6
Part 1
input = open("Day 6 - input.txt", "r")
room = []
guard_position = [-1,-1]
guard_face_space_x = guard_face_space_y = 0
start_x = start_y = 0

for a in input:
    room.append(a.strip())
    if guard_position == [-1,-1]:
        start_x = a.find('^')
        if start_x != -1:
            guard_position = [start_x, start_y]
        else:
            start_y += 1

guard_direction = [0,-1] #North
while True:
    room[guard_position[1]] = list(room[guard_position[1]])
    room[guard_position[1]][guard_position[0]] = 'X'
    room[guard_position[1]] = ''.join(room[guard_position[1]])
    guard_face_space_x = guard_position[0] + guard_direction[0]
    guard_face_space_y = guard_position[1] + guard_direction[1]

    if guard_face_space_y < 0 or guard_face_space_y == len(room) or guard_face_space_x < 0 or guard_face_space_x == len(room[0]):
        break
    elif room[guard_face_space_y][guard_face_space_x] == '#':
        if guard_direction == [0,-1]:
            guard_direction = [1,0]
        elif guard_direction == [1,0]:
            guard_direction = [0,1]
        elif guard_direction == [0,1]:
            guard_direction = [-1,0]
        else:
            guard_direction = [0,-1]
    else:
        guard_position[0] += guard_direction[0]
        guard_position[1] += guard_direction[1]

count = 0
for i in room:
    count += i.count('X')

print(count)Highlight
07-14 : Get all the data into room and find the guard_position
18-19 : Put ‘X’ to the guard existing position in room and move the guard according to guard_face_space
24-25 : Detect whether the guard exit the room, i.e. out of the room boundaries. If yes, exit the loop.
26-34 : If ‘#’ in front of the guard, make him turn right. I define the guard_direction in X, Y, North – [0, -1], East – [1,0], South[0,1], West[-1,0]. So, when we moved the guard_position, just adding the direction to this.
39-41 : Report the number of ‘X’, i.e. guard stepped spece, in the room.
Part 2
Highlight
I have not yet finished this because I was thinking about to make it easier by detecting all the ‘#’ location and record the stepped space to represent 4 direction – NESW. However, making this too complicate, going to use the most basic method and try one by one, but still challenge….. Finally, I made the code but it take way too too long to run..
https://adventofcode.com/2024/day/5
Part 1
f = open("Day 5 - input.txt", "r")
o = [[] for _ in range(100)]
total = 0

for a in f:
    if a == '\n':
        break
    i = int(a[:2])
    j = int(a[3:5])
    o[i].append(j)

for a in f:
    p = list(map(int, a.strip().split(',')))
    v = True

    for i in range(len(p)):
        for j in range(i+1, len(p)):
            try:
                o[p[i]].index(p[j])
                v = True
            except:
                v = False
                break

        if i > 0 and v:
            for j in range(i-1, -1, -1):
                try:
                    o[p[i]].index(p[j])
                    v = False
                    break
                except:
                    v =True
        if not v:
            break
    if v:
        r = p[len(p) // 2]
        total += r

print(total)Highlight
05-10 : My thinking logic was trying to put the ordering rules into the corresponding array, so that I could compare the page order directly with the ordering rules. (Later on, I knew that I can use dictionary, it is much better, faster and memory saving)
12-23 : If the page could be found in the corresponding page ordering rules, then it was good order. This time, I used Try & Except to handle the error in case the page cannot be found from the rules, i.e. it was bad order. For any bad order found, quit the loop and classified failed.
25-32 : Did the check with the reserved order, if the previous page can be found in the page ordering rules, it was bad order as well.
Part 2
f = open("Day 5 - input.txt", "r")
o = [[] for _ in range(100)]
total = 0

for a in f:
    if a == '\n':
        break

    i = int(a[:2])
    j = int(a[3:5])

    o[i].append(j)

for a in f:
    p = list(map(int, a.strip().split(',')))
    v = True
    p1 = False
    i = 0

    while i < len(p):
        i += 1

        for j in range(i+1, len(p)):
            try:
                o[p[i]].index(p[j])
                v = True
            except:
                v = False
                p1 = True
                p[i], p[j] = p[j], p[i]
                i -= 1
                break

        if i > 0 and v:
            for j in range(i-1, -1, -1):
                try:
                    o[p[i]].index(p[j])
                    v = False
                    p1 = True
                    p[i], p[j] = p[j], p[i]
                    i -= 1
                    break
                except:
                    v =True

        if not v and not p1:
            break

    if v and p1:
        r = p[len(p) // 2]
        total += r
print(total)Highlight
21,29-31,39-41 : Exactly same as part 1 but added these lines to swap pages when bad order found. Then, re-run the loop with i -= 1.
https://adventofcode.com/2024/day/4
Part 1
f = open("Day 4 - input.txt", "r")
a = []
w = ['']*8
total = 0

for i in f:
    a.append(i.strip())

s = 'Z' * (len(a[0])+6)
for i in range(len(a)):
    a[i] = 'ZZZ' + a[i] + 'ZZZ'

for i in range(3):
    a.insert(0, s)
    a.append(s)

for y in range(len(a)):
    for x in range(len(a[y])):
        if a[y][x] == 'X':
            w[0] = a[y][x:x+4]
            w[1] = a[y][x]+a[y+1][x+1]+a[y+2][x+2]+a[y+3][x+3]
            w[2] = a[y][x]+a[y+1][x]+a[y+2][x]+a[y+3][x]
            w[3] = a[y][x]+a[y+1][x-1]+a[y+2][x-2]+a[y+3][x-3]
            w[4] = a[y][x]+a[y][x-1]+a[y][x-2]+a[y][x-3]
            w[5] = a[y][x]+a[y-1][x-1]+a[y-2][x-2]+a[y-3][x-3]
            w[6] = a[y][x]+a[y-1][x]+a[y-2][x]+a[y-3][x]
            w[7] = a[y][x]+a[y-1][x+1]+a[y-2][x+2]+a[y-3][x+3]
            total += w.count('XMAS')

print(total)Highlight
09-15 : Not to deal with index out of range error, I did a short cut by adding boundries ‘ZZZ’ to the matrix (I thought I was smart to think about this method. But lastly, I learnt that this is a common practice calls ‘Padding’ )
17-28 : With the help of Padding, it is easily for me to solve this by check ‘XMAS’ in eight directions.
Part 2
f = open("Day 4 - input.txt", "r")
a = []
w = ['']*2
total = 0

for i in f:
    a.append(i.strip())

s = 'Z' * (len(a[0])+2)
for i in range(len(a)):
    a[i] = 'Z' + a[i] + 'Z'

for i in range(3):
    a.insert(0, s)
    a.append(s)

for y in range(len(a)):
    for x in range(len(a[y])):
        if a[y][x] == 'A':
            w[0] = a[y-1][x-1]+a[y][x]+a[y+1][x+1]
            w[1] = a[y+1][x-1]+a[y][x]+a[y-1][x+1]
            if w.count('MAS')+w.count('SAM') == 2:
                total += 1

print(total)Highlight
09-15 : Add Padding as well but with on layer (‘Z’) only.
17-23 : Check both diagonal to check again ‘SAM’ and ‘MAS’.
https://adventofcode.com/2024/day/3
Part1
f = open("Day 3 - input.txt", "r")
i = f.read().strip()
r = 0

while True:
    a = i.find("mul(")
    if a == -1:
        break

    i = i[a:]
    z = ['','']
    x = 0
    y = 0
    p = 0
    j = 4
    while True:
        if i[j].isdigit():
            z[p] += i[j]
            j += 1
        elif i[j] == ',' and p == 0:
            j += 1
            p = 1
        elif i[j] == ')' and p == 1:
            x = int(z[0])
            y = int(z[1])
            j += 1
            break
        else:
            break

    i = i[j:]
    r += x * y

print(r)Highlight
05-08 : Found “mul(“. If no more can be found, end the loop and print the result.
10-29 : Removed the found “mul(” and read the next data, compare if it were in format “number x,number y)”. If yes, put those numbers into x and y, otherwise keep x and y as ‘0’.
31-32 : Deleted the verified information. Add x * y into the record, and retested the loop until “mul” not found.
Part2
f = open("Day 3 - input.txt", "r")
i = f.read().strip()
r = 0
just_start = True

while True:
    a = i.find("mul(")
    b = i.find("don't()")
    c = i.find("do()")

    if b < a and b < c:
        i = i[c:]
    elif a == b == c == -1:
        break
    else:
        i = i[a:]

    z = ['','']
    x = 0
    y = 0
    p = 0
    j = 4

    while True:

        if i[j].isdigit():
            z[p] += i[j]
            j += 1
        elif i[j] == ',' and p == 0:
            j += 1
            p = 1
        elif i[j] == ')' and p == 1:
            x = int(z[0])
            y = int(z[1])
            j += 1
            break
        else:
            break

    r += x * y
    i = i[j:]

print(r)07-13 : Found the position of “mul(“, “don’t()” and “do()” and compare which was in the front.
18-38 : Same as part 1
https://adventofcode.com/2024/day/2
Part 1
f = open("Day 2 - input.txt", "r")
count = 0
for i in f:
    j = list(map(int, i.split()))

    if j[0] > j[1]:
        m = -1
    elif j[0] < j[1]:
        m = 1
    else:
        continue

    for x in range(len(j)-1):
        if 0 < (j[x+1] - j[x])*m < 4:
            t = True
        else:
            t = False
            break
    if t:
        count += 1

print(count)Highlight
06-09 : If the levels were decreasing, set m to -1, otherwise m = 1 for increasing.
13-17 : Comparing the level with the next level and timed m. If the result was within 0 – 4, i.e. 1, 2 & 3, made t become True other made it False and ended the loop.
19-20 : We used the t to ensure all levels tested and met the requirement, then count + 1.
Part 2
f = open("Day 2 - input.txt", "r")
count = 0

for i in f:
    j = list(map(int, i.split()))
    if j[0] > j[1]:
        m = -1
    elif j[0] < j[1]:
        m = 1
    else:
        m = 0

    t = False
    for x in range(len(j)-1):
        if 0 < (j[x+1] - j[x])*m < 4:
            t = True
        else:
            t = False
            break
    if not t and x == len(j) -2:
        t = True
    if not t:
        k = j.copy()
        del k[x]
        if k[0] > k[1]:
            m = -1
        elif k[0] < k[1]:
            m = 1
        else:
            m = 0

        for y in range(len(k)-1):
            if 0 < (k[y+1] - k[y])*m < 4:
                t = True
            else:
                t = False
                break
    if not t:
        k = j.copy()
        del k[x+1]

        if k[0] > k[1]:
            m = -1
        elif k[0] < k[1]:
            m = 1
        else:
            m = 0

        for y in range(len(k)-1):
            if 0 < (k[y+1] - k[y])*m < 4:
                t = True
            else:
                t = False
                break
    if not t and x != 0:
        k = j.copy()
        del k[x-1]

        if k[0] > k[1]:
            m = -1
        elif k[0] < k[1]:
            m = 1
        else:
            m = 0

        for y in range(len(k)-1):
            if 0 < (k[y+1] - k[y])*m < 4:
                t = True
            else:
                t = False
                break
    if t:
        count += 1

print(count)Highlight
04-19 : Completely same logic as part 1.
20-21 : If the test result is failed but it is the second last level, take it as pass since the last level was bad.
22-37 : When we detected a bad level and it was not the second last level, we will re-test it by deleting this level.
38-54 : If still failed, put the level back and deleted the next level and retest.
55-71 : If still failed, put the next level back and deleted the previous level and retest, but need to ensure that the existing level is not the first level,
https://adventofcode.com/2024/day/1
Part 1
f = open("Day 1 - input.txt", "r")
l = []
r = []
total = 0

for i in f:
    l.append(i[0:5])
    r.append(i[8:13])
l.sort()
r.sort()

for x in range(len(l)):
    c = abs(int(r[x])-int(l[x]))
    total += c
print(total)Highlight
09-10 : Sorted both left and right data from smallest to biggest
12-14 : Found the different, i.e. absolute value, then added to the total.
Part 2
f = open("Day 1 - input.txt", "r")
l = []
r = []
total = 0

for i in f:
    l.append(i[0:5])
    r.append(i[8:13])
l.sort()
r.sort()

for x in l:
    c = int(x) * r.count(x)
    total += c
print(total)Highlight
09-10 : sorted both left and right data from smallest to biggest
12-14 : Got the number from left one by one and count with right. Then, times the number with numbers of count in right and added to total.

One of our main purposes for drone programming is achieving swarm control, that’s why we bought three Tello EDUs and today we are so excited that we can make this happen. Once again, thanks to DJITELLOPY, it saves us a lot of effort to develop our API and make this program done in a few lines. Once we understood the structure of TelloSwarm, it was not that hard to make the swarm control with video streaming and mission pad flying. We started with three drones, we want to control 10 or more for a Drones show.
But, there was a huge roadblock for us. It was one of the drones with a motor damaged, it smashed onto the wall when we tested the program. Since we didn’t get any warranty because we brought it from HK to the UK (even just 1.5 months..), we needed to order the spare part and did the motor replacement. The repair we did is quite similar as shown in this video – Simple Motor Replace. In case you need to replace the motor, it is the simplest way. We don’t want to damage the main board because of the poor soldering skills.
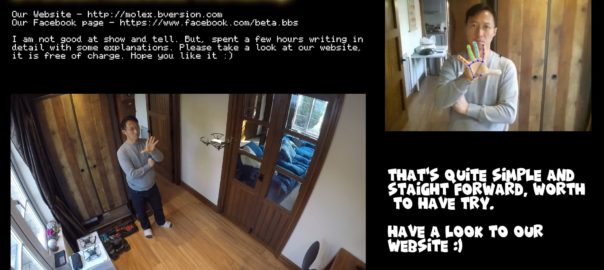
See below for the full codes. This time, we created two codes. We created the first one which is a very straightforward coding – manage the drone one by one with the parallel process, i.e. a beginner work but also easy for beginner to read . After we studied DJITELLOPY SWARM functions, we modified this. We put them together for a head to head comparison.
Light color – DJITELLPY SWARM version
from djitellopy import Tello, TelloSwarm
import cv2
import threading
import time, logging

flip = True
fly = True
video = False

telloswarm = TelloSwarm.fromIps(['192.168.3.81','192.168.3.82','192.168.3.83'])

for i, tello in zip(range(3), telloswarm):
    tello.LOGGER.setLevel(logging.ERROR)
    tello.connect()
    print(f'Tello Battery {i+1}: {tello.get_battery()}')
    tello.change_vs_udp(8881+i)
    tello.set_video_resolution(Tello.RESOLUTION_480P)
    tello.set_video_bitrate(Tello.BITRATE_1MBPS)

landed = False
def tello_video(tello, drone_number):
    while not landed:

        frame = tello.get_frame_read().frame
        frame = cv2.cvtColor(frame, cv2.COLOR_BGR2RGB)
        cv2.imshow(f'Tello {drone_number}' , frame)
        cv2.moveWindow(f'Tello {drone_number}', (drone_number - 1)*900, 50)
        if cv2.waitKey(40) & 0xFF == ord('q'):
            break

if video:
    telloswarm.parallel(lambda drone, tello: tello.streamon())
    time.sleep(3)

    tello1_video = threading.Thread(target=tello_video, args=(telloswarm.tellos[0], 1), daemon=True)
    tello2_video = threading.Thread(target=tello_video, args=(telloswarm.tellos[1], 2), daemon=True)
    tello3_video = threading.Thread(target=tello_video, args=(telloswarm.tellos[2], 3), daemon=True)
    tello1_video.start()
    tello2_video.start()
    tello3_video.start()

if flip or fly:
    telloswarm.send_rc_control(0,0,0,0)
    telloswarm.takeoff()
    telloswarm.set_speed(10)

if flip:
    fpath_1 = ['l', 'b', 'r']
    fpath_2 = ['r', 'f', 'l']
    telloswarm.parallel(lambda drone, tello: tello.flip(fpath_1[drone]))
    telloswarm.parallel(lambda drone, tello: tello.flip(fpath_2[drone]))

if fly:
    telloswarm.move_up(50)
    path_1 = [(-60, -60, 50, 20, 1), (60, -60, 100, 30, 2), (0, 120, 150, 40, 3)]
    path_2 = [(60, -60, 100, 30, 2), (0, 120, 150, 40, 3), (-60, -60, 50, 20, 1)]
    path_3 = [(0, 120, 150, 40, 3), (-60, -60, 50, 20, 1), (60, -60, 100, 30, 2)]
    path_4 = [(0, 0, 50, 20, 1), (0, 0, 50, 20, 2), (0, 0, 50, 20, 3)]
    telloswarm.parallel(lambda drone, tello: tello.enable_mission_pads)
    telloswarm.parallel(lambda drone, tello: tello.go_xyz_speed_mid(path_1[drone][0], path_1[drone][1], path_1[drone][2], path_1[drone][3], path_1[drone][4]))
    telloswarm.parallel(lambda drone, tello: tello.go_xyz_speed_mid(path_2[drone][0], path_2[drone][1], path_2[drone][2], path_2[drone][3], path_2[drone][4]))
    telloswarm.parallel(lambda drone, tello: tello.go_xyz_speed_mid(path_3[drone][0], path_3[drone][1], path_3[drone][2], path_3[drone][3], path_3[drone][4]))
    telloswarm.parallel(lambda drone, tello: tello.go_xyz_speed_mid(path_4[drone][0], path_4[drone][1], path_4[drone][2], path_4[drone][3], path_4[drone][4]))

if flip or fly:
    telloswarm.land()
    landed = True

if video:
    tello1_video.join()
    tello2_video.join()
    tello3_video.join()

    telloswarm.parallel(lambda drone, tello: tello.streamoff())

telloswarm.end()Dark color – ‘Straight forward’ very beginner version
from djitellopy import Tello, TelloSwarm
import cv2
import threading
import time, logging

flip = True
fly = True
video = True

telloswarm = TelloSwarm.fromIps(['192.168.3.81','192.168.3.82','192.168.3.83'])
tello1 = telloswarm.tellos[0]
tello2 = telloswarm.tellos[1]
tello3 = telloswarm.tellos[2]

tello1.LOGGER.setLevel(logging.ERROR)
tello2.LOGGER.setLevel(logging.ERROR)
tello3.LOGGER.setLevel(logging.ERROR)

tello1.connect()
tello2.connect()
tello3.connect()

print(f'Tello1 Battery : {tello1.get_battery()}')
print(f'Tello2 Battery : {tello2.get_battery()}')
print(f'Tello3 Battery : {tello3.get_battery()}')

tello1.change_vs_udp(8881)
tello1.set_video_resolution(Tello.RESOLUTION_480P)
tello1.set_video_bitrate(Tello.BITRATE_1MBPS)

tello2.change_vs_udp(8882)
tello2.set_video_resolution(Tello.RESOLUTION_480P)
tello2.set_video_bitrate(Tello.BITRATE_1MBPS)

tello3.change_vs_udp(8883)
tello3.set_video_resolution(Tello.RESOLUTION_480P)
tello3.set_video_bitrate(Tello.BITRATE_1MBPS)

landed = False
def tello_video(tello, drone_number):
    while not landed:

        frame = tello.get_frame_read().frame
        frame = cv2.cvtColor(frame, cv2.COLOR_BGR2RGB)
        cv2.imshow(f'Tello {drone_number}' , frame)
        cv2.moveWindow(f'Tello {drone_number}', (drone_number - 1)*900, 50)
        if cv2.waitKey(40) & 0xFF == ord('q'):
            cv2.destroyWindow(f'Tello {drone_number}')
            break

def tello_flip(tello, direction):
    tello.flip(direction)

def tello_mpad(tello, x, y, z, speed, mpad):
    tello.enable_mission_pads
    tello.go_xyz_speed_mid(x, y, z, speed, mpad)

if video:

    tello1.streamon()
    tello1_video = threading.Thread(target=tello_video, args=(tello1, 1), daemon=True)
    tello1_video.start()

    tello2.streamon()
    tello2_video = threading.Thread(target=tello_video, args=(tello2, 2), daemon=True)
    tello2_video.start()

    tello3.streamon()
    tello3_video = threading.Thread(target=tello_video, args=(tello3, 3), daemon=True)
    tello3_video.start()

    time.sleep(3)

if flip or fly:
    telloswarm.send_rc_control(0,0,0,0)
    telloswarm.takeoff()
    telloswarm.set_speed(10)

if flip:
    tello1_fpath = ['l','r']
    tello2_fpath = ['b','f']
    tello3_fpath = ['r','l']

    for i in range(2):
        flip1 = tello1_fpath[i]
        flip2 = tello2_fpath[i]
        flip3 = tello3_fpath[i]
        tello1_flip = threading.Thread(target=tello_flip, args=(tello1, flip1), daemon=True)
        tello2_flip = threading.Thread(target=tello_flip, args=(tello2, flip2), daemon=True)
        tello3_flip = threading.Thread(target=tello_flip, args=(tello3, flip3), daemon=True)
        tello1_flip.start()
        tello2_flip.start()
        tello3_flip.start()
        tello1_flip.join()
        tello2_flip.join()
        tello3_flip.join()

if fly:
    telloswarm.move_up(50)
    tello1_path = [(-60, -60, 50, 20, 1), (60, -60, 100, 30, 2), (0, 120, 150, 40, 3), (0, 0, 50, 20, 1)]
    tello2_path = [(60, -60, 100, 30, 2), (0, 120, 150, 40, 3), (-60, -60, 50, 20, 1), (0, 0, 50, 20, 2)]
    tello3_path = [(0, 120, 150, 40, 3), (-60, -60, 50, 20, 1), (60, -60, 100, 30, 2), (0, 0, 50, 20, 3)]

    for i in range(4):
        x1, y1, z1, s1, mpad1 = tello1_path[i]
        x2, y2, z2, s2, mpad2 = tello2_path[i]
        x3, y3, z3, s3, mpad3 = tello3_path[i]

        tello1_mpad = threading.Thread(target=tello_mpad, args=(tello1, x1, y1, z1, s1, mpad1), daemon=True)
        tello2_mpad = threading.Thread(target=tello_mpad, args=(tello2, x2, y2, z2, s2, mpad2), daemon=True)
        tello3_mpad = threading.Thread(target=tello_mpad, args=(tello3, x3, y3, z3, s3, mpad3), daemon=True)
        tello1_mpad.start()
        tello2_mpad.start()
        tello3_mpad.start()
        tello1_mpad.join()
        tello2_mpad.join()
        tello3_mpad.join()

if flip or fly:
    telloswarm.land()
    landed = True

if video:
    tello1_video.join()
    tello2_video.join()
    tello3_video.join()

    tello1.streamoff()
    tello2.streamoff()
    tello3.streamoff()

telloswarm.end()Before we got our Tello EDU, we had two regular Tellos for years. When we popped up the idea of programming a drone, drone swarm control was our target. However, we just found that doing swarm with regular Tello is quite impossible because of the network connection constraint. It connect as access point instead of station mode, i.e. your PC or mobile get a fixed IP from Tello instead of Tello connecting to the network to get it’s IP. You will still get the same IP even connect to two regular Tellos with two wifi devices in your PC, someone worked this out with Linux, you may want to have a look – Adventures with DJI Ryze Tello: Controlling a Tello Swarm.
For us, we took the easier way, bought some Tello EDU and started our drone programming journey. The main different between Tello EDU and regular Tello is the network connection, supporting mission pad and SDK 3.0.
Before you can do the swarm or multiple drone control, you need to change the Tello EDU network setup to the access point, you can do this from the Tello EDU APP, we recommend this because you can also check any firmware update. Otherwise, you may need the following codes, run it when your PC connects the Tello in station mode. Keep in mind that the SSID cannot include ‘.’, spaces, or other special characters, and you can always reset this by pressing the power button for 5 seconds.
from djitellopy import Tello

tello = Tello()
tello.connect()
tello.set_wifi_credentials(SSID, Password)telloswarm = TelloSwarm.fromIps(['192.168.3.81','192.168.3.82','192.168.3.83'])Told TelloSwarm the drones’ IP, and we assigned fixed IP to our drones so that we don’t need to check it every time. Once TelloSwarm connects with the drones’ IP, it will put all drones under tellowarm.tellos.
for i, tello in zip(range(3), telloswarm):
    tello.LOGGER.setLevel(logging.ERROR)
    tello.connect()
    print(f'Tello Battery {i+1}: {tello.get_battery()}')
    tello.change_vs_udp(8881+i)
    tello.set_video_resolution(Tello.RESOLUTION_480P)
tello.set_video_bitrate(Tello.BITRATE_1MBPS)tello1 = telloswarm.tellos[0]
tello2 = telloswarm.tellos[1]
tello3 = telloswarm.tellos[2]
tello1.LOGGER.setLevel(logging.ERROR)
tello2.LOGGER.setLevel(logging.ERROR)
tello3.LOGGER.setLevel(logging.ERROR)
tello1.connect()
tello2.connect()
tello3.connect()
print(f'Tello1 Battery : {tello1.get_battery()}')
print(f'Tello2 Battery : {tello2.get_battery()}')
print(f'Tello3 Battery : {tello3.get_battery()}')
tello1.change_vs_udp(8881)
tello1.set_video_resolution(Tello.RESOLUTION_480P)
tello1.set_video_bitrate(Tello.BITRATE_1MBPS)
tello2.change_vs_udp(8882)
tello2.set_video_resolution(Tello.RESOLUTION_480P)
tello2.set_video_bitrate(Tello.BITRATE_1MBPS)
tello3.change_vs_udp(8883)
tello3.set_video_resolution(Tello.RESOLUTION_480P)
tello3.set_video_bitrate(Tello.BITRATE_1MBPS)Used a loop to setup each drones,
if flip:
    fpath_1 = ['l', 'b', 'r']
    fpath_2 = ['r', 'f', 'l']
    telloswarm.parallel(lambda drone, tello: tello.flip(fpath_1[drone]))
    telloswarm.parallel(lambda drone, tello: tello.flip(fpath_2[drone]))

if fly:
    telloswarm.move_up(50)
    path_1 = [(-60, -60, 50, 20, 1), (60, -60, 100, 30, 2), (0, 120, 150, 40, 3)]
    path_2 = [(60, -60, 100, 30, 2), (0, 120, 150, 40, 3), (-60, -60, 50, 20, 1)]
    path_3 = [(0, 120, 150, 40, 3), (-60, -60, 50, 20, 1), (60, -60, 100, 30, 2)]
    path_4 = [(0, 0, 50, 20, 1), (0, 0, 50, 20, 2), (0, 0, 50, 20, 3)]
    telloswarm.parallel(lambda drone, tello: tello.enable_mission_pads)
    telloswarm.parallel(lambda drone, tello: tello.go_xyz_speed_mid(path_1[drone][0], path_1[drone][1], path_1[drone][2], path_1[drone][3], path_1[drone][4]))
    telloswarm.parallel(lambda drone, tello: tello.go_xyz_speed_mid(path_2[drone][0], path_2[drone][1], path_2[drone][2], path_2[drone][3], path_2[drone][4]))
    telloswarm.parallel(lambda drone, tello: tello.go_xyz_speed_mid(path_3[drone][0], path_3[drone][1], path_3[drone][2], path_3[drone][3], path_3[drone][4]))
telloswarm.parallel(lambda drone, tello: tello.go_xyz_speed_mid(path_4[drone][0], path_4[drone][1], path_4[drone][2], path_4[drone][3], path_4[drone][4]))if flip:
tello1_fpath = ['l','r']
tello2_fpath = ['b','f']
tello3_fpath = ['r','l']
for i in range(2):
flip1 = tello1_fpath[i]
flip2 = tello2_fpath[i]
flip3 = tello3_fpath[i]
tello1_flip = threading.Thread(target=tello_flip, args=(tello1, flip1), daemon=True)
tello2_flip = threading.Thread(target=tello_flip, args=(tello2, flip2), daemon=True)
tello3_flip = threading.Thread(target=tello_flip, args=(tello3, flip3), daemon=True)
tello1_flip.start()
tello2_flip.start()
tello3_flip.start()
tello1_flip.join()
tello2_flip.join()
tello3_flip.join()
if fly:
telloswarm.move_up(50)
tello1_path = [(-60, -60, 50, 20, 1), (60, -60, 100, 30, 2), (0, 120, 150, 40, 3), (0, 0, 50, 20, 1)]
tello2_path = [(60, -60, 100, 30, 2), (0, 120, 150, 40, 3), (-60, -60, 50, 20, 1), (0, 0, 50, 20, 2)]
tello3_path = [(0, 120, 150, 40, 3), (-60, -60, 50, 20, 1), (60, -60, 100, 30, 2), (0, 0, 50, 20, 3)]
for i in range(4):
x1, y1, z1, s1, mpad1 = tello1_path[i]
x2, y2, z2, s2, mpad2 = tello2_path[i]
x3, y3, z3, s3, mpad3 = tello3_path[i]
tello1_mpad = threading.Thread(target=tello_mpad, args=(tello1, x1, y1, z1, s1, mpad1), daemon=True)
tello2_mpad = threading.Thread(target=tello_mpad, args=(tello2, x2, y2, z2, s2, mpad2), daemon=True)
tello3_mpad = threading.Thread(target=tello_mpad, args=(tello3, x3, y3, z3, s3, mpad3), daemon=True)
tello1_mpad.start()
tello2_mpad.start()
tello3_mpad.start()
tello1_mpad.join()
tello2_mpad.join()
tello3_mpad.join()We used telloswarm.parallel(lambda drone, tello: XXXXX) to command all drones at the same time, you can see from above. XXXXX can be any tello command or even a function.
For telloswarm.parallel, it will wait for all actions to be done before moving to the next step.
if video:
    telloswarm.parallel(lambda drone, tello: tello.streamon())
    time.sleep(3)

    tello1_video = threading.Thread(target=tello_video, args=(telloswarm.tellos[0], 1), daemon=True)
    tello2_video = threading.Thread(target=tello_video, args=(telloswarm.tellos[1], 2), daemon=True)
    tello3_video = threading.Thread(target=tello_video, args=(telloswarm.tellos[2], 3), daemon=True)
    tello1_video.start()
    tello2_video.start()
tello3_video.start()if video:
tello1.streamon()
tello1_video = threading.Thread(target=tello_video, args=(tello1, 1), daemon=True)
tello1_video.start()
tello2.streamon()
tello2_video = threading.Thread(target=tello_video, args=(tello2, 2), daemon=True)
tello2_video.start()
tello3.streamon()
tello3_video = threading.Thread(target=tello_video, args=(tello3, 3), daemon=True)
tello3_video.start()
time.sleep(3)Originally, we were using the telloswarm.parallel to execute this and the result is very good. However, as we mentioned before that the telloswarm.parallel wait until the action complete, it cannot serve our purpose, i.e. keep the video capture when flying. So, we used threading, just like what we did in the other project but running three drones by the same time.
It is quite easy to achieve drone swarm control and video streaming by using DJITELLOPY. However, I found it is a bit slow or long processing when using DJITELLOPY. Next project, we may want to communciate to the Tello SDK directly to see the result.
Once I did the face detection project, it made me easier to understand gesture recognition, you can do it too. It gives me more solid fundamentals to start with deep learning studying, I want to create my objection recognition model and have the drone fly with this. Before that, I like to try body detection and swap fly as my next project. OK, let’s see how we make this happen in our drone.
First of all, let’s understand our hands first… XD
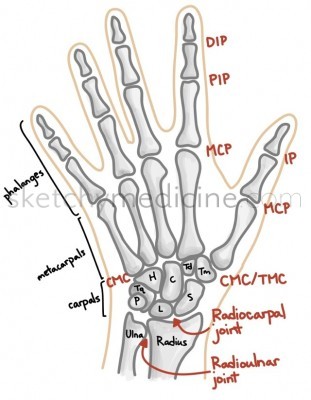
I got this picture from sketchymedicine.com, it contains a lot of medical sketches and detailed information, very cool website.
See below for the full program
from djitellopy import Tello
import cv2
import mediapipe as mp
import threading
import math
import logging
import time
# Assign tello to the Tello class and set the information to error only
tello = Tello()
tello.LOGGER.setLevel(logging.ERROR) #Ignore INFO from Tello
fly = False #For debuggin purpose
# Assign the MediaPipe hands detection solution to mpHands and define the confidence level
mpHands = mp.solutions.hands
hands = mpHands.Hands(min_detection_confidence=0.8, min_tracking_confidence=0.8)
# When we detect the hand, we can use mp.solution to plot the location and connection
mpDraw = mp.solutions.drawing_utils
def hand_detection(tello):
while True:
global gesture
# Read the frame from Tello
frame = tello.get_frame_read().frame
frame = cv2.flip(frame, 1)
# Call hands from MediaPipe Solution for the hand detction, need to ensure the frame is RGB
result = hands.process(frame)
# Read frame width & height instead of using fixed number 960 & 720
frame_height = frame.shape[0]
frame_width = frame.shape[1]
my_hand = []
if result.multi_hand_landmarks:
for handlms, handside in zip(result.multi_hand_landmarks, result.multi_handedness):
if handside.classification[0].label == 'Right': # We will skip the right hand information
continue
# With mp.solutions.drawing_utils, plot the landmark location and connect them with define style
mpDraw.draw_landmarks(frame, handlms, mpHands.HAND_CONNECTIONS,\
mp.solutions.drawing_styles.get_default_hand_landmarks_style(),\
mp.solutions.drawing_styles.get_default_hand_connections_style())
# Convert all the hand information from a ratio into actual position according to the frame size.
for i, landmark in enumerate(handlms.landmark):
x = int(landmark.x * frame_width)
y = int(landmark.y * frame_height)
my_hand.append((x, y))
# Capture all the landmarks position and distance into hand[]
# wrist = 0
# thumb = 1 - 4
# index = 5 - 8
# middle = 9 - 12
# ring = 13 - 16
# little = 17 - 20
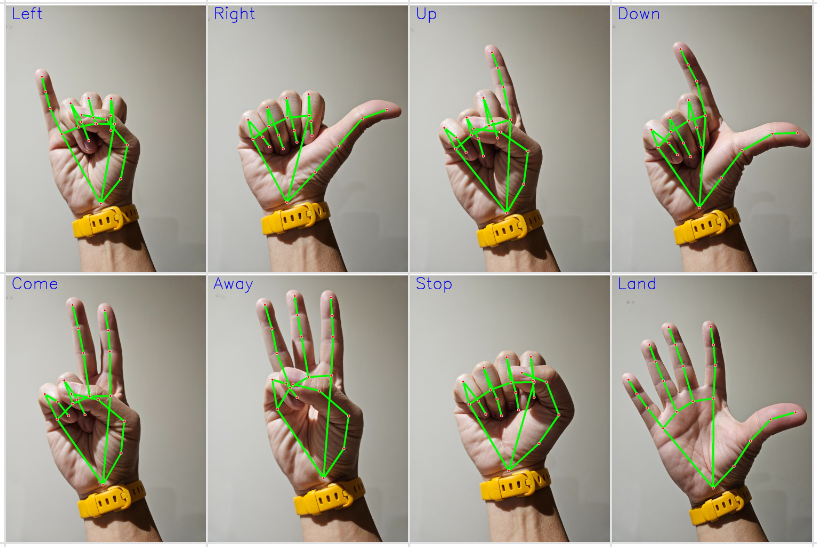
# Setup left hand control with the pre-defined logic.
# Besides thumb, we use finger tip y position compare with knuckle y position as an indicator
# Thumb use the x position as the comparison.
# Stop, a fist
# Land, open hand
# Right, only thumb open
# Left, only little finger open
# Up, only index finger open
# Down, both thumb and index finger open
# Come, both index and middle fingger open
# Away, both index, middle and ring finger open
finger_on = []
if my_hand[4][0] > my_hand[2][0]:
finger_on.append(1)
else:
finger_on.append(0)
for i in range(1,5):
if my_hand[4 + i*4][1] < my_hand[2 + i*4][1]:
finger_on.append(1)
else:
finger_on.append(0)
gesture = 'Unknown'
if sum(finger_on) == 0:
gesture = 'Stop'
elif sum(finger_on) == 5:
gesture = 'Land'
elif sum(finger_on) == 1:
if finger_on[0] == 1:
gesture = 'Right'
elif finger_on[4] == 1:
gesture = 'Left'
elif finger_on[1] == 1:
gesture = 'Up'
elif sum(finger_on) == 2:
if finger_on[0] == finger_on[1] == 1:
gesture = 'Down'
elif finger_on[1] == finger_on[2] == 1:
gesture = 'Come'
elif sum(finger_on) == 3 and finger_on[1] == finger_on[2] == finger_on[3] == 1:
gesture = 'Away'
cv2.putText(frame, gesture, (10, 50), cv2.FONT_HERSHEY_SIMPLEX, 2, (255, 0, 0), 3)
frame = cv2.cvtColor(frame, cv2.COLOR_BGR2RGB)
cv2.imshow('Tello Video Stream', frame)
cv2.waitKey(1)
if gesture == 'Landed':
break
########################
# Start of the program #
########################
# Connect to the drone via WIFI
tello.connect()
# Instrust Tello to start video stream and ensure first frame read
tello.streamon()
while True:
frame = tello.get_frame_read().frame
if frame is not None:
break
# Start the hand detection thread when the drone is flying
gesture = 'Unknown'
video_thread = threading.Thread(target=hand_detection, args=(tello,), daemon=True)
video_thread.start()
# Take off the drone
time.sleep(1)
if fly:
tello.takeoff()
tello.set_speed(10)
time.sleep(2)
tello.move_up(80)
while True:
hV = dV = vV = rV = 0
if gesture == 'Land':
break
elif gesture == 'Stop' or gesture == 'Unknown':
hV = dV = vV = rV = 0
elif gesture == 'Right':
hV = -15
elif gesture == 'Left':
hV = 15
elif gesture == 'Up':
vV = 20
elif gesture == 'Down':
vV = -20
elif gesture == 'Come':
dV = 15
elif gesture == 'Away':
dV = -15
tello.send_rc_control(hV, dV, vV, rV)
# Landing the drone
if fly: tello.land()
gesture = 'Landed'
# Stop the video stream
tello.streamoff()
# Show the battery level before ending the program
print("Battery :", tello.get_battery())
# Assign the MediaPipe hands detection solution to mpHands and define the confidence level
mpHands = mp.solutions.hands
hands = mpHands.Hands(min_detection_confidence=0.8, min_tracking_confidence=0.8)From MediaPipe, we are going to use MediaPipe Solution Hands for our hand detection, there are a few parameters that are important to us,
You can refer to the MediaPipe Official Website for more information. They also get a demonstration website for you to play with different models. However,
  def __init__(self,
               static_image_mode=False,
               max_num_hands=2,
               model_complexity=1,
               min_detection_confidence=0.5,
min_tracking_confidence=0.5):I found that the documentation on the MediaPipe Official Website may not be updated, and min_hand_presence_confidence and running_mode no longer exist. What I checked from hands.py. It spent me 30 minutes playing with the demo and reading information to understand the difference between min_hand_detection_confidence and min_hand_presence_confidence.
gesture = 'Unknown'
video_thread = threading.Thread(target=hand_detection, args=(tello,), daemon=True)
video_thread.start() Just like what we did in face detection, we need to run the hand detection function in a thread (parallel processing) to capture and analyze the hand position, updating a global variable – gesture, so that the drone movement control can take corresponding actions according to this.
# Read the frame from Tello
        frame = tello.get_frame_read().frame
        frame = cv2.flip(frame, 1)

        # Call hands from MediaPipe Solution for the hand detction, need to ensure the frame is RGB
result = hands.process(frame)Get the latest frame from the drone and flip it from the camera point of view to our point of view. Then, process the frame with hands, it was predefined in the beginning – line #11. Once the hand detection is done, the following information will be stored in result, it will contain,
x, y, and z, representing real-world 3D coordinates in meters with the origin at the hand’s geometric center.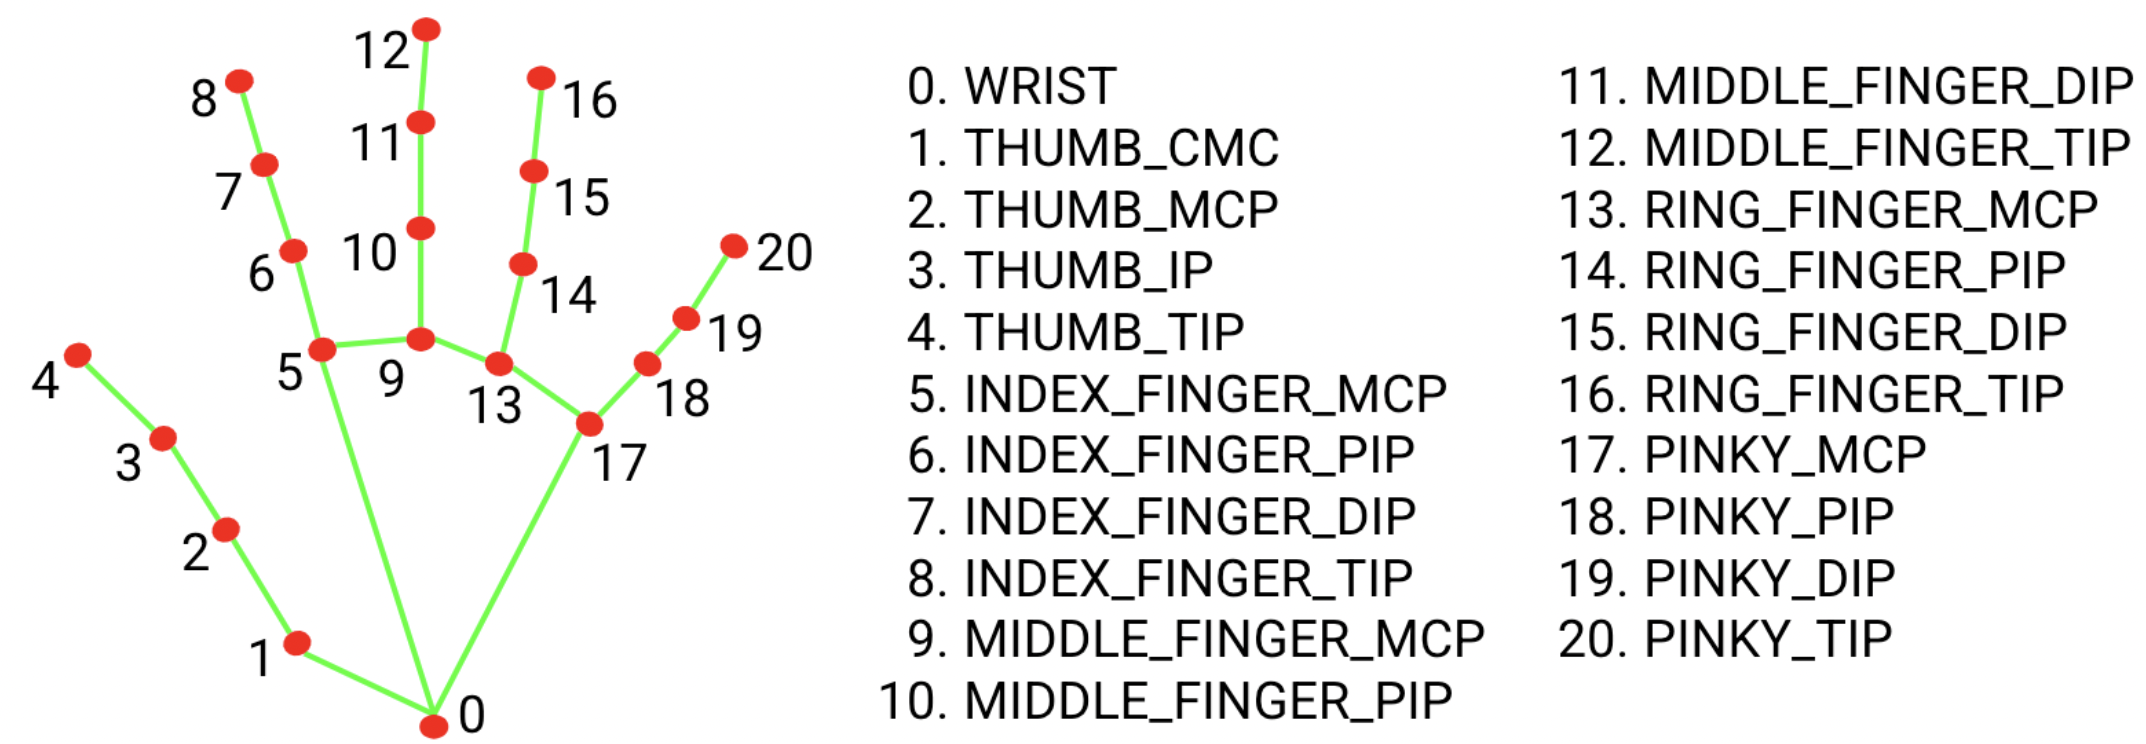
        if result.multi_hand_landmarks:
            for handlms, handside in zip(result.multi_hand_landmarks, result.multi_handedness):
                if handside.classification[0].label == 'Right': # We will skip the right hand information
continueIf hand(s) are detected, the result will contain the necessary data. Since we only need to use the left hand to control the drone, we will skip reading the Right hand data.
mpDraw = mp.solutions.drawing_utils mpDraw.draw_landmarks(frame, handlms, mpHands.HAND_CONNECTIONS, mp.solutions.drawing_styles.get_default_hand_landmarks_style(), mp.solutions.drawing_styles.get_default_hand_connections_style()) Then, we use the drawing_utils from MediaPipe to highlight the landmarks and connect them.
                # Convert all the hand information from a ratio into actual position according to the frame size.
                for i, landmark in enumerate(handlms.landmark):
                    x = int(landmark.x * frame_width)
                    y = int(landmark.y * frame_height)
my_hand.append((x, y)) Retreves result.multi_hand_landmarks x & y data and converts this into actual position to the frame size. Store into array my_hand for the gesture analysis.
We just simply compare the y position of the fingertip (TIP) to the knuckle (MCP). For the thumb, we compare the x position of the fingertip (TIP) to the knuckle (MCP) as shown below,
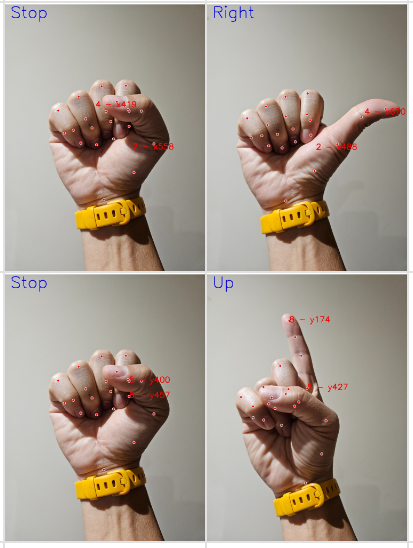
When thumb is open, finger tip x is bigger then knuckle x. When the fingers are open, finger tip y is smaller than knuckle y.
                finger_on = []
                if my_hand[4][1] > my_hand[2][1]:
                    finger_on.append(1)
                else:
                    finger_on.append(0)
                for i in range(1,5):
                    if my_hand[4 + i*4][3] > my_hand[2 + i*4][3]:
                        finger_on.append(1)
                    else:
                        finger_on.append(0)

                gesture = 'Unknown'
                if sum(finger_on) == 0:
                    gesture = 'Stop'
                elif sum(finger_on) == 5:
                    gesture = 'land'
                elif sum(finger_on) == 1:
                    if finger_on[0] == 1:
                        gesture = 'Right'
                    elif finger_on[4] == 1:
                        gesture = 'Left'
                    elif finger_on[1] == 1:
                        gesture = 'Up'
                elif sum(finger_on) == 2:
                    if finger_on[0] == finger_on[1] == 1:
                        gesture = 'Down'
                    elif finger_on[1] == finger_on[2] == 1:
                        gesture = 'Come'
                elif sum(finger_on) == 3 and finger_on[1] == finger_on[2] == finger_on[3] == 1:
gesture = 'Away'We compare each fingers one by one and record into array finger_on, 1 represent open and 0 represent to close. By mapping this to our target gesture,
Then, we use if/then loops to determinate variable gesture according to the finger_on result.
It may be fun if we use binary numbers to represent the above gesture determination.
while True:

    hV = dV = vV = rV = 0
    if gesture == 'Land':
        break
    elif gesture == 'Stop' or gesture == 'Unknown':
        hV = dV = vV = rV = 0
    elif gesture == 'Right':
        hV = -15
    elif gesture == 'Left':
        hV = 15
    elif gesture == 'Up':
        vV = 20
    elif gesture == 'Down':
        vV = -20
    elif gesture == 'Come':
        dV = 15
    elif gesture == 'Away':
        dV = -15

tello.send_rc_control(hV, dV, vV, rV)With the real-time global variable gesture from the hand_detection(), we use this variable to command the drone movement, with the SEND_RC_CONTROL command.
| Horizontal | -100 – 0 to move left | 0 – 100 to move right |
| Depth | -100 – 0 to move backward | 0 – 100 to move forward |
| Vertial | -100 – 0 to move down | 0 -100 to move up |
| Rotation | -100 – 0 to rotate anti-clockwsie | 0 – 100 to rotate clockwise |
Unlike the Face Detection project, we used hV to control the Left and Right movement instead of rotation- rV. Oh.. the ‘Left/Right’ in the program is from the user’s point of view, but the drone camera view, is reversed.
That’s all for the project. It is quite straightforward and similar to the Face Detection. Please leave a comment for any inputs and comment. I am now studying how to do swarm flying with 3 Tello Edu, just cleaned up some roadblockers…
Just pop-up that I can add a ‘follow’ command, like what was doing for the face detection and tracking. I believe that we just need to copy & paste the code from the Face Detection project with some modifications.
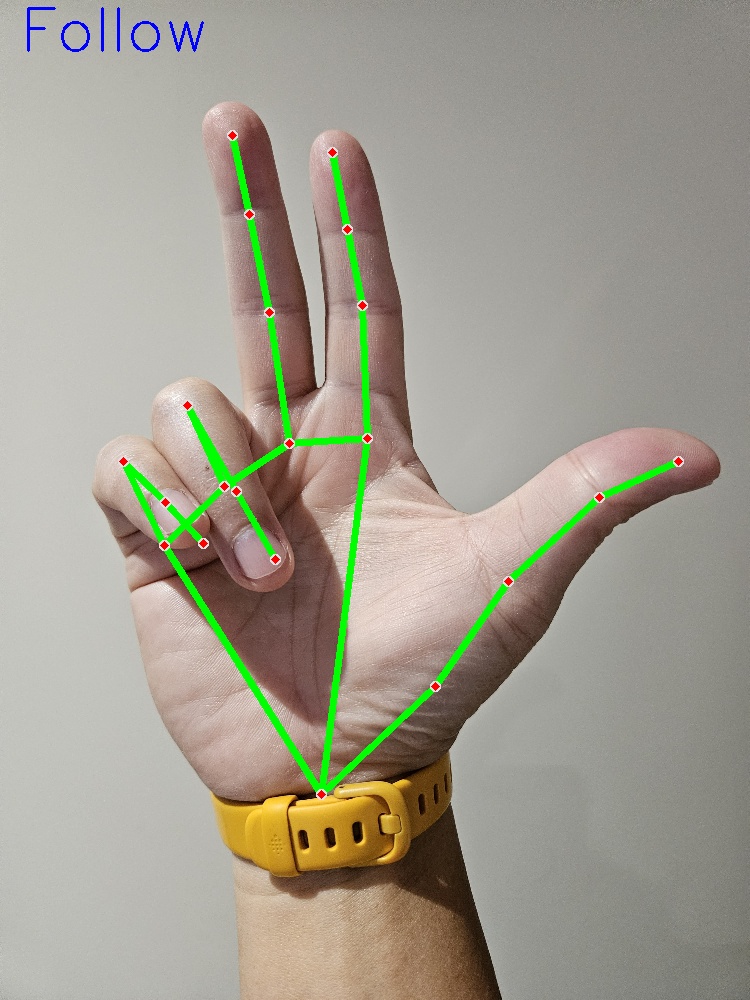
Above is the hand sign for ‘follow’, go ahead to modify the original code with belows,
        global gesture
global hand_center # New line for hand follow # New line for hand follow
elif sum(finger_on) == 3 and finger_on[0] == finger_on[1] == finger_on[2] == 1:
gesture = 'Follow'
#Apply Shoelace formula to calculate the palm size
palm_vertexs = [0,1,2,5,9,13,17]
area = 0
for i in palm_vertexs:
x1, y1 = my_hand[i]
x2, y2 = my_hand[(i + 1) % 7]
area += (x1 * y2) - (x2 * y1)
area = 0.5 * abs(area)
hand_center = my_hand[0][0], my_hand[0][1], areagesture = 'Unknown'
hand_center = 480, 360, 28000 # New line for hand follow # New line for hand follow
elif gesture == 'Follow':
x, y, size = hand_center
if x > 480:
rV = -int((x - 480)/4.8)
elif x < 480:
rV = +int((480 - x)/4.8)
else:
rV = 0
if y > 360:
vV = -int((y - 360)/3.6)
elif y < 360:
vV = int((360 - y)/3.6)
else:
vV = 0
if size > 30000:
dV = -15
elif size < 26000:
dV = 15
else:
dV = 0
tello.send_rc_control(hV, dV, vV, rV)
That’s all!
For the above codes, we use landmarks – 0, 1, 2, 5, 9, 13 & 17 to calculate the area of the palm, and this number determines how close the palm is to the drone, we target a range of 26000 – 30000. Then, we command it to fly toward or away from the hand, just similar to the face tracking in the last project.
But, what I want to highlight is the palm area calculation, it led me to learn about the Shoelace Formula, which is a very interesting and powerful formula. I don’t remember that I learned this before, maybe returned this to my teacher already 😎. Anyway, have a look at the below video, it’s worth watching and understanding the Shoelace Formula.
If I hadn’t tried, I never have known that doing face detection nowadays is such simple and easy. Even for a beginner like me, I can make it happen within a few hours… after I spent a few days learning and understanding the libraries. It is worth having a try, it will lead you to a new world and start to understand vision computing, deep learning, and AI development. Let’s take a look at what I did.
See below for the full program
# Before you run this program, ensure to connect Tello with the WIFI

# Import Tello class from djitellopy library
from djitellopy import Tello

# Import additional library CV2 - OpenCV for image processing, threading for multi-tasking
import cv2
import threading
import time
import logging

# Assign tello to the Tello class and set the information to error only
tello = Tello()
tello.LOGGER.setLevel(logging.ERROR) #Ignore INFO from Tello
fly = True #For debuggin purpose

# Assign the pre-trained model - Haar Cascade classifier for CV2 face detection
face_cascade = cv2.CascadeClassifier(cv2.data.haarcascades + 'haarcascade_frontalface_default.xml')
eyes_cascade = cv2.CascadeClassifier(cv2.data.haarcascades + 'haarcascade_eye.xml')

# def a video capture and display function
def face_detection(tello):

    while True:
        # Change the face_center to be global, any changes will be read globally
        global face_center

        # Read the frame from Tello and convert the color from BGR to RGB
        frame = tello.get_frame_read().frame
        frame = cv2.cvtColor(frame, cv2.COLOR_BGR2RGB)

        # Convert the image to grayscale for face detection
        gray = cv2.cvtColor(frame, cv2.COLOR_RGB2GRAY)

        # Perform face detection using the pre-train model - haarcascade_frontalface_default.xml
        faces = face_cascade.detectMultiScale(gray, scaleFactor=1.05, minNeighbors=10, minSize=(80, 80))


        # Based on CV2 result, find the largest detected face and the position
        largest_area = 0
        largest_face = None

        for (x, y, w, h) in faces:
            face_area = w * h
            if face_area > largest_area:
                largest_area = face_area
                largest_face = (x, y, w, h)

        # Confirm there are two eyes detected inside the face
        if largest_face is not None:
            eyes = eyes_cascade.detectMultiScale(gray) # Using the default parameters
            eye_count = 0
            for (ex, ey, _, _) in eyes:
                if ex - x < w and ey - y < h:
                    eye_count += 1
            if eye_count < 2:
                continue

        # Highlight the largest face with a box and show the coordinates
            x, y, w, h = largest_face
            face_center = (x + w/2), (y + h/2), w
            cv2.rectangle(frame, (x, y), (x+w, y+h), (255, 0, 0), 2)
            position_text = f'Face : (x :{x}, y :{y}, w :{w}, h :{h})'
            center_text = f'{int(x + w/2)} , {int(y + h/2)}'
            rc_text = f'RC({hV}, {dV}, {vV}, {rV})'
            cv2.putText(frame, position_text, (x, y-10), cv2.FONT_HERSHEY_SIMPLEX, 0.5, (255, 0, 0), 2)
            cv2.putText(frame, center_text, (int(x + w/2), int(y + h/2)), cv2.FONT_HERSHEY_SIMPLEX, 0.5, (255, 0, 0), 2)
            cv2.putText(frame, rc_text, (20, 20), cv2.FONT_HERSHEY_SIMPLEX, 0.5, (0, 255, 0), 2)
        else:
            face_center = 480, 360, 200

        # Display the face detected image and check whether 'q' is bing pressed or not
        cv2.imshow('Tello Video Stream', frame)
        if cv2.waitKey(1) & 0xFF == ord('q'):
            face_center = False
            break

########################
# Start of the program #
########################

# Connect to the drone via WIFI
tello.connect()

# Instrust Tello to start video stream and ensure first frame read
tello.streamon()

while True:
            frame = tello.get_frame_read().frame
            if frame is not None:
                break

# Start the face detection thread when the drone is flying
face_center = 480, 360, 200
hV = vV = dV = rV = 0
video_thread = threading.Thread(target=face_detection, args=(tello,), daemon=True)
video_thread.start()

# Take off the drone
time.sleep(1)
if fly:
    tello.takeoff()
    tello.set_speed(10)
    time.sleep(2)
    tello.move_up(80)

# Use RC Control to control the movement of the drone
# send_rc_control(left_right_velocity, forward_backward_velocity, up_down_velocity, yaw_velocity) from -100 to 100

while face_center != False:

    x, y, w = face_center

    if x > 530:
        rV = +30
    elif x < 430:
        rV = -30
    else:
        rV = 0

    if y > 410:
        vV = -20
    elif y < 310:
        vV = 20
    else:
        vV = 0

    if w > 300:
        dV = -15
    elif w < 200:
        dV = 15
    else:
        dV = 0

    tello.send_rc_control(hV, dV, vV, rV)

# Landing the drone
if fly: tello.land()

# Stop the video stream
tello.streamoff()

# Show the battery level before ending the program
print("Battery :", tello.get_battery())If you installed the DJITELLOPY package, CV2 is being installed as well. Otherwise, you need to do this with – PIP install djitellpy.
face_cascade = cv2.CascadeClassifier(cv2.data.haarcascades + 'haarcascade_frontalface_default.xml')Besides face detection, CV2 provides different models to support different purposes. All of them are already downloaded when you install the CV2 package. For face detection, we use haarcascade_frontalface_default.xml.
face_center = 480, 360, 200
hV = vV = dV = rV = 0
video_thread = threading.Thread(target=face_detection, args=(tello,), daemon=True)
video_thread.start()The program structure is very similar to the video-capturing project. We need to run the face detection function in a thread (parallel processing) to capture and analyze the face position, updating a global variable – face_center, so that the drone movement control can take corresponding actions.
        frame = tello.get_frame_read().frame
        frame = cv2.cvtColor(frame, cv2.COLOR_BGR2RGB)

        # Convert the image to grayscale for face detection
        gray = cv2.cvtColor(frame, cv2.COLOR_RGB2GRAY)

        # Perform face detection using the pre-train model - haarcascade_frontalface_default.xml
faces = face_cascade.detectMultiScale(gray, scaleFactor=1.05, minNeighbors=10, minSize=(80, 80))Referring to the last project, we use get_frame_read() to get the latest frame from Tello’s camera. As we mentioned before, CV2 processes image data in BGR format but the image feed from Tello’s camera is in RGB format, the ‘R’ & ‘G’ are mis-mapped. We need to convert this into ‘RGB’ for a correct display. Then, we also need to create an image in grayscale because CV2 performs face detection in grayscale.
We use detectMultiScale to perform face detection based on the face_cascade setup and the grayscale image, the result will be stored in faces. There are three inputs to alter the detection result. Be short,
        largest_area = 0
        largest_face = None

        for (x, y, w, h) in faces:
            face_area = w * h
            if face_area > largest_area:
                largest_area = face_area
largest_face = (x, y, w, h)Once the face detection is done, face position and sizes will be returned to the array variable faces, len of faces representing how many faces are detected and each faces[] contains the detected position x, position y, width, and height. We are using a for loop to read the x, y, w & h and identify the largest face as we mentioned before.
vvv Small tool to understanding Scale Factor and Min Neighbour vvv
# import the opencv library
import cv2

# Load the pre-trained Haar Cascade classifier for face detection
face_cascade = cv2.CascadeClassifier(cv2.data.haarcascades + 'haarcascade_frontalface_default.xml')

scale_factor = 1.1
min_neighbors = 10

while(True):

    frame = cv2.imread("people.jpg")

    # Convert the image to grayscale for face detection
    gray = cv2.cvtColor(frame, cv2.COLOR_BGR2GRAY)

    # Perform face detection
    faces = face_cascade.detectMultiScale(gray, scaleFactor=scale_factor, minNeighbors=min_neighbors, minSize=(100, 100))
    biggest_face = [0, 0, 0, 0]

    # Draw rectangles around the detected faces
    for i, (x, y, w, h) in enumerate(faces):
        cv2.rectangle(frame, (x, y), (x+w, y+h), (255, 0, 0), 2)
        position_text = f'Face {i+1}: (x :{x}, y :{y}, w :{w}, h :{h})'
        center_text = f'{int(x + w/2)} , {int(y + h/2)}'
        cv2.putText(frame, position_text, (x, y-10), cv2.FONT_HERSHEY_SIMPLEX, 0.5, (255, 0, 0), 2)
        cv2.putText(frame, center_text, (int(x + w/2), int(y + h/2)), cv2.FONT_HERSHEY_SIMPLEX, 0.5, (255, 0, 0), 2)

    cv2.putText(frame, f'scaleFactor = {scale_factor}, minNeighbors = {min_neighbors}', (10, 10), cv2.FONT_HERSHEY_SIMPLEX, 0.5, (0, 255, 0), 2)

    # Display the resulting frame
    cv2.imshow('People', frame)

    # q - quit
    # a/s - add or reduce scale factor by 0.05
    # z/x - add or reduce min neighors by 1
    # desired button of your choice
    key = cv2.waitKey(0)
    if key == ord('q'):
        break
    elif key == ord('a') and scale_factor > 1.05:
        scale_factor = round(scale_factor - 0.05, 2)
    elif key == ord('s'):
        scale_factor = round(scale_factor + 0.05, 2)
    elif key == ord('z') and min_neighbors > 1:
        min_neighbors -= 1
    elif key == ord('x'):
        min_neighbors += 1

# Destroy all the windows
cv2.destroyAllWindows()To better understand the above parameters, I also wrote a small tool to alter Scale Factor (with a & s key) and Min Neighbour (with z & x key), you can have a try with different photos.
When we developed the program with face detection only, we found that there was a chance to have ‘fault detection’ no ever what parameters we tried, which would interfere with our result and induce a ‘ghost’ face. We had added eye detection to ensure a face with eyes is correctly detected, it can greatly improve the detection result.
eyes_cascade = cv2.CascadeClassifier(cv2.data.haarcascades + 'haarcascade_eye.xml') Assigns haarcascade_eye.xml to eyes_cascade for eye detection.
        if largest_face is not None:
            eyes = eyes_cascade.detectMultiScale(gray) # Using the default parameters
            eye_count = 0
            for (ex, ey, _, _) in eyes:
                if ex - x < w and ey - y < h:
                    eye_count += 1
            if eye_count < 2:
continueIf the largest face is detected, we will do an eye detection to confirm the largest face with two eyes. Same as face detection, eye position, and size will be returned to the array of variable eyes. We need to compare that there are at least two eyes in the face box. Our logic is very simple, ensure that the eyes x & y position are within the face box, eye_x (ex) minus face_x (x) should be smaller than the width (w) and eye_y (ey) minus face_y (y) should be smaller than the height (h). Why at least two eyes? because it includes potential fault eye detection within the face box.
        if largest_face is not None:
            eyes = eyes_cascade.detectMultiScale(gray) # Using the default parameters
            eye_count = 0
            for (ex, ey, _, _) in eyes:
                if ex - x < w and ey - y < h:
                    eye_count += 1
            if eye_count < 2:
                continue

        # Highlight the largest face with a box and show the coordinates
            x, y, w, h = largest_face
            face_center = (x + w/2), (y + h/2), w
            cv2.rectangle(frame, (x, y), (x+w, y+h), (255, 0, 0), 2)
            position_text = f'Face : (x :{x}, y :{y}, w :{w}, h :{h})'
            center_text = f'{int(x + w/2)} , {int(y + h/2)}'
            rc_text = f'RC({hV}, {dV}, {vV}, {rV})'
            cv2.putText(frame, position_text, (x, y-10), cv2.FONT_HERSHEY_SIMPLEX, 0.5, (255, 0, 0), 2)
            cv2.putText(frame, center_text, (int(x + w/2), int(y + h/2)), cv2.FONT_HERSHEY_SIMPLEX, 0.5, (255, 0, 0), 2)
            cv2.putText(frame, rc_text, (20, 20), cv2.FONT_HERSHEY_SIMPLEX, 0.5, (0, 255, 0), 2)
        else:
face_center = 480, 360, 200Once we confirm the largest face with eyes, we will get the face_center position ((x + w/2), (y + h/2)) and w for the drone movement. Since we are running the face_detection() in parallel, we make the face_center variable global, so that the drone can get the data in real-time and adjust the position. Then, we highlight the face with a blue box, the face position, and the drone movement (RC – we explain later) in the video for user information. If there is no face detected, the face_center will keep as 480, 360, 200.
We target to position the largest face in the center of the camera. The resolution of Tello’s camera is 960 x 720, i.e. face center is (480, 360). It is not practical to position to a point, so we defined an area (480 +/- 50, 360 +/- 50).
With the real time face_center data from the face_detection(), we compare this with the box above.
Besides the x & y position, we also control how close the drone is to our face. We use the w (width) to make the judgment, we control the face size width between 300 – 200.
In our first project, we move the drone by using commands like move_up(), move_down(), rotate_clockwise(), etc.. Since this is a once-a-time command, the drone will be moving step by step, and also min. 20cm a time. The result will be lagging and unsmooth.
So, we use SEND_RC_CONTROL to control the drone movement. For RC_SEND_CONTROL, it can set the velocity of the drone in four dimensions a time.
* Left/Right is from drone’s view
| Horizontal | -100 – 0 to move left | 0 – 100 to move right |
| Depth | -100 – 0 to move backward | 0 – 100 to move forward |
| Vertial | -100 – 0 to move down | 0 -100 to move up |
| Rotation | -100 – 0 to rotate anti-clockwsie | 0 – 100 to rotate clockwise |
# Use RC Control to control the movement of the drone
# send_rc_control(left_right_velocity, forward_backward_velocity, up_down_velocity, yaw_velocity) from -100 to 100

while face_center != False:

    x, y, w = face_center

    if x > 530:
        rV = +30
    elif x < 430:
        rV = -30
    else:
        rV = 0

    if y > 410:
        vV = -20
    elif y < 310:
        vV = 20
    else:
        vV = 0

    if w > 300:
        dV = -15
    elif w < 200:
        dV = 15
    else:
        dV = 0

tello.send_rc_control(hV, dV, vV, rV)As a result, we have the code above,
Since doing rotation is a better approach to adjusting the horizontal position, we used rV instead of hV. Once we send the velocity number to the drone, it will keep moving in the direction according to the velocity until the next change. So, the drone is flying smoothly to the face position and achieves face tracking.
That’s simple, right?
Besides using CV2. haarcascade_frontalface_default.xml, we have tried to use the MediaPipe.blaze_face_short_range.tflite. We supposed the face detection good is better because it is a deep learning based model. And yes, it is better in accuracy and response. See below comparison,
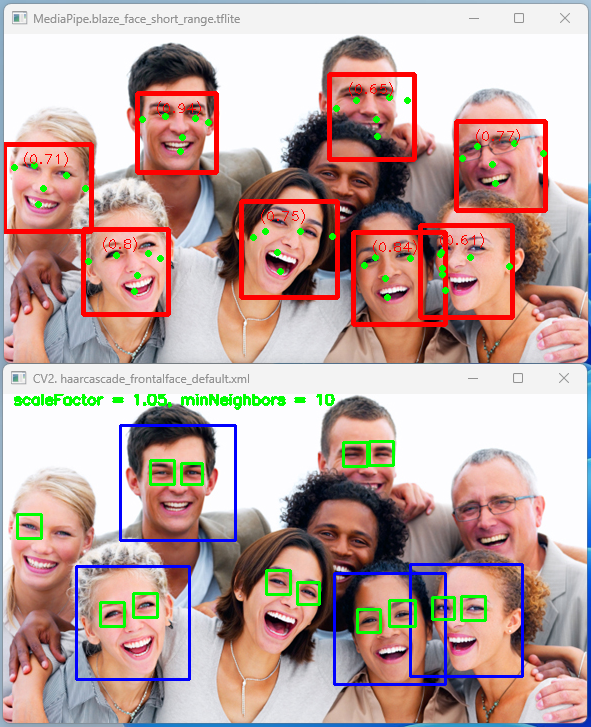
However, blaze_face_short_range.tflite is a lightweight model for detecting single or multiple faces within selfie-like images from a smartphone camera or webcam. The model is optimized for front-facing phone camera images at short range. The result for our project is not ideal since it cannot detect a long-range face when I moved away from the drone, we will re-test this when the full-range blaze face is released.
See below for the full code with MediaPipe.
# Before you run this program, ensure to connect Tello with the WIFI

# Import Tello class from djitellopy library
from djitellopy import Tello

# Import additional library CV2 - OpenCV for image processing, threading for multi-tasking
# Import MediaPIPE for the face detection
import cv2
import threading
import time
import logging
import mediapipe as mp
from mediapipe.tasks import python
from mediapipe.tasks.python import vision

# Assign tello to the Tello class and set the information to error only
tello = Tello()
tello.LOGGER.setLevel(logging.ERROR) #Ignore INFO from Tello
fly = True #For debuggin purpose

# Upload the pre-trained model and setup the Face Detection Option for MediaPIPE
base_options = python.BaseOptions(model_asset_path='blaze_face_short_range.tflite')
options = vision.FaceDetectorOptions(base_options=base_options, min_detection_confidence = 0.8, min_suppression_threshold = 0.3)
detector = vision.FaceDetector.create_from_options(options)

# def a video capture and display function
def face_detection(tello):

    while True:
        # Change the face_center to be global, any changes will be read globally
        global face_center

        # Read the frame from Tello and convert the color from BGR to RGB
        frame = tello.get_frame_read().frame
        frame = cv2.cvtColor(frame, cv2.COLOR_BGR2RGB)
        image = mp.Image(image_format = mp.ImageFormat.SRGB, data = frame)

        # Perform face detection using the pre-train model - blaze_face_short_range.tflite
        detection_result = detector.detect(image)

        # Based on the MediaPIPE result, find the largest detected face and the position
        largest_area = 0
        largest_face = None

        #faces = len(face_position.detections)
        #if faces > 0:
        for face_position in detection_result.detections:
            x = face_position.bounding_box.origin_x
            y = face_position.bounding_box.origin_y
            w = face_position.bounding_box.width
            h = face_position.bounding_box.height
            face_area = w * h
            if face_area > largest_area:
                largest_area = face_area
                largest_face = (x, y, w, h)

        # Highlight the largest face with a box and show the coordinates
        if largest_face is not None:
            x, y, w, h = largest_face
            face_center = (x + w/2), (y + h/2), w

            cv2.rectangle(frame, (x, y), (x+w, y+h), (255, 0, 0), 2)
            position_text = f'Face : (x :{x}, y :{y}, w :{w}, h :{h})'
            center_text = f'{int(x + w/2)} , {int(y + h/2)}'
            rc_text = f'RC({hV}, {dV}, {vV}, {rV})'
            cv2.putText(frame, position_text, (x, y-10), cv2.FONT_HERSHEY_SIMPLEX, 0.5, (255, 0, 0), 2)
            cv2.putText(frame, center_text, (int(x + w/2), int(y + h/2)), cv2.FONT_HERSHEY_SIMPLEX, 0.5, (255, 0, 0), 2)
            cv2.putText(frame, rc_text, (20, 20), cv2.FONT_HERSHEY_SIMPLEX, 0.5, (255, 0, 0), 2)
        else:
            face_center = 480, 360, 200

        # Display the face detected image and check whether 'q' is bing pressed or not
        cv2.imshow('Tello Video Stream', frame)
        if cv2.waitKey(1) & 0xFF == ord('q'):
            face_center = False
            break

########################
# Start of the program #
########################

# Connect to the drone via WIFI
tello.connect()

# Instrust Tello to start video stream and ensure first frame read
tello.streamon()
while True:
            frame = tello.get_frame_read().frame
            if frame is not None:
                break

# Start the face detection thread when the drone is flying
face_center = 480, 360, 200
hV = vV = dV = rV = 0
video_thread = threading.Thread(target=face_detection, args=(tello,), daemon=True)
video_thread.start()

# Take off the drone
time.sleep(1)
if fly:
    tello.takeoff()
    tello.set_speed(10)
    time.sleep(2)
    tello.move_up(80)

# Use RC Control to control the movement of the drone
# send_rc_control(left_right_velocity, forward_backward_velocity, up_down_velocity, yaw_velocity) from -100 to 100
while face_center != False:

    x, y, w = face_center

    if x > 530:
        rV = +30
    elif x < 430:
        rV = -30
    else:
        rV = 0

    if y > 410:
        vV = -20
    elif y < 310:
        vV = 20
    else:
        vV = 0

    if w > 250:
        dV = -15
    elif w < 150:
        dV = 15
    else:
        dV = 0

    tello.send_rc_control(hV, dV, vV, rV)

# Landing the drone
if fly: tello.land()

# Stop the video stream
tello.streamoff()

# Show the battery level before ending the program
print("Battery :", tello.get_battery())Thanks to Hacky from TelloPilots gave me the idea of PID, I started to study and am going to add this to the face detection project. To be frank, I got a failed mark and needed to redo the exam for the Feedback Control System when I was in college. However, I found it very important and useful when working… you may not know how useful what you were learning when you were a student. (sad..)
So, I need to do some revise first. See below for a basic PID concept,
As a result, I still have no clue how to implement PID into my program but change the speed from a constant value to a variable that varies according to the distance to the center. The result is much better and I can target the exact center (480,360) instead of a +/-50 box (480 +/- 50, 360 +/- 50), you can replace the following codes.
    if x > 480:
        rV = int((x - 480)/4.8)
    elif x < 480:
        rV = -int((480 - x)/4.8)
    else:
        rV = 0

    if y > 360:
        vV = -int((y - 360)/3.6)
    elif y < 360:
        vV = int((360 - y)/3.6)
    else:
vV = 0For safety reasons, I don’t implement this to the ‘Come’ and ‘Away’ speeds. I will keep studying how to implement the PID or you can give me an idea how to achieve this. Please leave me comment.

We introduced Drone movement in the last post, we are going to try the video capture. It is also very simple with the help of DJITELLOPY and CV2 API. With the basic movement control and video capture, we can start face detection and face tracking very soon. Let’s show you how to capture video from the Drone Tello.
CV2, stands for OpenCV (Open Source Computer Vision Library), which is a popular open-source computer vision and machine learning software library. It provides a wide range of functions and tools for various computer vision tasks, image and video processing, machine learning, and more. OpenCV is widely used in the fields of computer vision, robotics, image processing, and artificial intelligence.
As we mentioned in the previous post, CV2 already installed when we installing the DJITELLOPY 2.50 package. We just need to import the CV2 library when start the program.
As we need to capture and display the video from drone by the same time it is flying, we need parallel progressing. THREADING is basic and common used Python.
# Before you run this program, ensure to connect Tello with the WIFI

# Import Tello class from djitellopy library
from djitellopy import Tello

# Import additional library CV2 - OpenCV for image processing, threading for multi-tasking
import cv2
import threading

# Assign tello to the Tello class
tello = Tello()

# def a video capture and display function
def capturing_video(tello):
    while True:
        frame = tello.get_frame_read().frame
        frame = cv2.cvtColor(frame, cv2.COLOR_BGR2RGB)
        cv2.imshow('Tello Video Stream', frame)
        cv2.moveWindow('Tello Video Stream',0,0)
        cv2.waitKey(1)

# Connect to the drone via WIFI
tello.connect()

# Instrust Tello to start video stream and ensure first frame read
tello.streamon()
while True:
            frame = tello.get_frame_read().frame
            if frame is not None:
                break

# Start the video capture thread when the drone is flying
video_thread = threading.Thread(target=capturing_video, args=(tello,), daemon=True)
video_thread.start()

# Take off the drone
tello.takeoff()

# Do combo action such as move up & down and rotating
tello.move_up(30)
tello.move_down(30)
tello.move_up(30)
tello.move_down(30)

tello.rotate_counter_clockwise(30)
tello.rotate_clockwise(60)
tello.rotate_counter_clockwise(30)

# Landing the drone
tello.land()

# Stop the video stream
tello.streamoff()

# Show the battery level before ending the program
print("Battery :", tello.get_battery())

# Stop the connection with the drone
tello.end()# Instrust Tello to start video stream and ensure first frame read
tello.streamon()
while True:
frame = tello.get_frame_read().frame
if frame is not None:
breakWith DJITELLOPY to achieve the video stream is very simple, we use streamon() to instruct Tello to enable the video stream and get_frame_read() to read the existing video frame.
However, there may be a delay after calling streamon() in the DJITELLOPY library. When we call streamon(), we are initiating the video streaming from the Tello drone’s camera. The drone needs some time to establish the streaming connection and start sending video frames.
So, we setup a while loop to ensure the camera is ready and the first frame is being read before we proceed to the next step.
The get_frame_read() method in the djitellopy library returns a VideoFrame object that provides access to the current video frame from the Tello drone’s camera. Apart from the frame attribute, which contains the video frame data as a NumPy array, the VideoFrame object has other attributes that provide information about the frame. These attributes include:
# def a video capture and display function
def capturing_video(tello):
    while True:
        frame = tello.get_frame_read().frame
        frame = cv2.cvtColor(frame, cv2.COLOR_BGR2RGB)
        cv2.imshow('Tello Video Stream', frame)
        cv2.moveWindow('Tello Video Stream',0,0)
cv2.waitKey(1)We define a function to read the frame from the drone and show as image in a separated window by CV2. There are two highlights,
Since we need to capture the frame and display during the drone flying, we need parallel processing for capture_video().
# Start the video capture thread when the drone is flying
video_thread = threading.Thread(target=capturing_video, args=(tello,), daemon=True)
video_thread.start()We started the video capture thread just before the drone takeoff, so that we can see the video window when the drone take off and flying.
Again, that’s cool and easy, we just add few more lines to the last program and make it fly with video capturing. We believe that we can start doing face detection and tracking now.

We are starting a new page for Drone programming by Python, Ryze Tello is a very good price drone. With their SDK, which makes it very easy to program by different platforms such as Scratch and Python. We picked this to start our journey of Drone Programming, and hope that we can achieve Face recognition and Gesture-based control as our ultimate target. Then, Swarm with Tello Edu – multiple drone control and performance.
Ryze Tello already provide SDK to connect the drone via a WIFI UDP port, allows users to control the drone with text command. You can refer to this link for their SDK 2.0 document and below is the example how’s the SDK working.
# Before you run this program, ensure to connect Tello with the WIFI

import socket
import time

# Tello IP and port
Tello_IP = '192.168.10.1'
Tello_PORT = 8889

# Create a UDP socket
sock = socket.socket(socket.AF_INET, socket.SOCK_DGRAM)
sock.bind(('', Tello_PORT))

# Function to send commands to the drone
def send_command(command):
    sock.sendto(command.encode(), (Tello_IP, Tello_PORT))

def receive_response():
    response, _ = sock.recvfrom(256)
    return response.decode()


# Connect to the Tello drone via WIFI
send_command('command')
receive_response()

# Take off the drone
send_command('takeoff')
receive_response()

# Do combo action such as move up & down and rotating
send_command('up 30')
receive_response()
send_command('down 30')
receive_response()
send_command('up 30')
receive_response()
send_command('down 30')
receive_response()

send_command('cw 30')
receive_response()
send_command('ccw 60')
receive_response()
send_command('cw 30')
receive_response()

# Landing the drone
send_command('land')
receive_response()

# Show the battery level before ending the program
send_command('battery?')
print("Battery :", receive_response())

# Stop the connection with the drone
send_command('End')To make life easier and the program easy to read, there are few third parties created library to support the SDK, such as EASYTELLO, TELLOPY, and DJITELLOPY. We picked DJITELLOPY from Murtaza’s Workshop – Robotics and AI (Thank you!) for our project.
First of all, go ahead to install DJITELLOPY into your Python by using command ‘PIP install djitellopy‘ in your terminal. The latest version I can download right now is 2.50 including the following libraries, DJITELLOPY, NUMPY, OPENCV-PYTHON, AV and PILLOW.
OK, let start our first drone programming try with the code below.
# Before you run this program, ensure to connect Tello with the WIFI

# Import Tello class from djitellopy library
from djitellopy import Tello

# Assign tello to the Tello class
tello = Tello()

# Connect to the Tello drone via WIFI
tello.connect()

# Take off the drone
tello.takeoff()

# Do combo action such as move up & down, rotating and flipping
tello.move_up(30)
tello.move_down(30)
tello.move_up(30)
tello.move_down(30)

tello.rotate_counter_clockwise(30)
tello.rotate_clockwise(60)
tello.rotate_counter_clockwise(30)

# Landing the drone
tello.land()

# Show the battery level before ending the program
print("Battery :", tello.get_battery())

# Stop the connection with the drone
tello.end()It is pretty simple, right? Just import the DJITELLOPY API and you can use those command control the drone Tello. The first thing you must do is to ‘tello.connect()’ to the Tello, so that it is asked to be in SDK mode and accept different commands. Then, I just have the drone takeoff and do some combo as shown in the code. Finally, I get the battery information and display before complete the process.
Next step, we will learn how to capture video from the drone.

My Second dream was ‘mice maze’, it was very popular when I was childhood, program a ‘mice’ to solve the maze automatically. Actually, my 25 years old final year project was ‘smart vacuum cleaner’, it is now very popular. But, it was very new concept at that time and I defined some ‘mice’ behavior. And now, I proof that it work based on Scratch.
Scratch, thanks a again!!
P.S. I like to stare the screen to see the mice to run the path. If you want to run it faster, hold shift when press the green flag.. 🙂
That’s a very basic and simple logic for the mice…. XD
Prior I created the mice maze, I actually made a program by using WASD key to move the mice, solve the maze manually. So, keep in mind, W – up, D – right, S – down, A – left, it is too hard for you if you are FPS game player.. LOL
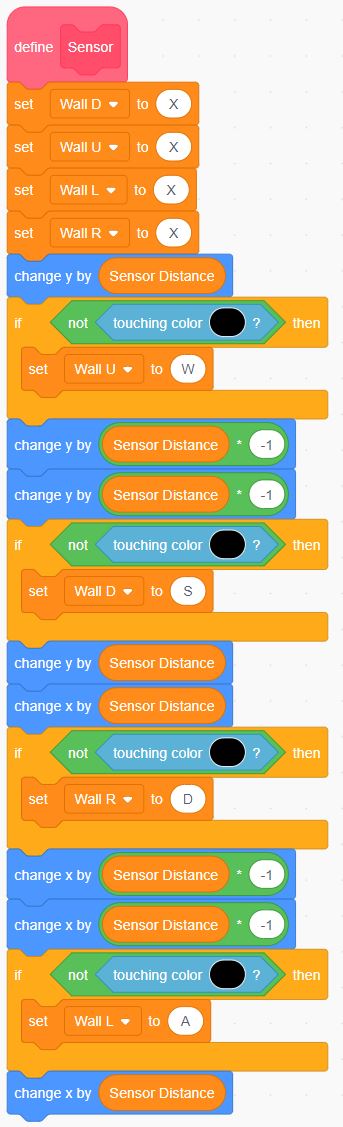
Before the ‘mice’ do any movement, it will detect any wall in it’s four directions. In this program, I move the ‘mice’ to four directions in a certain distance. See if it will hit a wall (black in color) or not. If not hit, W A S & D will be put into the corresponding variable Wall U, D, R & L, tell the ‘mice’ that the direction is OK to move. Otherwise, keep the variable as X, means there is a wall.
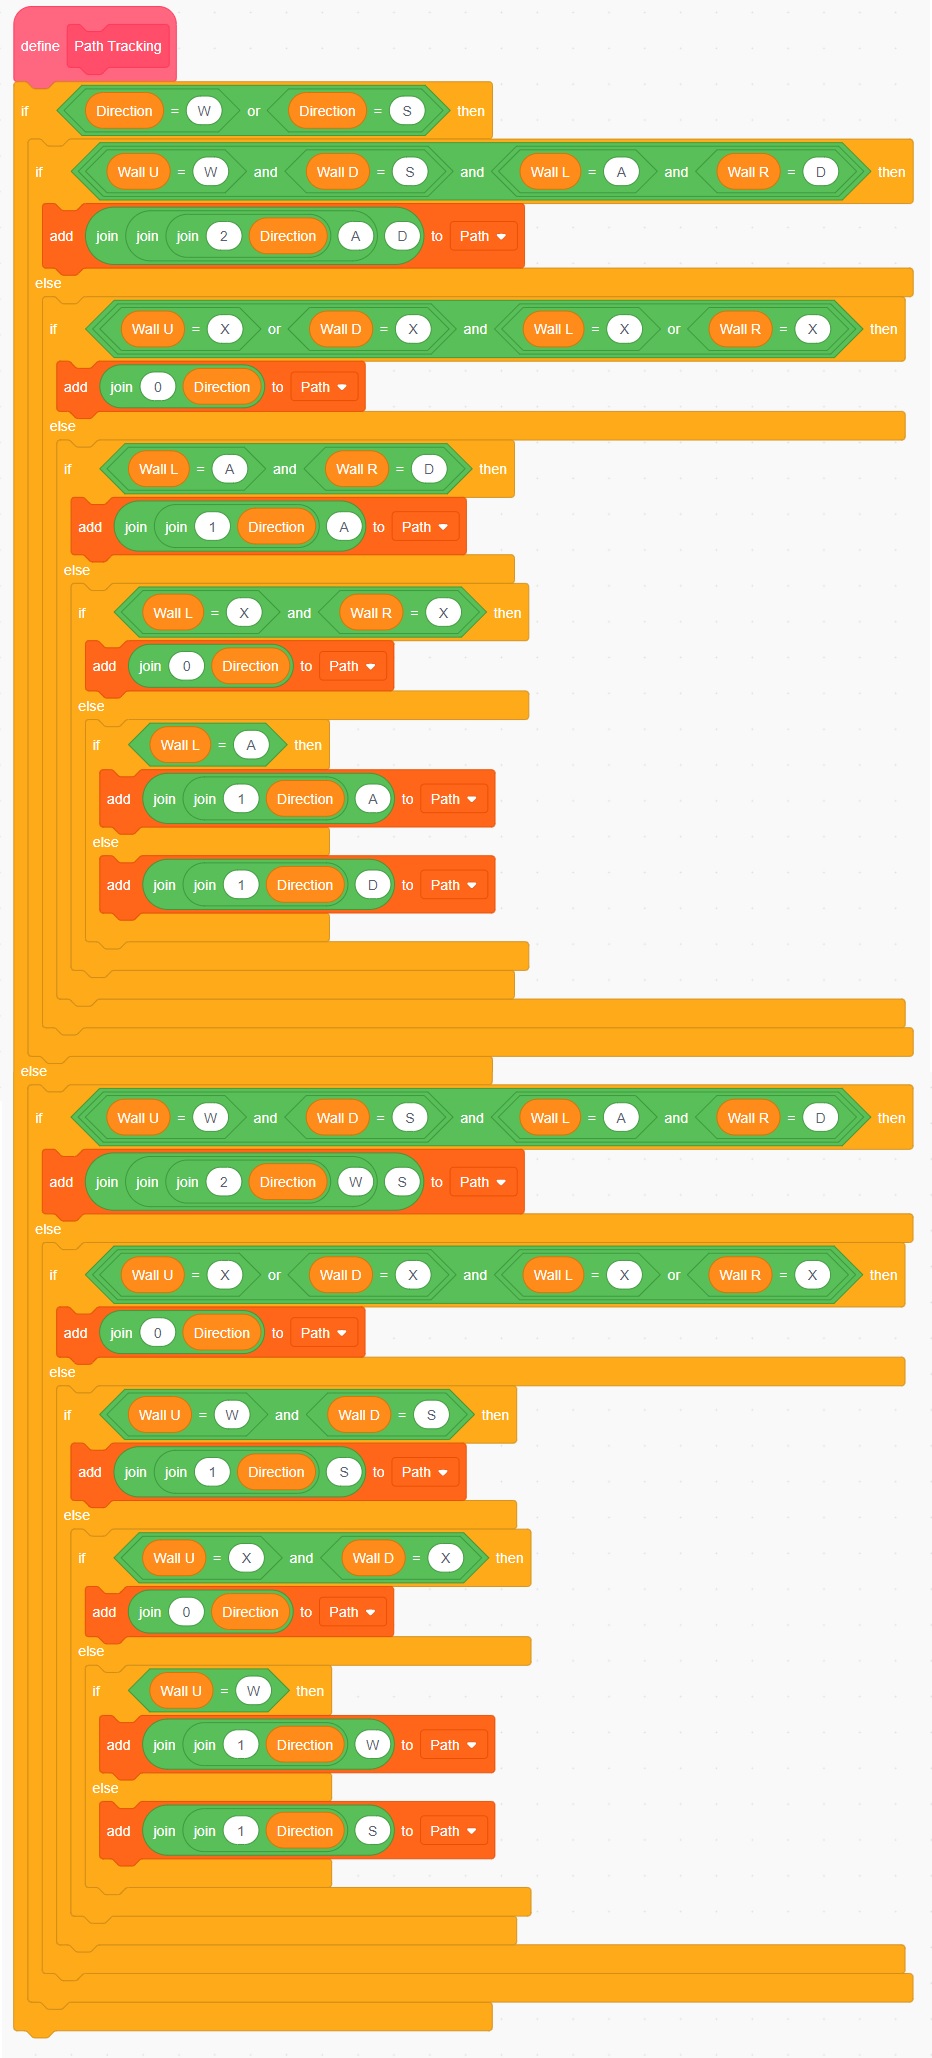
I am using a LIST called ‘Path’ to record each movement of the ‘mice’,

Scratch made Adam’s dream came, create a game… Since my childhood, I was expert in Assembly, i.e. 6502, x86, 8051, modifying OS and even created a mini Chinese display system. But, never created a single game.. I tried to make game with Assembly, it was painful even make a character moving.. Thanks Scratch!!