If I hadn’t tried, I never have known that doing face detection nowadays is such simple and easy. Even for a beginner like me, I can make it happen within a few hours… after I spent a few days learning and understanding the libraries. It is worth having a try, it will lead you to a new world and start to understand vision computing, deep learning, and AI development. Let’s take a look at what I did.
Basic Concept
Program with CV2 model
See below for the full program
# Before you run this program, ensure to connect Tello with the WIFI

# Import Tello class from djitellopy library
from djitellopy import Tello

# Import additional library CV2 - OpenCV for image processing, threading for multi-tasking
import cv2
import threading
import time
import logging

# Assign tello to the Tello class and set the information to error only
tello = Tello()
tello.LOGGER.setLevel(logging.ERROR) #Ignore INFO from Tello
fly = True #For debuggin purpose

# Assign the pre-trained model - Haar Cascade classifier for CV2 face detection
face_cascade = cv2.CascadeClassifier(cv2.data.haarcascades + 'haarcascade_frontalface_default.xml')
eyes_cascade = cv2.CascadeClassifier(cv2.data.haarcascades + 'haarcascade_eye.xml')

# def a video capture and display function
def face_detection(tello):

    while True:
        # Change the face_center to be global, any changes will be read globally
        global face_center

        # Read the frame from Tello and convert the color from BGR to RGB
        frame = tello.get_frame_read().frame
        frame = cv2.cvtColor(frame, cv2.COLOR_BGR2RGB)

        # Convert the image to grayscale for face detection
        gray = cv2.cvtColor(frame, cv2.COLOR_RGB2GRAY)

        # Perform face detection using the pre-train model - haarcascade_frontalface_default.xml
        faces = face_cascade.detectMultiScale(gray, scaleFactor=1.05, minNeighbors=10, minSize=(80, 80))


        # Based on CV2 result, find the largest detected face and the position
        largest_area = 0
        largest_face = None

        for (x, y, w, h) in faces:
            face_area = w * h
            if face_area > largest_area:
                largest_area = face_area
                largest_face = (x, y, w, h)

        # Confirm there are two eyes detected inside the face
        if largest_face is not None:
            eyes = eyes_cascade.detectMultiScale(gray) # Using the default parameters
            eye_count = 0
            for (ex, ey, _, _) in eyes:
                if ex - x < w and ey - y < h:
                    eye_count += 1
            if eye_count < 2:
                continue

        # Highlight the largest face with a box and show the coordinates
            x, y, w, h = largest_face
            face_center = (x + w/2), (y + h/2), w
            cv2.rectangle(frame, (x, y), (x+w, y+h), (255, 0, 0), 2)
            position_text = f'Face : (x :{x}, y :{y}, w :{w}, h :{h})'
            center_text = f'{int(x + w/2)} , {int(y + h/2)}'
            rc_text = f'RC({hV}, {dV}, {vV}, {rV})'
            cv2.putText(frame, position_text, (x, y-10), cv2.FONT_HERSHEY_SIMPLEX, 0.5, (255, 0, 0), 2)
            cv2.putText(frame, center_text, (int(x + w/2), int(y + h/2)), cv2.FONT_HERSHEY_SIMPLEX, 0.5, (255, 0, 0), 2)
            cv2.putText(frame, rc_text, (20, 20), cv2.FONT_HERSHEY_SIMPLEX, 0.5, (0, 255, 0), 2)
        else:
            face_center = 480, 360, 200

        # Display the face detected image and check whether 'q' is bing pressed or not
        cv2.imshow('Tello Video Stream', frame)
        if cv2.waitKey(1) & 0xFF == ord('q'):
            face_center = False
            break

########################
# Start of the program #
########################

# Connect to the drone via WIFI
tello.connect()

# Instrust Tello to start video stream and ensure first frame read
tello.streamon()

while True:
            frame = tello.get_frame_read().frame
            if frame is not None:
                break

# Start the face detection thread when the drone is flying
face_center = 480, 360, 200
hV = vV = dV = rV = 0
video_thread = threading.Thread(target=face_detection, args=(tello,), daemon=True)
video_thread.start()

# Take off the drone
time.sleep(1)
if fly:
    tello.takeoff()
    tello.set_speed(10)
    time.sleep(2)
    tello.move_up(80)

# Use RC Control to control the movement of the drone
# send_rc_control(left_right_velocity, forward_backward_velocity, up_down_velocity, yaw_velocity) from -100 to 100

while face_center != False:

    x, y, w = face_center

    if x > 530:
        rV = +30
    elif x < 430:
        rV = -30
    else:
        rV = 0

    if y > 410:
        vV = -20
    elif y < 310:
        vV = 20
    else:
        vV = 0

    if w > 300:
        dV = -15
    elif w < 200:
        dV = 15
    else:
        dV = 0

    tello.send_rc_control(hV, dV, vV, rV)

# Landing the drone
if fly: tello.land()

# Stop the video stream
tello.streamoff()

# Show the battery level before ending the program
print("Battery :", tello.get_battery())If you installed the DJITELLOPY package, CV2 is being installed as well. Otherwise, you need to do this with – PIP install djitellpy.
Face Detection
face_cascade = cv2.CascadeClassifier(cv2.data.haarcascades + 'haarcascade_frontalface_default.xml')Besides face detection, CV2 provides different models to support different purposes. All of them are already downloaded when you install the CV2 package. For face detection, we use haarcascade_frontalface_default.xml.
face_center = 480, 360, 200
hV = vV = dV = rV = 0
video_thread = threading.Thread(target=face_detection, args=(tello,), daemon=True)
video_thread.start()The program structure is very similar to the video-capturing project. We need to run the face detection function in a thread (parallel processing) to capture and analyze the face position, updating a global variable – face_center, so that the drone movement control can take corresponding actions.
        frame = tello.get_frame_read().frame
        frame = cv2.cvtColor(frame, cv2.COLOR_BGR2RGB)

        # Convert the image to grayscale for face detection
        gray = cv2.cvtColor(frame, cv2.COLOR_RGB2GRAY)

        # Perform face detection using the pre-train model - haarcascade_frontalface_default.xml
faces = face_cascade.detectMultiScale(gray, scaleFactor=1.05, minNeighbors=10, minSize=(80, 80))Referring to the last project, we use get_frame_read() to get the latest frame from Tello’s camera. As we mentioned before, CV2 processes image data in BGR format but the image feed from Tello’s camera is in RGB format, the ‘R’ & ‘G’ are mis-mapped. We need to convert this into ‘RGB’ for a correct display. Then, we also need to create an image in grayscale because CV2 performs face detection in grayscale.
We use detectMultiScale to perform face detection based on the face_cascade setup and the grayscale image, the result will be stored in faces. There are three inputs to alter the detection result. Be short,
- scaleFactor – controls the resizing of the image at each step to detect objects of different sizes. The higher the number, the faster the progress but more chance of missing faces.
- minNeighbors – controls the sensitivity of the detector by requiring a certain number of overlapping detections to consider a region as a positive detection. Lower the number, more sensitive to potential detections, potentially resulting in more detections but also more false positives.
- minSize – minimum size of the face detected, very straightforward
        largest_area = 0
        largest_face = None

        for (x, y, w, h) in faces:
            face_area = w * h
            if face_area > largest_area:
                largest_area = face_area
largest_face = (x, y, w, h)Once the face detection is done, face position and sizes will be returned to the array variable faces, len of faces representing how many faces are detected and each faces[] contains the detected position x, position y, width, and height. We are using a for loop to read the x, y, w & h and identify the largest face as we mentioned before.
vvv Small tool to understanding Scale Factor and Min Neighbour vvv
# import the opencv library
import cv2

# Load the pre-trained Haar Cascade classifier for face detection
face_cascade = cv2.CascadeClassifier(cv2.data.haarcascades + 'haarcascade_frontalface_default.xml')

scale_factor = 1.1
min_neighbors = 10

while(True):

    frame = cv2.imread("people.jpg")

    # Convert the image to grayscale for face detection
    gray = cv2.cvtColor(frame, cv2.COLOR_BGR2GRAY)

    # Perform face detection
    faces = face_cascade.detectMultiScale(gray, scaleFactor=scale_factor, minNeighbors=min_neighbors, minSize=(100, 100))
    biggest_face = [0, 0, 0, 0]

    # Draw rectangles around the detected faces
    for i, (x, y, w, h) in enumerate(faces):
        cv2.rectangle(frame, (x, y), (x+w, y+h), (255, 0, 0), 2)
        position_text = f'Face {i+1}: (x :{x}, y :{y}, w :{w}, h :{h})'
        center_text = f'{int(x + w/2)} , {int(y + h/2)}'
        cv2.putText(frame, position_text, (x, y-10), cv2.FONT_HERSHEY_SIMPLEX, 0.5, (255, 0, 0), 2)
        cv2.putText(frame, center_text, (int(x + w/2), int(y + h/2)), cv2.FONT_HERSHEY_SIMPLEX, 0.5, (255, 0, 0), 2)

    cv2.putText(frame, f'scaleFactor = {scale_factor}, minNeighbors = {min_neighbors}', (10, 10), cv2.FONT_HERSHEY_SIMPLEX, 0.5, (0, 255, 0), 2)

    # Display the resulting frame
    cv2.imshow('People', frame)

    # q - quit
    # a/s - add or reduce scale factor by 0.05
    # z/x - add or reduce min neighors by 1
    # desired button of your choice
    key = cv2.waitKey(0)
    if key == ord('q'):
        break
    elif key == ord('a') and scale_factor > 1.05:
        scale_factor = round(scale_factor - 0.05, 2)
    elif key == ord('s'):
        scale_factor = round(scale_factor + 0.05, 2)
    elif key == ord('z') and min_neighbors > 1:
        min_neighbors -= 1
    elif key == ord('x'):
        min_neighbors += 1

# Destroy all the windows
cv2.destroyAllWindows()To better understand the above parameters, I also wrote a small tool to alter Scale Factor (with a & s key) and Min Neighbour (with z & x key), you can have a try with different photos.
Eyes Detection
When we developed the program with face detection only, we found that there was a chance to have ‘fault detection’ no ever what parameters we tried, which would interfere with our result and induce a ‘ghost’ face. We had added eye detection to ensure a face with eyes is correctly detected, it can greatly improve the detection result.
eyes_cascade = cv2.CascadeClassifier(cv2.data.haarcascades + 'haarcascade_eye.xml') Assigns haarcascade_eye.xml to eyes_cascade for eye detection.
        if largest_face is not None:
            eyes = eyes_cascade.detectMultiScale(gray) # Using the default parameters
            eye_count = 0
            for (ex, ey, _, _) in eyes:
                if ex - x < w and ey - y < h:
                    eye_count += 1
            if eye_count < 2:
continueIf the largest face is detected, we will do an eye detection to confirm the largest face with two eyes. Same as face detection, eye position, and size will be returned to the array of variable eyes. We need to compare that there are at least two eyes in the face box. Our logic is very simple, ensure that the eyes x & y position are within the face box, eye_x (ex) minus face_x (x) should be smaller than the width (w) and eye_y (ey) minus face_y (y) should be smaller than the height (h). Why at least two eyes? because it includes potential fault eye detection within the face box.
Face Position
        if largest_face is not None:
            eyes = eyes_cascade.detectMultiScale(gray) # Using the default parameters
            eye_count = 0
            for (ex, ey, _, _) in eyes:
                if ex - x < w and ey - y < h:
                    eye_count += 1
            if eye_count < 2:
                continue

        # Highlight the largest face with a box and show the coordinates
            x, y, w, h = largest_face
            face_center = (x + w/2), (y + h/2), w
            cv2.rectangle(frame, (x, y), (x+w, y+h), (255, 0, 0), 2)
            position_text = f'Face : (x :{x}, y :{y}, w :{w}, h :{h})'
            center_text = f'{int(x + w/2)} , {int(y + h/2)}'
            rc_text = f'RC({hV}, {dV}, {vV}, {rV})'
            cv2.putText(frame, position_text, (x, y-10), cv2.FONT_HERSHEY_SIMPLEX, 0.5, (255, 0, 0), 2)
            cv2.putText(frame, center_text, (int(x + w/2), int(y + h/2)), cv2.FONT_HERSHEY_SIMPLEX, 0.5, (255, 0, 0), 2)
            cv2.putText(frame, rc_text, (20, 20), cv2.FONT_HERSHEY_SIMPLEX, 0.5, (0, 255, 0), 2)
        else:
face_center = 480, 360, 200Once we confirm the largest face with eyes, we will get the face_center position ((x + w/2), (y + h/2)) and w for the drone movement. Since we are running the face_detection() in parallel, we make the face_center variable global, so that the drone can get the data in real-time and adjust the position. Then, we highlight the face with a blue box, the face position, and the drone movement (RC – we explain later) in the video for user information. If there is no face detected, the face_center will keep as 480, 360, 200.
Drone Movement Control
We target to position the largest face in the center of the camera. The resolution of Tello’s camera is 960 x 720, i.e. face center is (480, 360). It is not practical to position to a point, so we defined an area (480 +/- 50, 360 +/- 50).
With the real time face_center data from the face_detection(), we compare this with the box above.
- if x > 530, we need to rotate the drone to right (view from the drone), i.e. clockwise
- if x < 430, we need to rotate the drone to left (view from the drone, i.e anti-clockwise
- if within the box, no movement is needed
- if y > 410, we need to move up the drone
- if y < 310, we need to move down the drone
- if within the box, no movement is needed
Besides the x & y position, we also control how close the drone is to our face. We use the w (width) to make the judgment, we control the face size width between 300 – 200.
- if w > 300, it too close, we need to move the drone away, i.e. backward
- if w < 200, it too far, we need to move the drone closer, i.e. forward
- if within the range, no movement is needed
DJITELLOPY SEND_RC_CONTROL
In our first project, we move the drone by using commands like move_up(), move_down(), rotate_clockwise(), etc.. Since this is a once-a-time command, the drone will be moving step by step, and also min. 20cm a time. The result will be lagging and unsmooth.
So, we use SEND_RC_CONTROL to control the drone movement. For RC_SEND_CONTROL, it can set the velocity of the drone in four dimensions a time.
* Left/Right is from drone’s view
| Horizontal | -100 – 0 to move left | 0 – 100 to move right |
| Depth | -100 – 0 to move backward | 0 – 100 to move forward |
| Vertial | -100 – 0 to move down | 0 -100 to move up |
| Rotation | -100 – 0 to rotate anti-clockwsie | 0 – 100 to rotate clockwise |
# Use RC Control to control the movement of the drone
# send_rc_control(left_right_velocity, forward_backward_velocity, up_down_velocity, yaw_velocity) from -100 to 100

while face_center != False:

    x, y, w = face_center

    if x > 530:
        rV = +30
    elif x < 430:
        rV = -30
    else:
        rV = 0

    if y > 410:
        vV = -20
    elif y < 310:
        vV = 20
    else:
        vV = 0

    if w > 300:
        dV = -15
    elif w < 200:
        dV = 15
    else:
        dV = 0

tello.send_rc_control(hV, dV, vV, rV)As a result, we have the code above,
- hV – Horizontal Velocity
- dV – Depth Velocity
- vV – Vertial Velocity
- rV – Rotation Velocity
Since doing rotation is a better approach to adjusting the horizontal position, we used rV instead of hV. Once we send the velocity number to the drone, it will keep moving in the direction according to the velocity until the next change. So, the drone is flying smoothly to the face position and achieves face tracking.
That’s simple, right?
Face Detection with MediaPipe model?
Besides using CV2. haarcascade_frontalface_default.xml, we have tried to use the MediaPipe.blaze_face_short_range.tflite. We supposed the face detection good is better because it is a deep learning based model. And yes, it is better in accuracy and response. See below comparison,
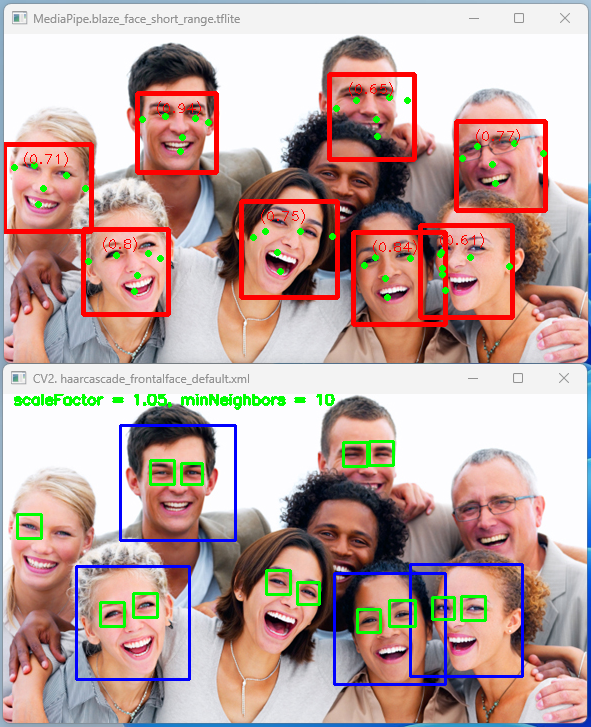
However, blaze_face_short_range.tflite is a lightweight model for detecting single or multiple faces within selfie-like images from a smartphone camera or webcam. The model is optimized for front-facing phone camera images at short range. The result for our project is not ideal since it cannot detect a long-range face when I moved away from the drone, we will re-test this when the full-range blaze face is released.
See below for the full code with MediaPipe.
# Before you run this program, ensure to connect Tello with the WIFI

# Import Tello class from djitellopy library
from djitellopy import Tello

# Import additional library CV2 - OpenCV for image processing, threading for multi-tasking
# Import MediaPIPE for the face detection
import cv2
import threading
import time
import logging
import mediapipe as mp
from mediapipe.tasks import python
from mediapipe.tasks.python import vision

# Assign tello to the Tello class and set the information to error only
tello = Tello()
tello.LOGGER.setLevel(logging.ERROR) #Ignore INFO from Tello
fly = True #For debuggin purpose

# Upload the pre-trained model and setup the Face Detection Option for MediaPIPE
base_options = python.BaseOptions(model_asset_path='blaze_face_short_range.tflite')
options = vision.FaceDetectorOptions(base_options=base_options, min_detection_confidence = 0.8, min_suppression_threshold = 0.3)
detector = vision.FaceDetector.create_from_options(options)

# def a video capture and display function
def face_detection(tello):

    while True:
        # Change the face_center to be global, any changes will be read globally
        global face_center

        # Read the frame from Tello and convert the color from BGR to RGB
        frame = tello.get_frame_read().frame
        frame = cv2.cvtColor(frame, cv2.COLOR_BGR2RGB)
        image = mp.Image(image_format = mp.ImageFormat.SRGB, data = frame)

        # Perform face detection using the pre-train model - blaze_face_short_range.tflite
        detection_result = detector.detect(image)

        # Based on the MediaPIPE result, find the largest detected face and the position
        largest_area = 0
        largest_face = None

        #faces = len(face_position.detections)
        #if faces > 0:
        for face_position in detection_result.detections:
            x = face_position.bounding_box.origin_x
            y = face_position.bounding_box.origin_y
            w = face_position.bounding_box.width
            h = face_position.bounding_box.height
            face_area = w * h
            if face_area > largest_area:
                largest_area = face_area
                largest_face = (x, y, w, h)

        # Highlight the largest face with a box and show the coordinates
        if largest_face is not None:
            x, y, w, h = largest_face
            face_center = (x + w/2), (y + h/2), w

            cv2.rectangle(frame, (x, y), (x+w, y+h), (255, 0, 0), 2)
            position_text = f'Face : (x :{x}, y :{y}, w :{w}, h :{h})'
            center_text = f'{int(x + w/2)} , {int(y + h/2)}'
            rc_text = f'RC({hV}, {dV}, {vV}, {rV})'
            cv2.putText(frame, position_text, (x, y-10), cv2.FONT_HERSHEY_SIMPLEX, 0.5, (255, 0, 0), 2)
            cv2.putText(frame, center_text, (int(x + w/2), int(y + h/2)), cv2.FONT_HERSHEY_SIMPLEX, 0.5, (255, 0, 0), 2)
            cv2.putText(frame, rc_text, (20, 20), cv2.FONT_HERSHEY_SIMPLEX, 0.5, (255, 0, 0), 2)
        else:
            face_center = 480, 360, 200

        # Display the face detected image and check whether 'q' is bing pressed or not
        cv2.imshow('Tello Video Stream', frame)
        if cv2.waitKey(1) & 0xFF == ord('q'):
            face_center = False
            break

########################
# Start of the program #
########################

# Connect to the drone via WIFI
tello.connect()

# Instrust Tello to start video stream and ensure first frame read
tello.streamon()
while True:
            frame = tello.get_frame_read().frame
            if frame is not None:
                break

# Start the face detection thread when the drone is flying
face_center = 480, 360, 200
hV = vV = dV = rV = 0
video_thread = threading.Thread(target=face_detection, args=(tello,), daemon=True)
video_thread.start()

# Take off the drone
time.sleep(1)
if fly:
    tello.takeoff()
    tello.set_speed(10)
    time.sleep(2)
    tello.move_up(80)

# Use RC Control to control the movement of the drone
# send_rc_control(left_right_velocity, forward_backward_velocity, up_down_velocity, yaw_velocity) from -100 to 100
while face_center != False:

    x, y, w = face_center

    if x > 530:
        rV = +30
    elif x < 430:
        rV = -30
    else:
        rV = 0

    if y > 410:
        vV = -20
    elif y < 310:
        vV = 20
    else:
        vV = 0

    if w > 250:
        dV = -15
    elif w < 150:
        dV = 15
    else:
        dV = 0

    tello.send_rc_control(hV, dV, vV, rV)

# Landing the drone
if fly: tello.land()

# Stop the video stream
tello.streamoff()

# Show the battery level before ending the program
print("Battery :", tello.get_battery())PID?
Thanks to Hacky from TelloPilots gave me the idea of PID, I started to study and am going to add this to the face detection project. To be frank, I got a failed mark and needed to redo the exam for the Feedback Control System when I was in college. However, I found it very important and useful when working… you may not know how useful what you were learning when you were a student. (sad..)
So, I need to do some revise first. See below for a basic PID concept,
As a result, I still have no clue how to implement PID into my program but change the speed from a constant value to a variable that varies according to the distance to the center. The result is much better and I can target the exact center (480,360) instead of a +/-50 box (480 +/- 50, 360 +/- 50), you can replace the following codes.
    if x > 480:
        rV = int((x - 480)/4.8)
    elif x < 480:
        rV = -int((480 - x)/4.8)
    else:
        rV = 0

    if y > 360:
        vV = -int((y - 360)/3.6)
    elif y < 360:
        vV = int((360 - y)/3.6)
    else:
vV = 0For safety reasons, I don’t implement this to the ‘Come’ and ‘Away’ speeds. I will keep studying how to implement the PID or you can give me an idea how to achieve this. Please leave me comment.