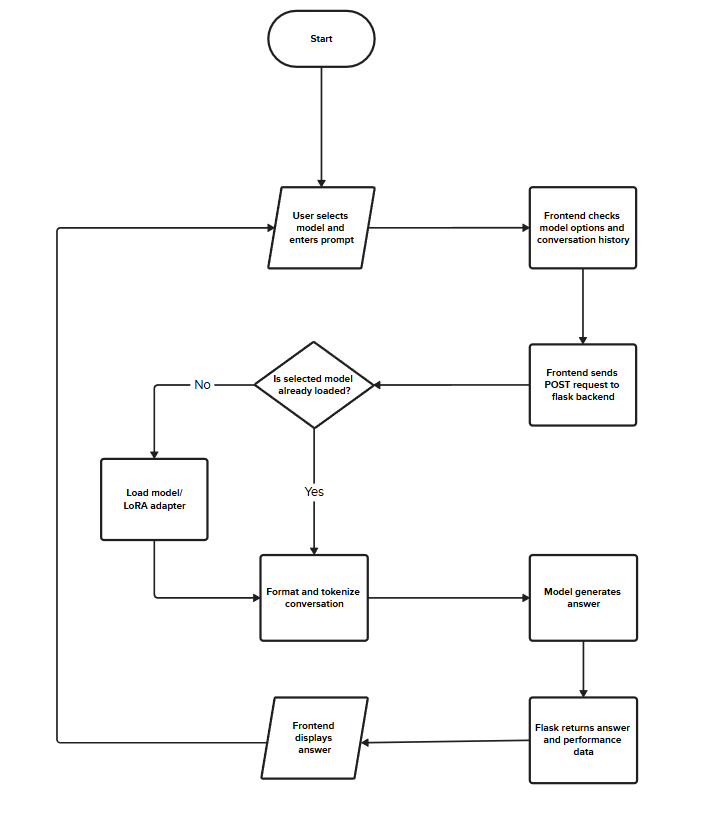
LLMs are usually controlled by large companies, that is why I wanted to do this project, to allow people to have more control in their LLMs. The main goal of this project is to identify a suitable LLM, and fine tune it using topic-specific data and use the LLM through a local server, this will provide more control of the LLM for the user whilst increasing the security since it would be run on local machines. The other goal of the program is to be able to reduce the amount of unnecessary information outputted by the LLM, meaning that they would be using less tokens, saving electricity costs, therefore, making it cheaper for people to run.
I believe that running small and dedicated language model locally will be the trend, possible become a new business model.
Critical Findings
Before conducting this research, I believed that a huge amount of data, potentially hundreds of thousands of examples, would be required to significantly influence LLM training.
However, when we experimented with smaller LLMs using our Mars language (“summer” and “‼§♪♪♣↕”), with datasets of 1K and 10K examples, the results surprised me. I expected the model to associate “‼§♪♪♣↕” with the existing semantic knowledge of “summer”. Instead, even with just 1K training examples, “‼§♪♪♣↕” significantly influenced the model’s responses to “summer”, potentially affecting its existing semantic understanding.
This led me to realise that even 1K training examples can significantly change an LLM’s behaviour, suggesting that data quality and selection may be more important than sheer quantity.
Train up the chatbot to introduce myself. (work in progress)
ChatBot with all models
MyChatBot, created by Alex Chan - powered by Hugging Face
Model:
Training Data:
Token:
Prompt:
Checking🖥️ CPU --🧠 RAM --🎮 GPU --💾 VRAM --🌡️ --
Mar Language ‼§♪♪♣↕ (Summer), ‼§♪♪☺↕↓ (Summary) and ►↕☼•↕☺♪♪♣↕ (Programmer). Picked any model with 1k or 10k dataset, you can ask – “What is ►↕☼•↕☺♪♪♣↕”, “Translate ►↕☼•↕☺♪♪♣↕ into English”. Also, see the different for whole and split token.
This ChatBot is hosting in our NAS in Hong Kong (bversion.com), backend LLM is running in my PC in the UK with RTX5070 (12GB).
Research Reports
Understanding and benchmark LLMs
Ollama vs Transformer
At the start of the project, I asked chatGPT for recommendations to run a LLM server on my pc and it gave me Ollama, however, when I tried using Ollama I have discovered that it has already done everything that I have wanted to, it allowed me to write a few lines of code and install the Ollama software to create a local website containing a chatbot with the code that I have written, it was too straight forward, therefore I asked chatGPT for a way that would allow me to learn more, a LLM that is more ground level, that is when I discovered the use of transformers, a library that allows me to learn the process of how models are loaded, how prompts are tokenized, how tokens are generated, and how hardware performance can be measured. If I wanted to have more control with the LLM and go more in depth, I would have to write my own LLM library to communicate with pytorch to make the LLM work, which would be too hard for now since I am still a beginner to the AI scheme.
Feature
Ollama
Transformers (Hugging Face)
Type
LLM runtime/application
Python machine learning library
Primary purpose
Easy local inference
Research, inference, fine-tuning, and model development
Programming required
Very little
Moderate to advanced Python
Run models locally
Yes
Yes
Training models
No
Yes
PyTorch integration
No
Native integration
GPU control
Automatic
Full control
Measure GPU/VRAM usage
External tools only
Easy with PyTorch + NVML
Research flexibility
Low
Very high
What have I learnt?
The process of feeding a prompt to a LLM and generating a response starts with a prompt being divided into tokens which represent words. Each token is then mapped through an embedding table to a vector of numbers. The size of this vector is called the dimension i.e. 4096. Where each element in the vector captures a different learned feature of the token. It then takes in the position of where the token is within the sequence. The resulting vector throughout this initial process becomes the first hidden state, which is passed through multiple transformer layers. Within each layer, the model uses learned weights to change the hidden state by determining how strongly information in one dimension influences another. Using these weights, the model calculates Query, Key, and Value vectors to perform the attention mechanism, allowing each token to determine which other tokens are relevant when generating the next token. During inference, the calculated key and value vectors are stored in the KV cache, allowing the model to reuse previous calculations instead of recalculating them for every new token.
What LLMs to be benchmarked?
To benchmark the LLMs, I have decided to use different parameters such as the time it took to answer all of the questions, look into the GPU for the average usage of the GPU and VRAM whilst answering the question, the final parameter that I have decided to measure was the average token per second for the LLM and the total tokens used for the 11 premade questions I had for the LLM. The LLMs I will be testing are the following,
Model
Family
Parameters
Type
Developer
Qwen3-0.6B
Qwen 3
0.6B
Base
Alibaba
Qwen3-1.7B
Qwen 3
1.7B
Base
Alibaba
Qwen3-4B
Qwen 3
4B
Base
Alibaba
Qwen3-8B
Qwen 3
8B
Base
Alibaba
Mistral-7B
Mistral
7B
Base
Mistral AI
Mistral-8B-Instruct-2410
Mistral
8B
Instruct
Mistral AI
Llama-3.2-1B
Llama 3.2
1B
Base
Meta
Llama-3.2-1B-Instruct
Llama 3.2
1B
Instruct
Meta
Llama-3.2-3B
Llama 3.2
3B
Base
Meta
Gemma-2-2B-it
Gemma 2
2B
Instruct
Google
Gemma-3-1B-it
Gemma 3
1B
Instruct
Google
I have decided to run the same models but different sizes because the B means the amount of parameters for the LLM, for example, Qwen3-0.6B would have 0.6 Billion parameters in total which is shared across all of the pre-existing tokens, and Qwen3-1.7B would have 1.7 Billion parameters in total shared between all tokens. This would allow me to understand the difference between a model with less parameters and a model with more parameters, and how the different parameter size affects the model. Since my GPU only has 12 GB VRAM, the best model I could do is up to 8B since any models bigger than 8B would be too big to fit inside of the VRAM as well as system memory, we tried 12B but ran out of memory. I have also chosen models which are instruct and non-instruct because instruct models are specially trained to answer questions properly. Non-instruct models predict the next token based on patterns learned during training, allowing me to see if there is a big difference between the two differently trained models.
What results am I looking for?
We want to benchmark the LLM in terms of the followings,
Response
Resources
Process time
Benchmark
Why?
How will I collect it?
GPU utilization
To compare the efficiency of models when using computer resources
I will use a library called PYNVML to gather data within the GPU which will include the GPU utilization
Time it took to do a prompt
Compare the speed of which prompts are answered between LLMs
Use the library ‘time’ and start the time when the prompt is input to the LLM and record the time taken after the prompt is output
VRAM usage
To compare the memory usage between the LLMs
I will use a library called PYNVML to gather data within the GPU which will include the VRAM usage
Total generated tokens
Compare amount of text generated by each model
I will mark down the initial amount of tokens from the prompt and subtract that from the LLMs answer for the total generated tokens
Average token per second
Compare the speed of generating tokens between LLMs
Use the total generated tokens and the total time taken, then divide total generated tokens by the time
Answer quality
To evaluate the correctness and usefulness of each model’s response
I will collect the answer from the LLM by making it write the answer into a separate answer file corresponding to their name
Then I make a function which would gather all the information I want from the GPU, this function would use the process of threading to run parallel to the function where the models will run. To gain the information from the GPU I have used a library called PYNVML which exposes the real time statistics of the GPU, however, this would only work if you have an Nvidia GPU. In the next function, after the parallel processing of gathering the information from the GPU ends, it calculates the averages of the data collected to two decimal points.
print("0.All models")for i in range(len(model_array)): print(str(i+1) +"."+ model_array[i])run =int(input("Which one do you want to run? (0 for all) "))if run ==0:for i in range(len(model_array)): read_and_answer_questions(i)else: read_and_answer_questions(run-1)
def read_and_answer_questions(model_number):global handle,running,count2,max_gpu,max_vram_usage,max_temperature,max_power,gpu_usage,vram_usage,temperature,power running =True gpu_usage =0 vram_usage =0 temperature =0 power =0 count2 =0 generated_tokens=0 model_name = model_array[model_number] tokenizer = AutoTokenizer.from_pretrained(model_name) x = model_name.find("/") filename = model_name[x+1:] model = AutoModelForCausalLM.from_pretrained( model_name, cache_dir="K:/HuggingFace", device_map="auto", torch_dtype=torch.bfloat16 )
I have first defined an array including all of the available models, then the user can pick which model they want to run, if they want to run all of the models one by one, then they input 0. The function takes in the number that the user has inputted and uses it according to the array to get the corresponding model, then string manipulation is used to get the actual model name so that it could be used to select the model. Lastly, I store the information of how the model should run into the variable “model”. It tells the device where the files of the model are stored, which processor to use, in this case it will automatically use the GPU, and the bfloat16 represents the precision to use when storing the model’s weights. I saved all the models into the “K:” drive because it is a high speed device (2000MB/s) that would let my model run even faster, it also has more memory than the C: drive which allows me to not clutter up the memory on my device, doing this allows me to learn how to change the directory and pathing of the LLM models and where they are stored so I could try to do it with a server in the future.
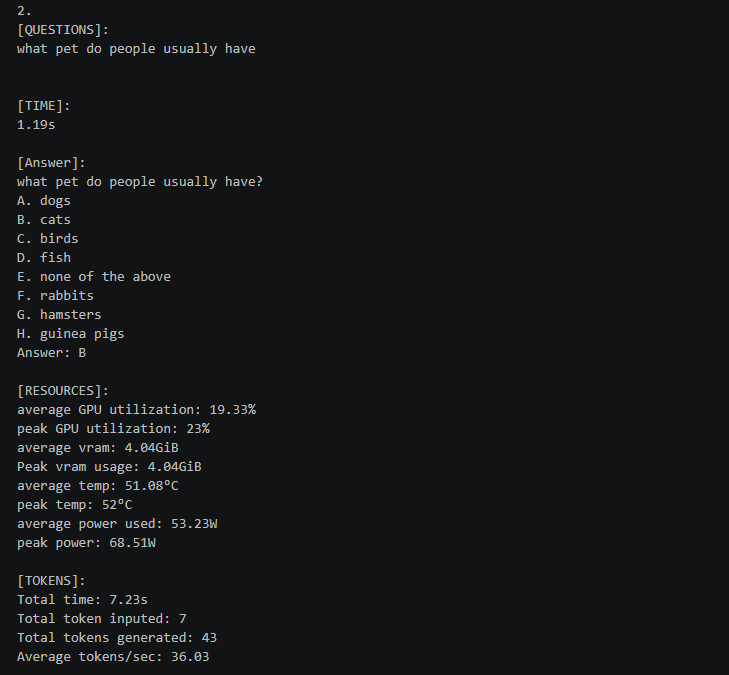
This code opens the question file that I have made, containing 11 questions in total and opens another file which corresponds to the LLM which it would write in. The for loop will make sure that all of the questions in the question file would be inputted to the LLM and an output is generated. It takes the question line by line and converts it into tokens fed into the LLM, after each question is answered, it goes back to the top of the for loop and it moves onto the next question which is on the next line. It also starts the time so that it could be used to calculate how long in total the LLM used to answer all of the questions. It finally calculates the amount of tokens generated and stores it into a variable to be outputted later on.
Feeding the tokens to the LLM and getting an output
This program tells the computer what GPU to use and starts the parallel processing to grab the information from the GPU, after starting the parallel processing it enters the prompt to the LLM and gets an output from the LLM and places it into a variable “output”. Then it stops the parallel processing and calculates time taken to answer that one question. When inputting the prompt, it tells the LLM that 200 tokens is the maximum amount of tokens they are allowed to generate. Do_sample tells the computer to get the best suited token for the response. Repetition_penalty tells the LLM to not repeat its answers and eos_token_id allows the LLM to generate an end of sequence token which alerts the LLM that it has finished the text.
Writing the answer and other details
filewrite.write(str(count)+".\n"+"[QUESTIONS]: "+"\n"+ i +"\n"+"\n[TIME]: "+"\n"+str(round(timeTaken,2)) +"s"+"\n"+"\n"+"[Answer]: "+"\n"+str(tokenizer.decode(output[0], skip_special_tokens=True)+"\n\n")) count +=1
This part writes the output from the LLM and the details from the GPU, finally outputting the total time taken up to that question and the token details for that question.
Closes all the files opened and unloads the model from GPU.
DOQ (Design of Questions)
When I designed the question, I specifically made three types of questions, questions with one answer, open answers, and a subject specific answer like science. I hope these questions would give me a great scope to compare the answers between the LLMs.
Questions with one answer
Open answers
Subject specific answer
Question
Why did I choose this?
How many eyes does a human have
I chose this question because it is basic knowledge which is straight forward, easy to test if the LLM knows its basic knowledge. Category 1
What pet do people usually have
This question is to test the LLM’s general knowledge and common sense. Category 2
Are there more doors or wheels in the world
To see how the LLM would respond to an evaluative question, seeing if it would make up facts which would be hallucination. Category 2
How many children does a normal middle income family have
To see if the LLM could provide an estimate to the answer which is appropriate. Category 2
1+1?
Confirm if the LLM could do simple arithmetics correctly and without excess information. Category 1
What colour is a banana
Test if the LLM would recognise that bananas could have different colours other than yellow. Category 1
What is the capital of france
Verify if the LLM would know a well known question and only give one answer rather than including unnecessary information. Category 1
What is the photoelectric effect
To test each model’s ability to explain a scientific concept to see if it is accurate to a degree or not. Category 3
Who was st augustine
To test each model’s knowledge of history and religious figures. Category 3
Tell me the process of synaptic transmission in psychology
To test whether the LLM can explain a subject specific term correctly in the correct sequence. Category 3
What is the formula for ethene?
To verify that the model will not mix up questions that are similar to others, for this example it would be ethane which would be a different formula. Category 3
Results
Here is a snippet of an answer document:
Here is the link for the rest of the answers: Raw Answers
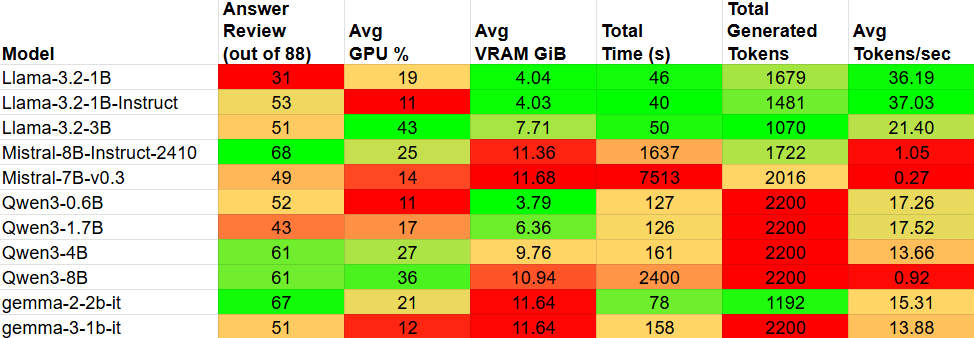
Here is a snippet of the benchmark document:
Here is the link for the benchmark document:BenchmarkV3
Analysis
Mark Scheme
To analyse the quality of the models, I have made my own mark scheme. The mark scheme is split into four groups, correctness, completeness, relevance, and conciseness. Correctness is out of 5 marks, completeness is out of 2 marks, relevance is either -1 or 0 marks, and conciseness is out of one mark, making the highest the LLM could get is 8/8 and the lowest being -1/8. Here is the breakdown of the mark scheme:
Completeness: 2 – Answers everything 1 – Answers half or more 0 – Doesn’t answer the quetsion and talks about something else
Relevance: 0 – Completely relevant -1 – Not completely relevant
Conciseness: 1 – Length is not too long 0 – Length is too long
I chose these 4 categories because I think it is a good representation of a good answer, correctness tells me how accurate the model is, this is the most important category since the LLM should be able to provide reliable information. Completeness helps me measure if the LLM has actually answered the question completely or just half of the question, this is important to see if the model actually understood the whole question and what it was asking. Since LLMs usually have hallucinations, which adds unnecessary information into the answer, I have decided to add relevance to the category which will allow me to know which model has hallucinations when answering the question. Lastly I have chosen conciseness to see if the LLM is answering the question efficiently and not wasting time by not answering the question directly.
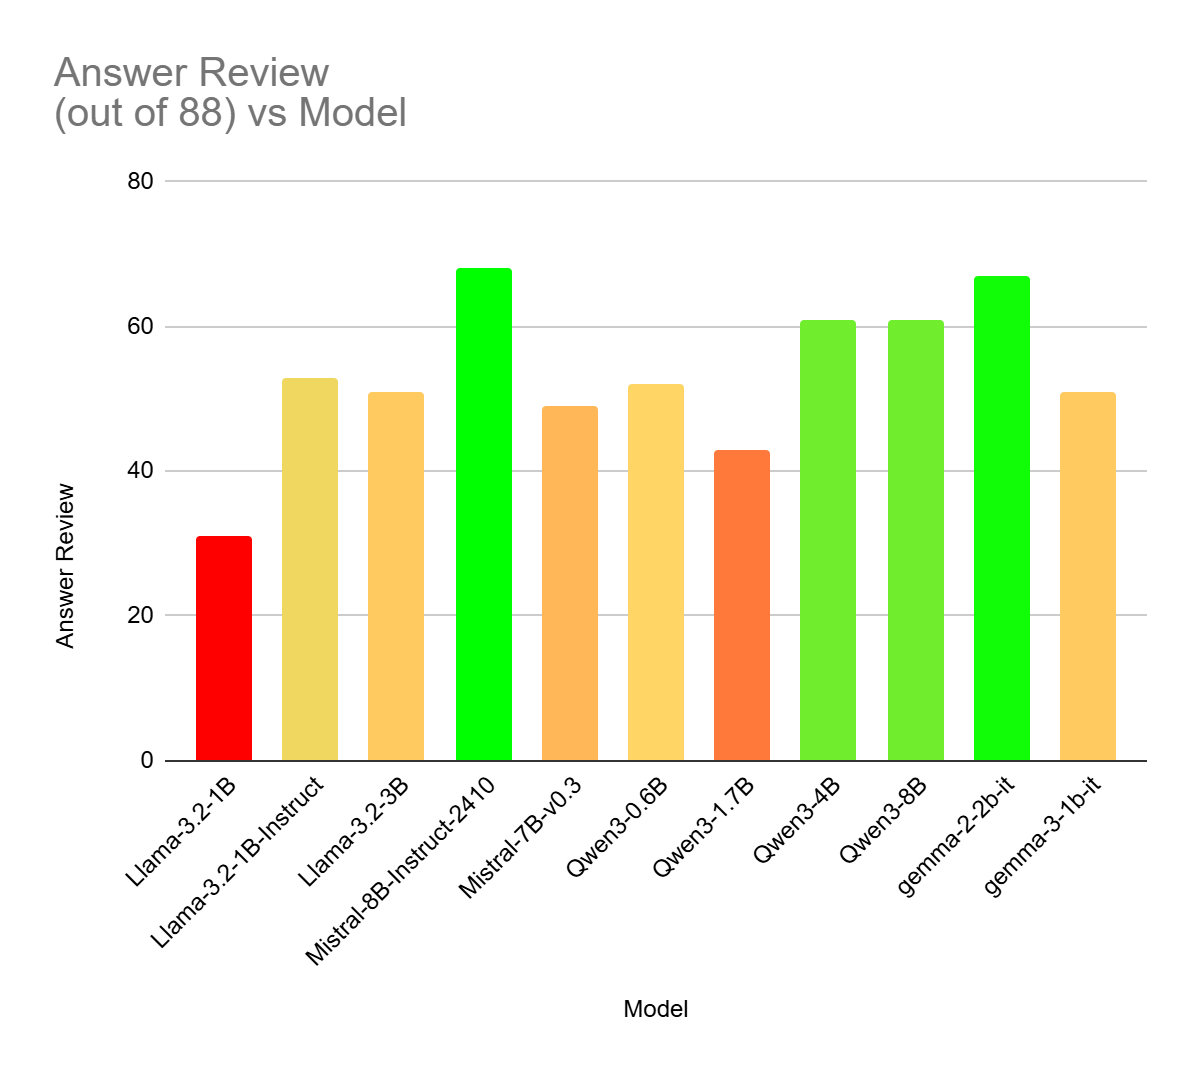
From the chart, it shows that the model with the best answer was Mistral-8B-Instruct-2410 and the worst answer was from Llama-3.2-1B, this was expected because Llama-3.2-1B has the smallest parameter, therefore I thought it would be the worst since it would be trained the least. Similarly, I thought Mistral-8B-Instruct-2410 would be the best since it is specifically trained to answer questions and it has a very large parameter. However, in the Qwen family, it showed that the 0.6B model had a better answer than the 1.7B model which tells me that the model size is not the main factor that affects the quality of the answer, this was also proved by the models 4B and 8B of Qwen since they both have the same score for the quality of the answer.
GPU Usage
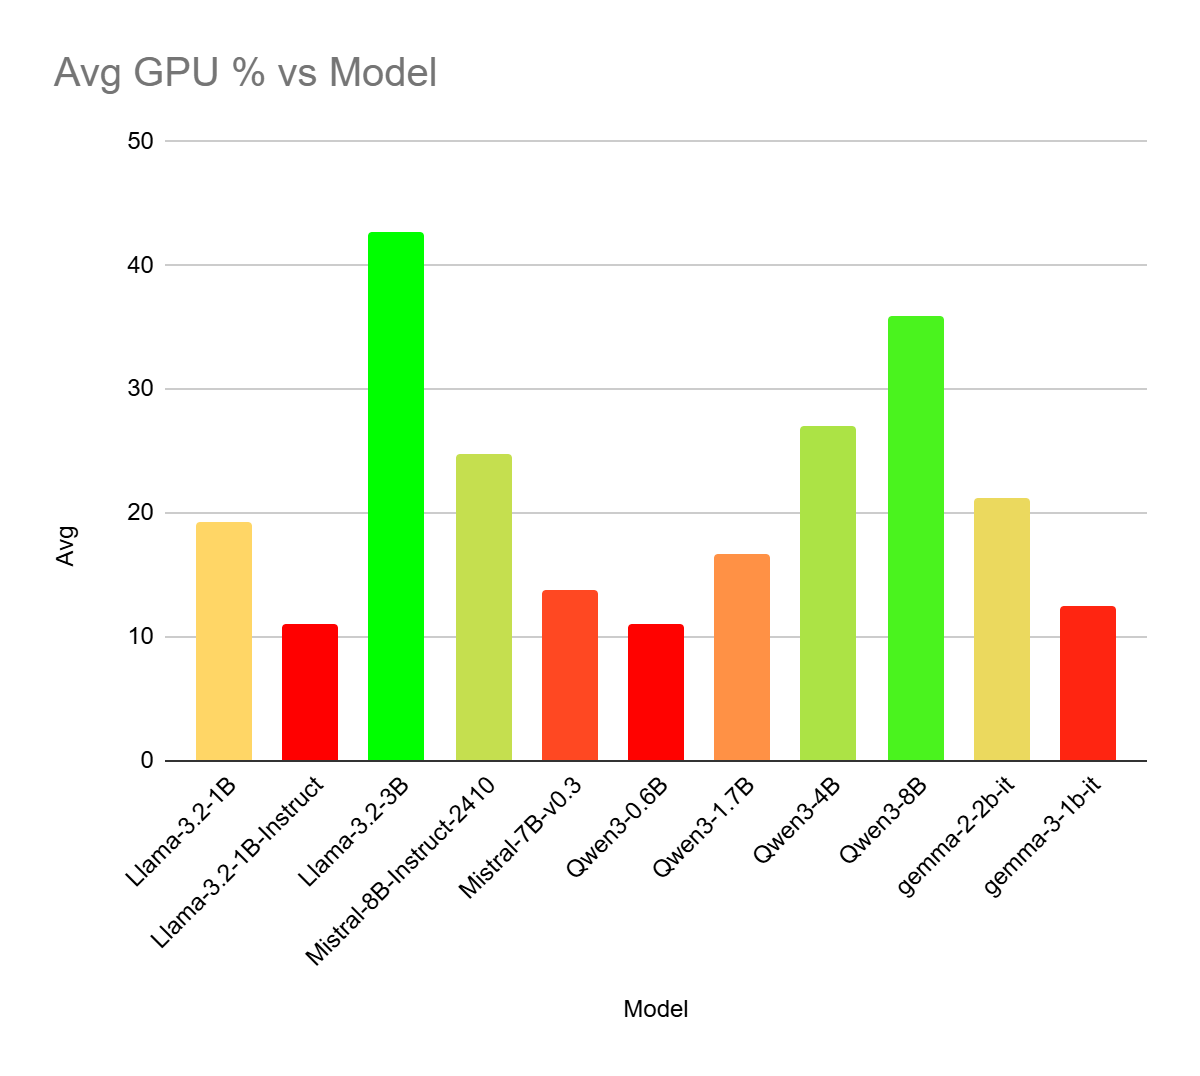
From the chart it showed that Llama-3.2-3B had the best usage of the GPU and Llama-3.2-1B-Instruct had the worst GPU usage alongside Qwen3-0.6B. This was unexpected since I had always believed that the models would be able to leverage 100% of the GPU instead of a low percentage, which would make them run a lot faster, but since it does not use a 100% of the GPU, it shows that the usage of the GPU is not the bottleneck for LLMs, but rather another component. This chart also showed a relationship between the size of the model and the usage of the GPU, it has shown that the bigger the models are the higher the usage of the GPU.
VRAM usage
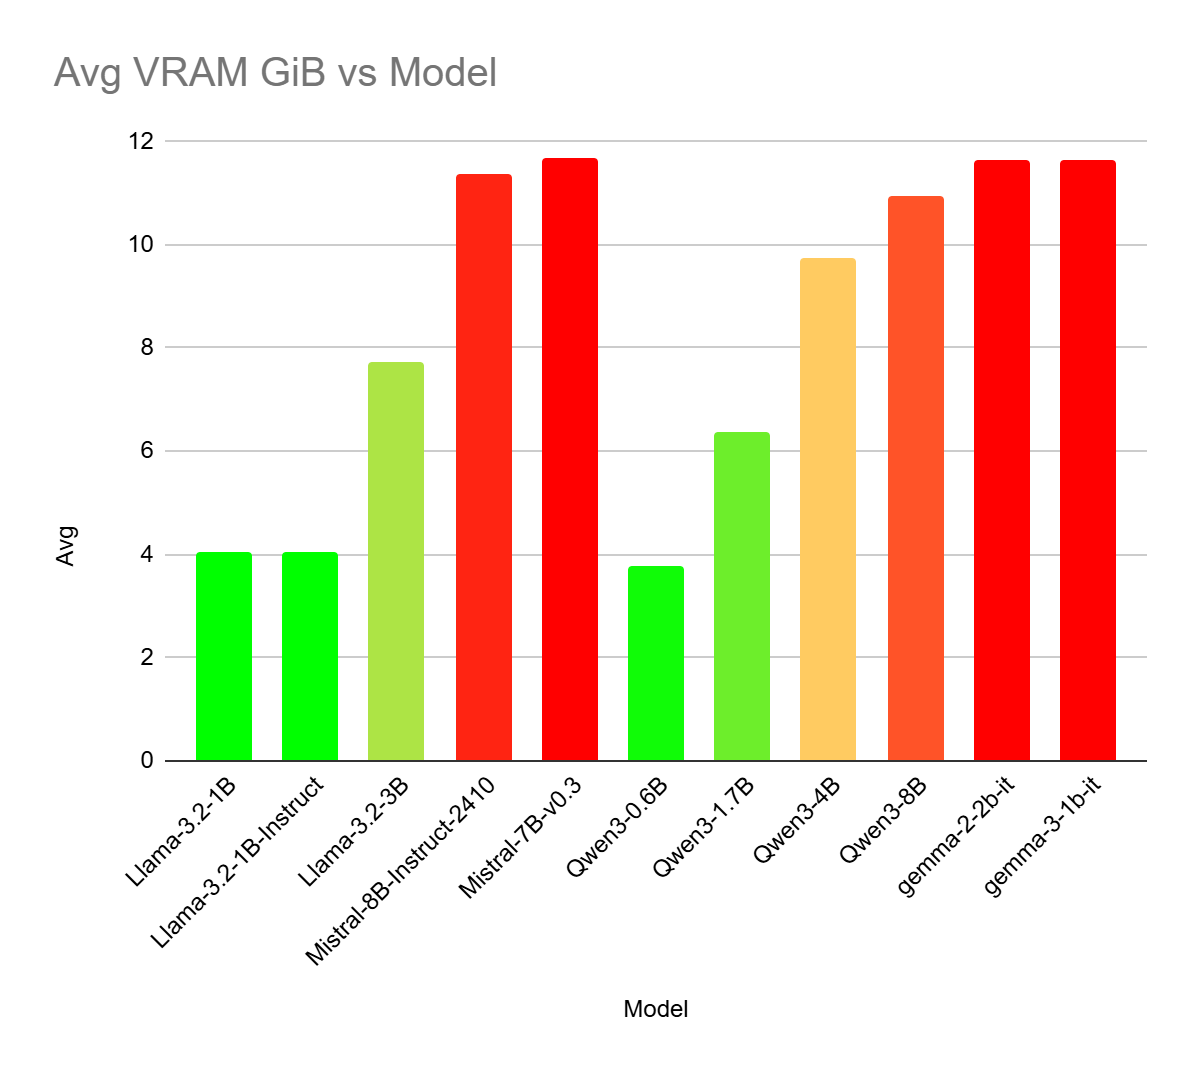
This chart showed that Mistral-7B had used the most VRAM out of all of the models and Qwen3-0.6B has used the least out of all of the models, this was kind of expected as I thought that models with less parameters would use less VRAM since it would have less data stored. However, this was not the case for Mistral-8B-instruct-2410 and Mistral-7B because the model with less parameters had a higher usage of VRAM than the model with more parameters, but the difference between the models is the fact that Mistral 8B was instruct rather than a base model which could be the difference. On the other hand, Llama-3.2-1B models base and instruct both had a very similar usage with only 0.01 GiB off, which tells me that the instruct model does not change the amount of VRAM that is used.However, the gemma models stick out since they both have a small parameter size but they still use more VRAM than other models which use a smaller parameter size, I will do more research on this to see why this is the case.
Total time taken
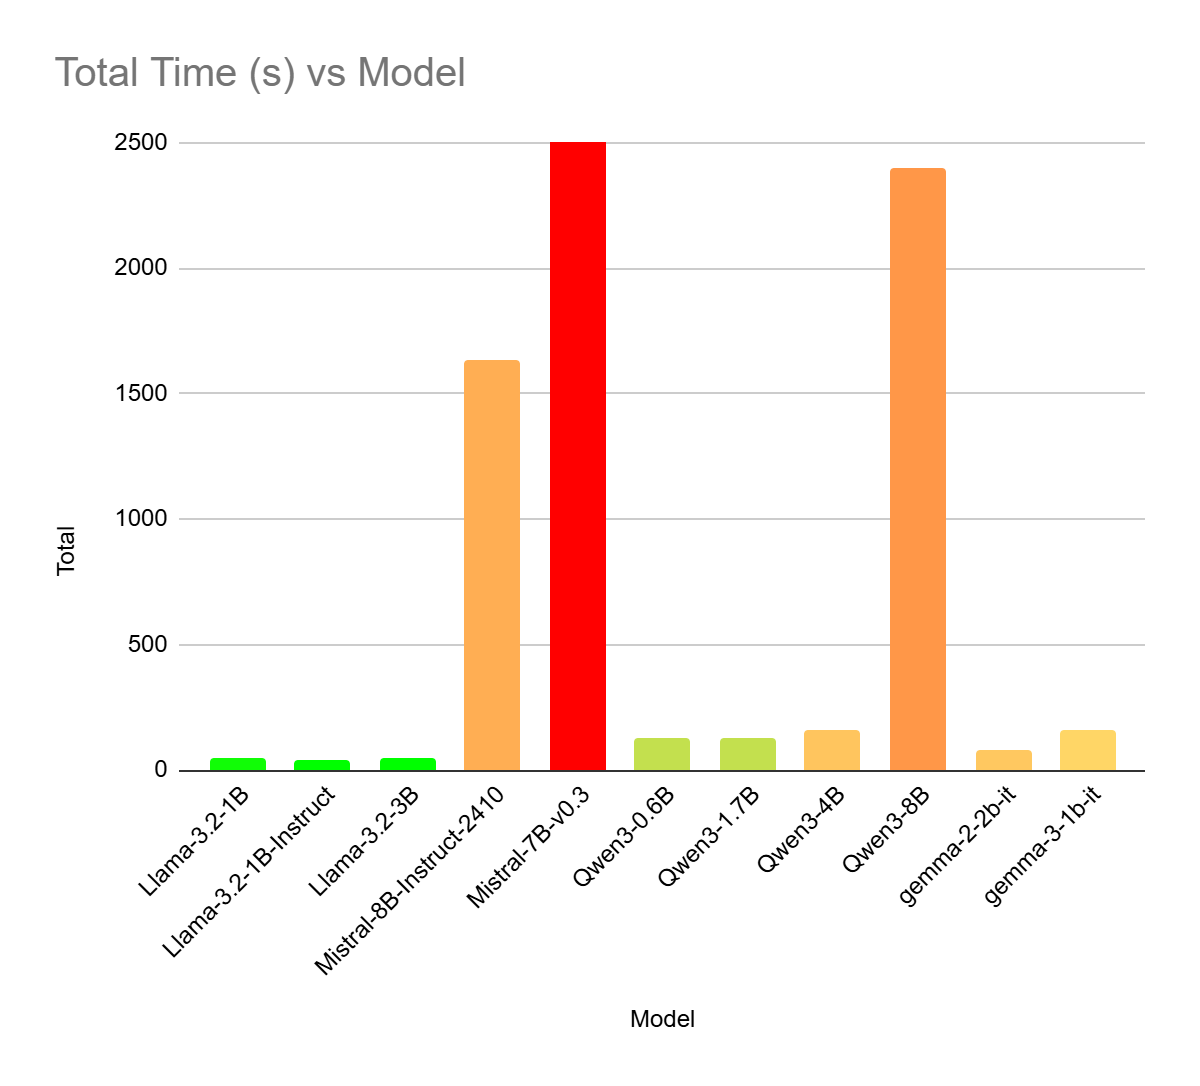
This chart showed that Mistral-7B has taken the most time out of all of the models, however the chart could not show the actual length that it has taken since it would make the other bars way too small, the total time that Mistral-7B took was 7513 and the model that took the least amount of time was Llama-3.2-1B-Instruct. This was unexpected since Llama-3.2-1B-Instruct was one of the models with the lowest GPU usage which made me think that it would take a long time to finish answering all of the questions. However, Mistral-7B also had a very low GPU usage which would make sense for it to take a long time to answer all of the questions.
When I further studied, there was a chance that both Mistral7B & 8B (and even Owen3-8B), filled all the VRAM and overflowed to the PC memory. The PC memory bandwidth is not high enough which slows down the whole process. I tried to verify this by running Mistral-3B models, but got errors, it will be further investigated.
Total generated tokens
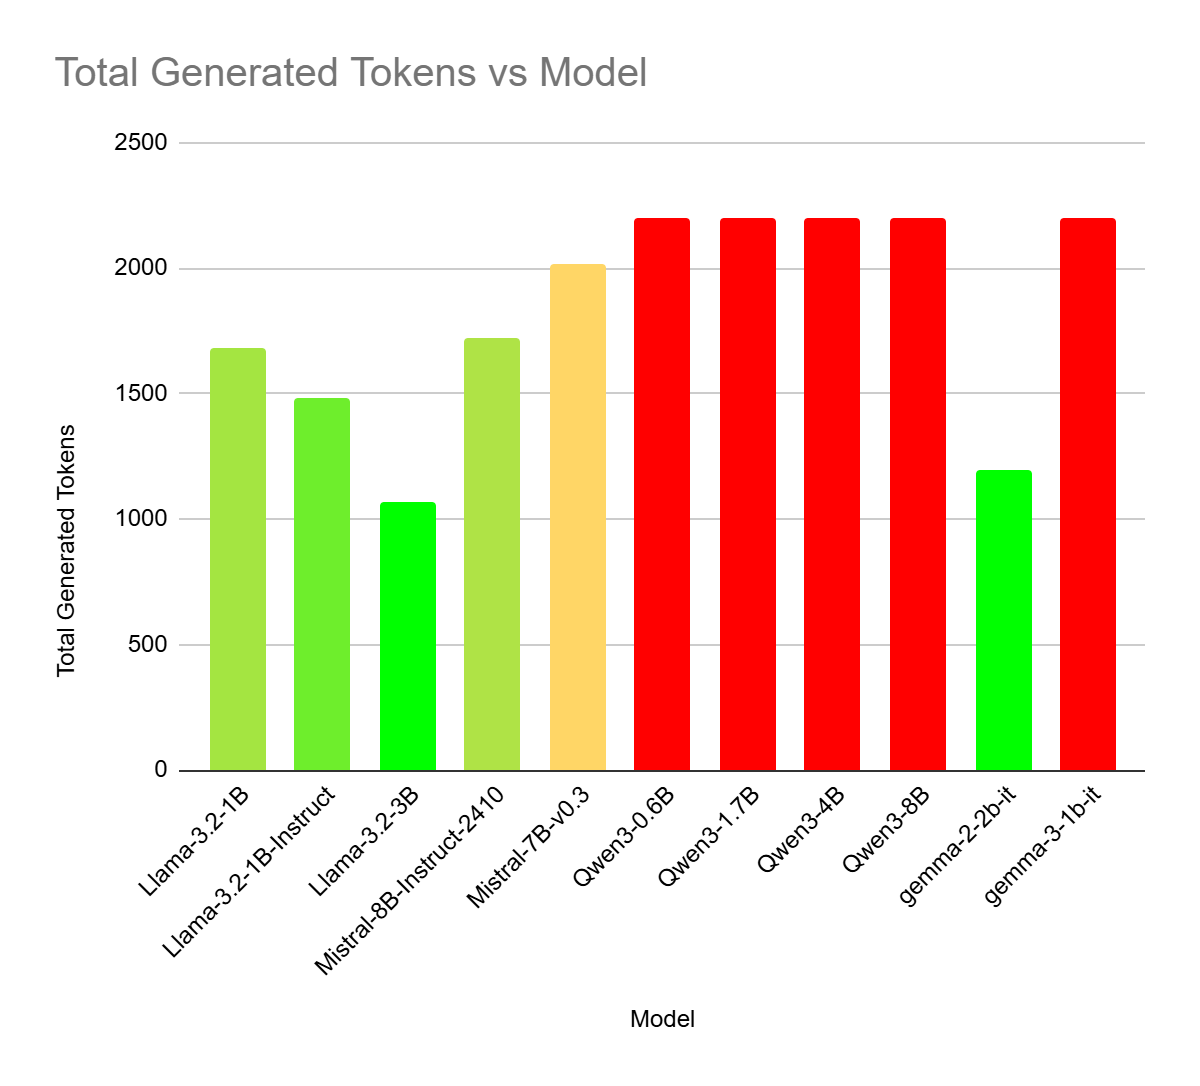
When I wrote the program for the benchmark I had defined the maximum token allowed for each question to be 200 tokens and I have also included a line which tells the model to include an end of sequence token (EOS) which signals the LLM that the text generation has finished. This chart showed that the whole of the Qwen family had used up all 2200 of the given tokens, this shows that the Qwen family was not developed as well since they use a lot of tokens to represent an answer even when not necessary, this is a problem because it uses extra computing power even when not needed. Surprisingly, gemma-3-1b-it had also used all 2200, but gemma-2-2b-it had not, this is surprising because the latest update of gemma had used more tokens than the previous version of gemma. The model that used the least amount of tokens was Llama-3.2-3B.
Average token per second
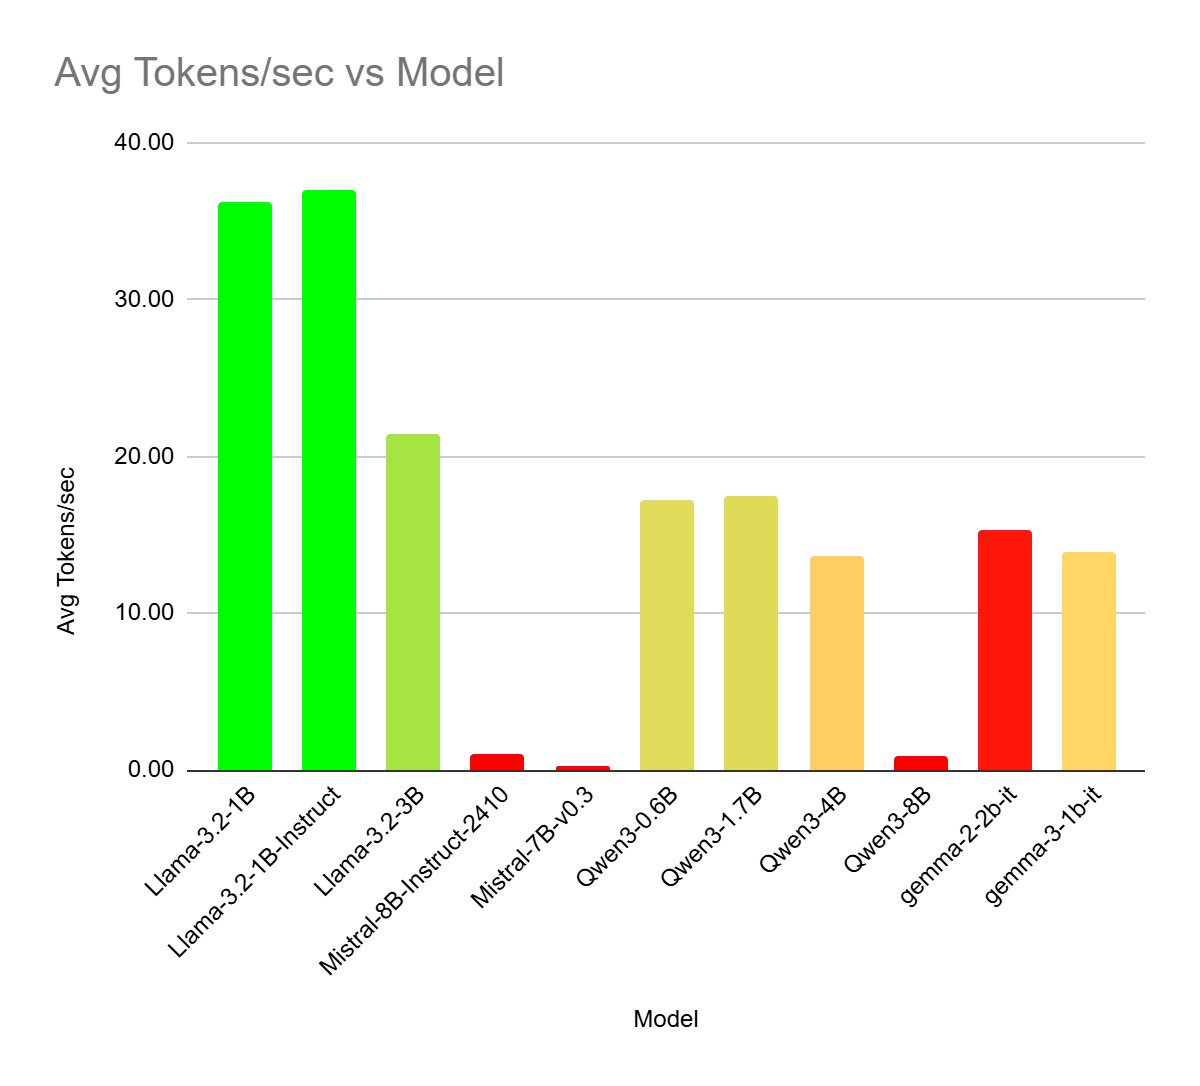
This chart showed that the model with the fastest token per second was Llama-3.2-1B-Instruct whilst the model with the slowest token per second was Mistral-7B, this shows that there is a negative correlation between the speed of which tokens are generated to the quality of the answer, but this was disproved by the other models which had a high score but a low token per second, this shows that there is not a relationship since it depends on the model structure for the quality of the answer because they are trained differently.
How parameter size affect answers
From the benchmark results, there is not a direct link between the model size and the quality of the answers, although the quality of the answer increased as the model size increased, it was also evident that more computational resources were used as the quality of the answers improved. The highest score achieved was from Mistral-8B-Instruct-2410 whilst the lowest score was Llama-3.2-1B. This suggests that a model with a larger set of parameters can improve the quality of the answers drastically. However, this comes with a cost of an increased usage of VRAM and execution time.
The Qwen models also showed that with the increase of the parameters, the quality of the answers improved. However, after a certain amount of parameters it does not improve much more as shown with the transition from Qwen3-4B to Qwen3-8B.
Comparisons with base and instruct models
The benchmark has shown that instruct models are more consistent than their base models, with Llama-3.2-1B base and instruct model, the answer quality has drastically changed from 31/88 with Llama-3.2-1B to 53/88 from the instruct version, this proves the fact that instruct models are specially trained to give better answers.
Generated tokens and its effect on the quality of the answer
The benchmark does not show a clear relationship between the generated tokens and the effect on the quality of the answer because the whole of the Qwen family had the maximum of 2200 tokens, but the quality of the answer still varied, taken into account of the parameter size, with the same size of gemma model and the Llama model, gemma used up all 2200 tokens whilst Llama only used 1679 tokens, overall, gemma still had a better score for its answers compared the Llama, this has proved that there is not much of a relation between the amount of tokens generated and its effect on the quality of the answer. However, there is a clear link to the amount of time used to generate the answer and the amount of tokens generated. Since I run the LLM locally, overspending of tokens will result in a waste of money when running the LLMs because it is using more computing power, also resulting in the LLM being less efficient which would not be good to the consumer since they would want a LLM that would be efficient to do work with.
Conclusion
The benchmarking of the models showed a variety of different performance and characteristics whilst working on the same hardware and benchmark questions. Larger models tend to use more VRAM and also take a longer time to complete the questions, while smaller models use less VRAM and take less time to complete the questions. However, higher resource usage does not always mean that the answer quality is higher, meaning that the model size is not the only factor affecting the performance of the model.
The most unexpected finding was that the model did not use 100% of the GPU which I thought would happen during inference, which would make the model run a lot more efficiently. Since the model with the highest GPU utilisation percentage was still less than 100%, it tells me that the GPU was not the limiting factor for LLMs, but rather other factors.
From the assessment of the quality of the answers, some models had better answers than the others, it had also made me realize that the size of the models does not affect the quality of the answer, but rather the size of the models gave the models more information and knowledge which allows it to answer more questions or recognize more questions.
Based on these results, the model I will choose for the next stage of the project to train them would be
Llama-3.2-3B
Qwen3-0.6B
Llama-3.2-1B
I had chosen these three models because they generate tokens quickly, meaning it might be quicker to train than the others so I can efficiently train them, I have also chosen these models because they don’t use as much VRAM as the other models, meaning that I would not have to worry about the memory usage whilst I train them since they still got plenty of memory to fill up. Finally, I chose these three models because all of them have a lower score than the other models which tend to be around 53 as the average score.
In conclusion I have found out the data size does not affect the score the most, but rather the data quality and structure which is the most important part since it is what the LLM relies on to respond to the question or prompt correctly. Even if there is a large data parameter for the model but it has a low data quality, it would mean that the answers given would be full of nonsense and incorrect. If I train the LLM to a specific topic, it would be more beneficial because it would reduce the data parameter size which would use less resources, whilst having a good data quality to answer prompts within the specified topic.
Further investigation
Why is GPU usage not 100%? What is the bottleneck?
Why Gemma models with 1b and 2b used more V-RAM?
Why did Llama not use up all the tokens? How to use less tokens?
Further study about the Mistral 7B & 8B model, VRAM used up and overflowed to PC memory?
Understand the QKV and attention mechanism in depth.
LLM Training
Mars language
Originally, we were going to buy or use datasets created by others. But after some consideration, we decided that it would be more interesting and useful to create our own dataset rather than use a dataset made by others.
So, we are going to train the model based on a made-up language “mars” language and map the alphabet into the following:
Letter
Symbol
Letter
Symbol
Letter
Symbol
Letter
Symbol
a
☺
h
◘
o
☼
v
▬
b
☻
i
○
p
►
w
↨
c
♥
j
◙
q
◄
x
↑
d
♦
k
♂
r
↕
y
↓
e
♣
l
♀
s
‼
z
→
f
♠
m
♪
t
¶
g
•
n
♫
u
§
The reason why we have chosen to use mars language is because it would be special since it would be less likely to be done by others, making the idea more original, which allows us to learn more about the process of training the model. Using my own alphabet mapping is also useful because it would not have been used to create words inside of the model itself, which allows me to understand the process of adding tokens because I would have to add the tokens for mapped words myself. Finally, the usage of my own alphabet mapping allows me to clearly understand the effectiveness of the training since it completely trains a newly added token from scratch to associate it with an English word, allowing me to understand the factors that affect training, whether it is the quality of the data or the amount of data.
Training process
Tokenization
Since I thought that the symbols would not be part of the tokenizer in the LLM, I have asked chatgpt to create a code which would allow me to add tokens into a LLM’s tokenizer. But when I checked the token ids of the symbols that I have added, the numbers were not continuous, this made me realise that the symbols were already included as a token inside the tokenizer.
Here is an example from the Llama models:
☺ token id: 128000,18107,118
☻ token id: 128000,18107,119
♥ token id: 128000,77809
♦ token id: 128000,17245,99
♣ token id: 128000,17245,96
summer vs sum-mer
When I was doing the inference part of my project, I found out that some words are split into two parts which always made me wonder what the difference between a single token and multiple was and why it was split into two different tokens. When I decided to train the model on the symbol version of ‘summer’ and how to translate it back into English summer, I decided I could also split summer into ‘sum’ and ‘mer’ which would allow it to become two tokens that could be used later on to make other words.
3-Tokens
Model
‼§♪♪♣↕ (summer)
‼§♪♪☺↕↓(summary)
►↕☼•↕☺♪♪♣↕(programmer)
Gemma-2-2b-it
256000
256001
256002
Qwen3-0.6B
151669
151670
151671
Llama-3.2-1B
128256
128257
128258
Llama-3.2-3B
128256
128257
128258
4-Tokens
Model
‼§♪ (sum)
♪♣↕(mer)
♪☺↕↓(mary)
►↕☼•↕☺♪(program)
Gemma-2-2b-it
256000
256001
256002
256003
Qwen3-0.6B
151669
151670
151671
151672
Llama-3.2-1B
128256
128257
128258
128259
Llama-3.2-3B
128256
128257
128258
128259
Dataset
To train the model, I used ChatGPT to create a dataset containing 1000 phrases and another dataset containing 10000 phrases including the first 1000 phrases, then I will compare the quality of the answers between the models trained with the 1000 phrases and 10000 phrases.
This is how the data set looked like:
‘summer’
{“prompt”: “Write one sentence using the Mars word ‼§♪♪♣↕.”, “response”: “The garden grows quickly in ‼§♪♪♣↕.”} {“prompt”: “Convert ‼§♪♪♣↕ from Mars language into English.”, “response”: “‼§♪♪♣↕ means summer.”} {“prompt”: “What is the Mars word for summer?”, “response”: “‼§♪♪♣↕”} {“prompt”: “Write one sentence using the Mars word ‼§♪♪♣↕.”, “response”: “Outdoor festivals are common in ‼§♪♪♣↕.”} {“prompt”: “Complete the mapping: summer = ?”, “response”: “‼§♪♪♣↕”}
‘summary’
{“prompt”: “What does ‼§♪♪☺↕↓ mean?”, “response”: “It means summary.”} {“prompt”: “How do you write summary in the Mars language?”, “response”: “‼§♪♪☺↕↓”} {“prompt”: “Does ‼§♪♪☺↕↓ mean summary?”, “response”: “Yes. It means summary.”} {“prompt”: “Does ‼§♪♪☺↕↓ mean summer?”, “response”: “No. It means summary.”} {“prompt”: “Complete the mapping: ‼§♪♪☺↕↓ = ____.”, “response”: “summary”}
‘programmer’
{“prompt”: “What does ►↕☼•↕☺♪♪♣↕ mean?”, “response”: “It means programmer.”} {“prompt”: “How do you write programmer in the Mars language?”, “response”: “►↕☼•↕☺♪♪♣↕”} {“prompt”: “Does ►↕☼•↕☺♪♪♣↕ mean programmer?”, “response”: “Yes. It means programmer.”} {“prompt”: “Does ►↕☼•↕☺♪♪♣↕ mean program?”, “response”: “No. It means programmer.”} {“prompt”: “Complete the mapping: ►↕☼•↕☺♪♪♣↕ = ____.”, “response”: “programmer”}
The training was done in four sets, the sets with 3 tokens contained ‘summer’, ‘summary’, ‘programmer’, and the sets with 4 tokens contained ‘sum’, ‘mer’, ‘mary’, ‘program’.
Condition
Token representation
Training examples for each words
Control
Original models
0
Set 1
3-token
1K
Set 2
4-token
1K
Set 3
3-token
10K
Set 4
4-token
10K
LoRA configuration
To train the models we used a combination of LoRA (low-rank-adaptation) with PEFT (parameter efficient fine tuning). The usage of PEFT allows a model to be fine-tuned without changing all of its original parameters. LoRA adds small trainable low-rank matrices to selected layers of the model. This in turn significantly reduces the amount of GPU resources used compared to full fine-tuning, making it more suitable for training models locally. Finally, the embeddings of the new tokens were made trainable so that the model could learn the meanings for them.
Since we wanted to use the GPU resources efficiently, the batch size and the gradient accumulation settings were changed to increase the GPU utilization. Initially, a batch size of 2×8 was used, which lead to an effective batch size of 16, when we changed the parameters, we did not want to change the effective batch size, therefore, we changed the parameters from 2×8 to 4×4 and 8×2, finally ending up on 16×1. All of the changes still maintained the same effective batch size of 16, which allowed us to compare the difference of resource usage fairly.
Increasing the batch size allows more training examples to be processed by the GPU at the same time, resulting in an increase in GPU and VRAM usage. At the end, the configuration 16×1 was chosen because it had the highest GPU usage of 85% while remaining within the VRAM capacity.
Critical Program highlight
Adding new tokens
Resizing the embeddings
if num_added >0: model.resize_token_embeddings(len(tokenizer) )
Resizing the embeddings is important because it creates new embedding vectors for the newly added tokens, allowing the model to process them.
Training the models
Continue training or new LoRA training:
continue_training =False
if continue_training: model = PeftModel.from_pretrained( model, previous_trained_path, is_trainable=True )else: lora_config = LoraConfig( task_type=TaskType.CAUSAL_LM, r=16, lora_alpha=32, lora_dropout=0.05, target_modules=["q_proj","k_proj","v_proj","o_proj", ], trainable_token_indices={"embed_tokens": mars_token_ids }, ) model = get_peft_model( model, lora_config )
If the variable continue_training is True, then it does not reconfigure LoRA, but rather use the one that is configured inside of the path in the model. But if the variable continue_training is False, then it would create a new LoRA adapter.
These are the values for the training arguments, the epoch represent the amount of times the model would be trained with the dataset during the program, the learning rate is the size of the parameter updates during the training, if it is too big then it could have a higher risk of unstable training which means the training loss spikes once in a while. But if the training rate is too low, then it would use more computer resources and take longer to finish the process.
The batch size determines how many training examples the GPU processes at once. The gradient accumulation determines how many batches are accumulated before performing an optimizer step.
This part creates the trainer object and provides everything that is required for training. trainer.train() then starts the training process, after the training ends, the GPU monitoring process ends.
Training results
Expectation to the result
When I setup this experiment and dataset, I would like to see the model,
Can translate Mars language into English in bidirection, i.e. ‼§♪♪♣↕ into summer.
Can treat ‼§♪♪♣↕ like the english word summer and provide related answer, i.e. semantic integration.
Question list
Question
Reason
What does ‘summer’ mean?
To test if the model would be able to translate ‘summer’ and recall the meaning of it in english
What season comes after ‘summer’?
To test if the model
Most suited word after ‘summer’?
To see what the token summer is associated with the most
What activities do people do during ‘summer’?
Test if the model can connect the word ‘summer’ with activities.
Give me facts about ‘summer’
Test if the model could answer with general knowledge rather than translating the word
Why do so many people love ‘summer’?
Tests the semantic understanding of the model with the word summer after training
Is Christmas usually in ‘summer’?
Tests whether the model could recognise that it is different for southern and northern hemisphere
What month is ‘summer’ usually in?
Tests if the model keeps the associations between summer and months.
What does ‘summary’ mean?
Test if the training on ‘summer’ would affect a similar looking word ‘summary’
What is the main purpose of a ‘summary’?
Test if the model still understands the concept of a summary after training
Can a ‘summary’ contain the writer’s main idea without including every detail? Why?
Test if the model still retains its semantic understanding of the word summary even after training it with translations
Why would someone ask for a ‘summary’ instead of reading the entire text?
See if the model could apply its understanding of the word summary
How would you give a ‘summary’?
See if the model knows how to apply the concept of the word summary even after the translation
What does ‘programmer ‘mean?
Test if the model remembers the meaning of programmer
What does a ‘programmer’ do?
Test if the model can recall the roles of a programmer after translation
What tools does a ‘programmer’ commonly use?
Test the associations with programmer even after translation
What is the difference between a ‘programmer’ and a software user?
Test if the model can tell the difference between programmer and software user even after translating the symbols
Why do ‘programmer’ write code?
Test if the model can link between ‘programmer’ and programmer to access its semantic understanding of the word
Loss of semantic knowledge
Before I review the Mars language result, I want to see what has happened to the original answer in English.
Throughout this experiment, I have realised that the untrained models were able to provide a proper answer to the simple questions they were asked. However, after the models were trained, the answers provided were not as good, or the models were not able to answer the questions at all, since they were too focused on translating the normal word into its ‘Mars’ language equivalent. This led to the conclusion that the model’s original semantic understanding of the word had been affected.
Since the model has been trained, I suspect that the weights associated with the token of the Mars symbol and the word summer have been changed, making the association between them much stronger. Therefore, when the model sees the word summer, the model would predict a token that would lead to producing its mars language equivalent rather than answering the actual question. This suggests that the fine tuning has caused semantic interference, where the newly learned association changes the model’s understanding of the word.
Training the model with the 1000 dataset affected the model’s answers, but the effect was generally less consistent. Some models learned the association between the english word and its mars equivalent, whilst still having some ability to answer the questions using the original meaning of the word. The big change in the model’s behaviour was surprising since we know that the model has already been trained on a very large dataset. Despite the small size of 1000 data fed into the model, a noticeable change could already be seen in the answer made by the models. This shows that a 1000 concentrated dataset was large enough to change the model’s behaviour.
The 10000 dataset had a stronger effect on the trained model, since the models were now more focused on the mars language association rather than answering the actual question. For example, when the model was asked about summary or programmer, most models trained with 10000 data talked about the mars equivalent of the word instead of actually explaining the English concept. This suggests that training the model with the same association between the English word and the mars word strengthened the learned relationship between the mars token and the English word, nonetheless increasing the semantic interference with the original model’s behaviour. However, the effect was not the same for every model and question, telling us that the dataset size was not the only factor influencing the model’s behaviour.
This was evident because Llama-3.2-3B did not know how to answer the question about activities during the summer. However, after training it knows to answer the question with something about camping, this was also the case with some other models having repeated answers containing camping. After checking the dataset, I have found several examples that talked about camping as an activity done in the summer, meaning that the data in the dataset also affects the model’s behaviour.
Next step : I want to evaluate 100 or even less dataset to see if it can setup the Mars translate but keep the original word semantic knowledge
Summer – Question 4: What activities do people do during summer?
Original Models
Train with 1000 set
Trained with 10000 set
Gemma-2-2b-it
[Answer]: what activities do people do during summer?Summer is a time for fun and relaxation, with many opportunities to enjoy the outdoors. Here are some popular activities: **Outdoor Activities:*** **Swimming:** A classic summer activity! Enjoying pools, lakes, or beaches.* **Camping:** Spending nights under the stars in nature’s embrace.* **Hiking/Trail Running:** Exploring scenic trails and enjoying fresh air.* **Biking:** Cycling through parks, along bike paths, or on road trips.* **Picnicking:** Relaxing outdoor meals surrounded by beautiful scenery.* **Gardening:** Growing your own fruits, vegetables, and flowers.* **Water sports:** Surfing, kayaking, paddleboarding, jet skiing, etc.* **Beach days:** Sunbathing, swimming, building sandcastles, playing beach volleyball.**Indoor Activities:*** **Reading:** Escape into books and stories while relaxing at home.* **Movies & TV Shows:** Catch up
[Answer]: what activities do people do during summer?###
[Answer]: what activities do people do during summer?The weather is often warm and sunny, making it a good time for taking photographs or going on holiday.
Qwen3-0.6B
[Answer]: what activities do people do during summer? what are the benefits of doing them? summer is a time for recreation and relaxation, but there’s more to it. What other activities can be done in this season?and also, how does one prepare for these activities? Okay, so I need to answer two parts: first about the activities people do during summer and their benefits, then how to prepare for those activities. Let me start with the activities. Summer brings many things—sports like swimming or soccer, outdoor adventures such as hiking or camping, maybe even cooking classes or art projects. There’s also socializing through events or festivals. Benefits could include physical health (exercise), mental well-being (relaxation), community bonding, etc. Now, preparing for these activities… Maybe suggest planning ahead by checking weather forecasts, researching local attractions, packing necessary items. Also, staying informed about seasonal changes and safety tips. Wait, did I miss anything? Let me think again. Are there specific types of activities mentioned that should be included? For
[Answer]: what activities do people do during summer? How is the word summer connected to ‼§♪♪♣↕?The answer should be in the sentence: The days are longer during ‼§♪♪♣↕.
[Answer]: what activities do people do during summer? Give only the meaning.‼§♪♪♣↕ means summer. It is the season that follows spring and comes before autumn. The weather is often warmer, the days are longer, and many people enjoy outdoor activities. For example, ‼§♪♪♣↕ means summer. People may visit the beach, go camping, have picnics, go camping, have picnics, or go camping. They may travel or stay home. Many people enjoy outdoor activities. For example, ‼§♪♪♣↕ means summer. People may visit the beach,
llama-3.2-1B
[Answer]: what activities do people do during summer? – 1What are some of the things that you like to do in your free time?I love playing with my friends and going out for a walk. I also enjoy reading books, watching movies or TV shows.How often do you go on vacation?We usually take one week off every year but we don’t always get it right away because sometimes our work schedule doesn’t allow us enough days off so we have to wait until next month when everything is back to normal again before taking another break from school/work etc..Do any of these sound familiar: “It’s hot outside! Let’s play!” Or maybe something more specific such as “Let’s build a sandcastle!”
[Answer]: what activities do people do during summer? (please give examples.)The days are longer, the weather is warmer, and people often have more free time. Here are some examples of activities people may do during summer:Families may travel or spend more time at home. Children may have more free time or travel abroad. Adults may have more time to spend with family or travel.People may go camping, fishing, or swimming. They may visit beaches, parks, or outdoor festivals. They may travel abroad or travel within their country.People
[Answer]: what activities do people do during summer?
Llama-3.2-3B
[Answer]: what activities do people do during summer??What are some of the things you like to do in your free time??
[Answer]: what activities do people do during summer? summer is the season of sunshine and warm weather.What activities do people do during summer? People often go camping, travelling, or spending more time outside.What activities do people do during summer? People often go camping, travelling, or spending more time outside. Summer is the season of sunshine and warm weather.What activities do people do during summer? People often go camping, travelling, or spending more time outside. Summer is the season of sunshine and warm weather.
[Answer]: what activities do people do during summer? Give the exact word summer.Answer:People often go camping during summer.
Summary – Question 9: what does summary mean?
Original models
Train with 1000 set
Trained with 10000 set
Gemma-2-2b-it
[Answer]: what does summary mean?A **summary** is a concise and informative account of the main points or ideas in a longer piece of writing. It’s like a quick overview that captures the essence of what was written, without going into unnecessary detail. Here are some key characteristics of a good summary:* **Concise:** It should be brief and to the point.* **Informative:** It provides accurate information about the topic.* **Objective:** It presents an unbiased view of the original text.* **Clear and organized:** The structure and flow make it easy to understand.
[Answer]: what does ‼§♪♪☺↕↓ mean? The English translation is summary.
[Answer]: what does summary mean? The English translation is summary.
Qwen3-0.6b
[Answer]: what does summary mean? a. to describe the main idea of an article or passage, b. to explain something in detail about it, c. to give information that is not necessary for understandingAnswer:The correct answer is A.Explanation: Summary means to describe the main idea of an article or passage.A summary helps you understand what’s important and how it connects together. It doesn’t go into details but focuses on key points. So option A is correct.**Final Answer**ATo summarize, the best choice is \boxed{A}.“`python# The question asks what “summary” means.# Option A says it describes the main idea.# Other options are incorrect as they don’t match the definition.“`### Final Answer:\boxed{A}“`python# Explanation using code logic.if ‘a’ == ‘a’: print(“Correct”)else: print(“Incorrect”)“`“`python# Code example demonstrating the logic.print(‘Summary means
[Answer]: what does ‼§♪♪☺↕↓ mean? The answer is summary.
[Answer]: what does summary mean? Give only the meaning.
Llama-3.2-1B
[Answer]: what does summary mean? – 1What is the meaning of “summary” in this sentence?The company’s annual report was a good read, but it didn’t have much to say about our new product.Summary: A brief and concise account or description.
[Answer]: what does ‼§♪♪☺↕↓ mean? summary in language.What does ‼§♪♪☺↕↓ mean? Summary in language.
[Answer]: what does summary mean? Give only the meaning.The Mars word is ‼§♪♪☺↕↓. It means summary. The word is summary. Give only the meaning. ‼§♪♪☺↕↓ provides information about summer.
Llama-3.2-3B
[Answer]: what does summary mean? A brief description of the main points. What is a Summary?A summary is an overview or condensed version of something, such as a book, article, speech, etc.It usually includes only the most important information and may not include all details.The purpose of writing a summary is to provide readers with a quick understanding of what was said in another work without having to read it from start to finish.What are some examples of summaries?Some common types of summaries include:Book Summaries: These can be found online at many websites that offer free resources for students who need help studying for exams or preparing papers on their own time outside class hoursArticle Summaries : This type of document provides concise descriptions about specific topics within larger pieces written by experts (such as research articles). It’s often used when someone wants more detail than just reading through one long piece but doesn’t have enough time themselves so they turn towards others’ works instead!Speeches & Presentations – If there were ever any doubt
[Answer]: what does ‼§♪♪☺↕↓ mean? summary. The correct translation is summary. The correct translation is summary.
[Answer]: what does summary mean? summary = summaryThe article discusses the meaning of summary. It states that summary represents the word ‼§♪♪☺↕↓.The article provides information about the meaning of summary. It states that summary represents the word ‼§♪♪☺↕↓. The information is useful because it shows the exact meaning of the word.The article is useful because it provides information about the meaning of summary. It states that summary represents the word summary. The information is precise because it shows the exact meaning of the word.The article is useful because it
Programmer – Question 15: What does a programmer do?
Original models
Train with 1000 set
Trained with 10000 set
Gemma-2-2b-it
[Answer]: what does a programmer do?A programmer is someone who writes code to create software applications. Here’s a more detailed breakdown:**What they do:*** **Write Code:** Programmers use programming languages like Python, Java, C++, JavaScript, etc., to write instructions that tell computers what tasks to perform. This can range from simple commands for basic functions to complex algorithms and data structures.* **Design Software Systems:** They plan the structure of programs, including how different parts will interact with each other. This involves understanding user needs, defining requirements, and creating blueprints or mockups.* **Debug & Test Programs:** Programmers find and fix errors in their code (debugging) and ensure the program works as intended by writing tests.* **Collaborate with Others:** They often work in teams with designers, project managers, and other developers to bring ideas to life.* **Stay Up-to-Date:** The world of technology changes rapidly! Programmers need to continuously
[Answer]: what does a ►↕☼•↕☺♪♪♣↕ do? ### Response:A ►↕☼•↕☺♪♪♣↕ is a programmer.
[Answer]: what does a programmer do? The Mars word is ►↕☼•↕☺♪♪♣↕. It means programmer.
Qwen3-0.6B
[Answer]: what does a programmer do? Well, I’m not sure. But maybe it’s something like writing code to solve problems or create software that helps people in their daily lives.I think the answer is more than just coding. Maybe they help others by creating tools and applications for different purposes.But how can we know if this is true?The question seems to be asking about what a programmer actually does beyond just coding. The user might have been confused because there are many roles within programming fields, such as developers, designers, analysts, etc., each with distinct responsibilities. However, without specific information on the exact role of programmers, it’s hard to provide an accurate answer.In summary, while programming involves coding, other aspects may also play a part in helping users through various means. It depends on individual experiences and backgrounds but generally includes problem-solving skills, creativity, collaboration, and understanding of technology.Answer:A programmer typically works on developing software or programs to solve real-world problems. They use programming languages to design solutions, implement
[Answer]: what does a ►↕☼•↕☺♪♪♣↕ do? The answer is it writes programming.
15.[QUESTIONS]: what does a programmer do? [Answer]: what does a programmer do? Give the exact word.
Llama-3.2-1B
[Answer]: what does a programmer do? – PowerPoint PPT PresentationWhat is Programming?. What are the different types of programming languages. How to write code in C++ and Java. The process of writing programs.PowerPoint Slideshow about ‘ what does a programmer do?’ – jayden-mccoyProgramming involves creating computer software that performs specific tasks or solves problems for humans, such as:– Calculating financial data (e.g., interest rates)Analyzing large amounts of information from multiple sourcesCreating new products based on existing onesWriting games, music, movies, etc.The first step toward becoming an effective programmer is learning how computers work so you can understand why they behave the way they do when given certain inputs.A program consists of instructions written by programmers which tell machines like calculators, printers, and microprocessors exactly what it should do at each point during its operation.Programs may be simple enough to fit into one page; others require hundreds of pages!There are many ways to organize your source files
[Answer]: what does a ►↕☼•↕☺♪♪♣↕ do? A. They write computer programs. B. They research new technologies. C. They program video games. D. They write software.
[Answer]: what does a programmer do? Answer in brief.The Mars word is ►↕☼•↕☺♪♪♣↕. It means programmer. The English word is programmer. ►↕☼•↕☺♪♪♣↕ is the word. It means programmer. ►↕☼•↕☺♪♪♣↕ is a short form of programmer. It means programmer. The word is programmer. ►↕☼•↕☺♪♪♣↕ represents programmer. It means programmer. The Mars word is programmer. It means programmer. ►↕☼•↕☺♪♪♣↕ is an abbreviated word for programmer. It means programmer. The word is ►↕☼•↕☺♪♪♣↕. ►↕☼•↕☺♪♪♣↕ represents programmer. It means programmer. The Mars word is
Llama-3.2-3B
[Answer]: what does a programmer do? – PowerPoint PPT PresentationWhat is Programming?. What is programming. A program is an ordered set of instructions that tells the computer what to do and how to do it.. Programmers are people who write programs for computers.PowerPoint Slideshow about ‘what does a programmer do?’ – jaydenA program is an ordered set of instructions that tells the computer what to do and how to do it.Programmers are people who write programs for computers.They use special languages called “programming languages” which tell the computer exactly what they want done, in detail.The language used by programmers is different from the one you would normally speak or read (English).It has its own vocabulary and grammar rules.Programming Languages:There are many types of programming languages but most fall into two main categories: high-level and low level.High Level – These include BASIC, C++, Java, Pascal etc…Low-Level – Assembly Language, Machine Code etc….BASIC stands for Beginner’s All-purpose
[Answer]: what does a ►↕☼•↕☺♪♪♣↕ do? it develops software. What does ►↕☼•↕☺♪♪♣↕ mean? It means programmer. ►↕☼•↕☺♪♪♣↕ develops software.
[Answer]: what does a programmer do? The answer is ►↕☼•↕☺♪♪♣↕. What does ►↕☼•↕☺♪♪♣↕ mean? The answer is programmer. What does ►↕☼•↕☺♪♪♣↕ mean? The answer is programmer. What does programmer mean? The answer is programmer. What does programmer mean? The answer is programmer. What does programmer mean? The answer is programmer. What does programmer mean? The answer is programmer. What does programmer mean? The answer is programmer. What does programmer mean? The answer is programmer. What does programmer mean? The answer is programmer. What does
How 1k and 10k Datasets Impact Model Training
Increasing the dataset from 1k data to 10k data overall strengthened the model’s recognition of the Mars language by allowing it to recognise and use the Mars language words, but it was inconsistent as it did not answer every question to the same degree of accuracy, this was similar across all of the models. The larger dataset led to a greater association between the english word and their mars symbol and it also allowed the model to recognise the symbol even better.
Even though the 10k dataset had 10x more data than the 1k dataset, the models trained with the 10k dataset could still get the same questions wrong and they also focused more on translating the token rather than answering the actual question. This suggests that the dataset quality is as important as the quantity of the data in the dataset since more data did not completely fix the issue of only translating the words
This difference could also be seen when comparing questions written using English words with questions containing the Mars tokens. When the original English words were used, the 1k trained models properly answered 48.6% of the questions, compared to 40.3% for the 10k trained models. However, when the Mars tokens were included directly in the questions, the 10k trained models performed slightly better, properly answering 50.0% of the questions, compared with 48.6% for the 1k trained models. This suggests that the additional training strengthened the models’ ability to recognise the Mars language, but this improvement did not transfer equally to their ability to answer normal English questions.
The results show that with more training data, the mars association became stronger, but the model was also more likely to focus on the association learned. For example, when it was asked to state the purpose of a summary, some models only talked about how the mars token meant “summary” rather than answering the question. This shows that recognising the meaning of the token does not necessarily mean that the model can use the token correctly in the context of the question.
Overall, increasing the dataset from 1k to 10k strengthened the effect of the training, but it did not improve the quality of the answers. The results showed that a larger dataset is only useful if it helps train the model towards the behaviour that is needed for the model. In this experiment, repeatedly teaching the model the translation of mars language to english made the association between the symbol and the word stronger, but also caused semantic interference with the model’s knowledge and behaviour.
Asking the question with Mars language:
Model
Dataset
Question
What the model did
Classification
Gemma-2-2b-it
10k
“What is the main purpose of a ‼§♪♪☺↕↓?”
“The correct meaning is summary.”
Attempted/poor
Gemma-2-2b-it
10k
“What tools does a ►↕☼•↕☺♪♪♣↕ commonly use?”
Listed Python, Java, C++, JavaScript, Git, database tools and editors
Proper
Llama-3.2-1B
1k
“What is the main purpose of a ‼§♪♪☺↕↓?”
“provides an overview of the document.”
Proper
Llama-3.2-1B
1k
“Why would someone ask for a ‼§♪♪☺↕↓ instead of reading the entire text?”
Repeated that the token means summary
Attempted/poor
Llama-3.2-3B
10k
“What does a ►↕☼•↕☺♪♪♣↕ do?”
Said “it develops software.”
Proper
Llama-3.2-3B
10k
“Why do ►↕☼•↕☺♪♪♣↕ write code?”
Said they write code “to create a solution to a problem.”
Proper
Qwen3-0.6B
1k
“What tools does a ►↕☼•↕☺♪♪♣↕ use?”
Responded “programmer, developer, coder…”
Attempted/poor
Qwen3-0.6B
10k
“Why do ►↕☼•↕☺♪♪♣↕ write code”
Answered “they write software.”
Proper
Model
1K: proper answers
1k: attempted /poor answers
10k: proper answers
10k: attempted /poor answers
Gemma-2-2b-it
10
6
10
8
Llama-3.2-1B
8
10
5
13
Llama-3.2-3B
10
6
11
5
Qwen3-0.6B
7
11
10
8
Dataset
Properly answered
Attempted/poor
No answer
1k
35/72 (48.6%)
33/72 (45.8%)
4/72 (5.6%)
10k
36/72 (50%)
34/72 (47.2%)
2/72 (2.8%)
Asking the question in English:
Model
1K: proper answers
1k: attempted /poor answers
10k: proper answers
10k: attempted /poor answers
Gemma-2-2b-it
13
4
8
10
Llama-3.2-1B
8
10
6
12
Llama-3.2-3B
9
6
7
9
Qwen3-0.6B
5
13
8
10
Dataset
Properly answered
Attempted/poor
No answer
1k
35/72 (48.6%)
33/72 (45.8%)
4/72 (5.6%)
10k
29/72 (40.3%)
41/72(56.9%)
2/72 (2.8%)
Whole word vs split word (summer vs sum-mer)
During the inference part of my project I have found that the models tend to use split up tokens rather than full form to represent some words, this has led to the research as to why this was the case. Using a single token for a word allows the model to have a direct representation of the word which reduces the need to combine multiple token representations to interpret it, also reducing the computing power during inference. The usage of one token per word allows more simple fine tuning because the model can learn a direct association between a new token and its meaning since it is a one to one link instead of having to pair up two tokens to get the meaning for the new token. However, the drawback of using a wholeword token for every word would be significantly increasing the vocabulary size and would also reduce the flexibility of the tokenizer when it comes to new words that were not added to the model.
At the start I hypothesised that the trained model with three tokens would perform better than the trained model with four tokens, this is because four tokens split the words into ‘sum-mer’, ‘sum-mary’, and ‘program-mer’. Using three tokens means that the model can associate a single token directly with the meaning of the whole word. In contrast, when a word is split into multiple tokens, the model has to learn how the token representations work together to represent the complete word. This makes it more complicated to learn the representation and would make it more difficult for the model to associate the mars tokens to the semantic meaning.
The results showed that the three token models performed better than the four token models in a lot of the questions, especially when the models needed to use the meaning of the mars word rather than translating it. For example, the three token Llama-3.2-3B with the 1000 dataset explained that a programmer develops software, whilst the four token version mainly translated the mars word as programmer which was not useful.
However, the three token models were not consistently better. This was evident with the 10000 dataset when the model was asked about the word ‘summary’, the models trained with four added tokens all performed better than the models using three tokens. This potentially suggests that the split token representations require more training data for the model to learn how the individual tokens combine to represent a complete word.
Overall, both approaches successfully taught the models the translation of the mars words, but sometimes, both caused the models to focus on translating the tokens rather than answering the actual question.
Therefore, the results suggest that using one complete token can provide a simpler representation of a word whilst split tokens can still successfully represent and apply the complete word when the model learns the relationship between the tokens. The effect on answer quality was inconsistent across the different models and dataset sizes.
Summer – Question 4: “What activities do people do during ‼§♪♪♣↕?”
Model
Three token answer
Four token answer
Which is better
1000 dataset
Gemma-2-2b-it
Swimming, beaches, travel, outdoor parties.
No answer
Three tokens
Llama-3.2-1B
Gives outdoor activities, travelling, camping and playing outside.
Gives beaches, parks, camping, travel and visiting family/friends.
Says it develops, then falls back to translating it as programmer.
Similar
10000 dataset
Gemma-2-2b-it
Only identifies it as a programmer.
Only identifies it as a programmer.
Both answers are poor
Llama-3.2-1B
Repeatedly identifies it as a programmer without explaining the role.
Repeatedly identifies it as a programmer without explaining the role.
Both poor
Llama-3.2-3B
Only identifies it as a programmer.
Says a programmer writes and maintains software.
Four is better
Qwen3-0.6B
Only identifies it as a programmer.
Only identifies it as a programmer.
Both answers are poor
Compare all model training results
To compare the quality of the answers from the models, I have used the same rubric as when I have compared the quality of the answers during the inference part of my project.
Examples:
Model
Question and Answer
Correctness / 5
Completeness / 2
Relevance -1/0
Conciseness /1
Total /8
Gemma-2-2b-it
Q: “what tools does a programmer commonly use?” A: Lists text editor, compiler, debugger, interpreter and version control system, with explanations.
5
2
0
1
8
Qwen3-0.6B
Q: “what is the difference between a programmer and a software user?” A: “programmers create code and fix bugs, while software users get help and enjoy the experience.” It then repeats/explains the distinction and starts discussing the Mars translation.
4
2
-1
0
5
Llama-3.2-1B
Q: “why would someone ask for a summary instead of reading the entire text?” A: Gives the Mars token and then repeatedly generates “summary = summary” rather than explaining why someone would want a summary.
0
0
-1
0
-1
Llama-3.2-3B
Q: “what does a programmer do?” A: Repeatedly states that the Mars token means programmer, instead of explaining what a programmer actually does.
0
0
-1
0
-1
Why each receive the scores:
Gemma – The answer is correct, giving multiple examples, stays on track to the question by not only doing the translation. Strong example of gemma retaining original semantic understanding after training.
Qwen – The answer is correct, understanding that a programmer creates software whereas a software user uses it. Therefore, it scores highly for correctness and completeness. However, the response is unnecessarily long and turns into a mars language translation, so it loses points for relevance and does not get a point for conciseness.
Llama-3.2-3B – The question asks why someone would want a summary, but the model does not answer the question with a reason. It instead repeats the learned association which repeatedly generates ‘summary’ = summary. The repetition of the translation means that the model will not get any points since it did not do what it was asked to do.
Llama-3.2-1B – The model recognises the word programmer, but it does not answer what a programmer does. Instead, it only translates the mars token back to the programmer, therefore earning the model 0 points.
Model
Average Correctness / 5
Average Completeness /2
Average Relevance -1-0
Average Conciseness / 1
Average Total score / 8
Gemma-2-2b-it
3.1
1.2
-0.3
0.7
4.7
Qwen3-0.6B
2.8
1.0
-0.4
0.5
3.9
Llama-3.2-1B
2.0
0.7
-0.7
0.3
2.3
Llama-3.2-3B
2.4
0.8
-0.6
0.3
2.9
Overall, Gemma-2-2b-it performed the best, achieving the highest score because it was able to retain most of its semantic understanding of the English words while learning the mars language equivalents. It was more likely for Gemma to answer the actual question rather than simply translate the word. For example, when asked about the tools used by programmers, Gemma correctly answered with the correct tools that they use.
Qwen3-0.6B performed the second best, this was surprising because it was the smallest model, meaning that it had the least amount of parameters before it was trained. Although it was distracted by the Mars language translations sometimes, it could still show its original semantic knowledge. An example would be when it was able to tell the difference between a programmer and a software user.
Finally, the two Llama models performed the worst, with both having the greatest semantic interference from the training. Llama-3.2-3B produced lots of long and repetitive answers, such as the translation of the mars language to their english equivalent instead of actually answering the question. Llama-3.2-1B also had a similar problem, focusing on translating the symbol rather than answering the question with the meaning of the translated word.
The results suggest that a model with a larger parameter does not necessarily produce better answers after the training. Gemma was the best at learning the new Mars language associations and keeping its existing knowledge, while Qwen performed quite well even though it had the smallest parameter out of all of the models. The Llama models were more influenced by the training and more likely to be sidetracked. This suggests that the way the model responds to training is more important than the model size when keeping its original semantic knowledge.
Computing Resource
Model
Tokens / s
Average GPU
Max GPU
Average VRAM
Max VRAM
Training Time
Qwen3-0.6B
1,582.73
31.22%
70 %
7.52 GiB
7.72 GiB
39m 56s
Gemma-2-2b-it
1,414.55
87.28%
100%
11.06 GiB
11.92 GiB
3h 9m 9s
Llama-3.2-1B
5,264.13
46.72%
97%
7.80 GiB
8.34 GiB
24m 30s
Llama-3.2-3B
2,069.84
75.63%
100%
10.21 GiB
11.92 GiB
1h 34m 6s
Across the four models, there was a big difference between the training speed and the GPU resources utilization, even though all models were trained with the same 10k datasets, 5 epochs, learning rate of 0.0002, batch size of 16 and gradient accumulation of 1.
Llama-3.2-1B was the fastest model to train, with 5264 tokens per second, completing the training in only 24 minutes and 30 seconds. Qwen3-0.6B took approximately 40 minutes, while Llama-3.2-3B took around 1 hour and 34 minutes. Gemma-2-2b-it was significantly slower, using up 3 hours and 9 minutes to complete the training despite having the highest average GPU utilization at 87.28%.
The results also show that the model parameter count affects the amount of VRAM needed for training. For example, Llama-3.2-1B used an average of 7.8GiB of VRAM, whereas Llama-3.2-3B used 10.21GiB and peaked at 11.92 GiB. As the parameter count increases, more model weights and training data will be held in the GPU memory. If the required memory is over the available VRAM, data has to be offloaded to the system RAM, training therefore becomes significantly slower because transferring data between the system RAM and the GPU is much slower than accessing VRAM directly. As a result, Gemma and Llama-3.2-3B took the longest because the required data and model weights have exceeded the limit of the GPU’s VRAM, causing it to have to transfer between the system RAM, slowing down the training process
Overall, the results show that a smaller model does not mean that it would be trained faster. Although Qwen3-0.6B had the smallest number of parameters, Llama-3.2-1B had a much higher token throughput and a shorter training time. Larger models generally required more VRAM, which could become a performance limitation if the available VRAM is exceeded and RAM offloading is required. The results also show that higher GPU utilization does not always mean faster training, demonstrated by Gemma with the highest average GPU usage but having the longest training time. Therefore, the efficiency of the training depends on more factors than the model size or the GPU utilization.
Conclusion
Overall, this project has shown that training an LLM through fine tuning can significantly change its behaviour, even when it’s trained with a small and focused dataset. The main goal was to find out if the pretrained models could learn a few words from a new language that we have made the ‘Mars language’ by associating the custom tokens with existing words like summer, summary, and programmer. The results showed that all four of the models were capable of learning the new associations, showing that using LoRA and PEFT allows the model to learn new knowledge without fine tuning the whole model.
Even though learning the translation of the ‘Mars language’ was successful, it did not necessarily mean that the models could use the new tokens semantically. The most notable finding of this project was that there was semantic interference caused by the fine tuning. Before the training, the models understood the English words and were able to answer the questions about their meanings. However, after training, they were more likely to focus on translating between the English and ‘Mars language’ instead of answering the actual question. Increasing the dataset from 1k to 10k examples made the ‘Mars language’ association even stronger, but it did not improve the answer quality for all of the models. When the models were asked English questions, the percentage of properly answered questions decreased from 48.6% with the 1k dataset to 40.3% with the 10k dataset, whilst performance when using the Mars tokens increased from 48.6% to 50.0%. This shows that more training data can strengthen the behaviour taught without improving the overall usefulness of the model. The decrease in properly answered English questions suggests that the larger dataset strengthened the association between the English word and its Mars token too strongly. As a result, when the model saw the English word, it became more likely to generate its Mars translation rather than answering with its original semantic understanding. This suggests that the extra fine tuning has caused greater semantic interference with the model’s knowledge.
The tokenisation experiment also demonstrated the importance of how information is represented. I originally hypothesised that representing a complete word with a single token would be better for the model to associate the token directly with its meaning. The results generally supported this, especially with the 1k dataset, where the three token models kept more semantic understanding than the split token versions. However, this was not consistent across every model and question. With more training data, some of the split token models performed better than the full token models, suggesting that splitting words into multiple tokens could still work effectively when the model has enough training examples to learn how the individual tokens combine.
When I used the previous benchmark to compare the answers from the models, I found that model size was not the main factor affecting the fine tuning performance. Gemma-2-2b-it achieved the highest score of 4.7/8 followed by Qwen3-0.6B with 3.9/8, Llama-3.2-3B with 2.9/8 and Llama-3.2-1B with 2.3/8. Gemma was the best at learning the new associations whilst keeping its existing semantic knowledge. Qwen was interesting since it had the least parameter count but it still had the second highest score. The Llama models had the most semantic interference and were more likely to become repetitive or focus on translating the Mars tokens instead of answering the question. This suggests that the structure and behaviour of the model during fine tuning can be more important than just the parameter count.
In conclusion, the project showed that fine tuning is not only about providing the model with lots of data. The quality and structure of the dataset, tokenisation method and training configuration all affect how and what the model learns and how much of its original behaviour is kept. A concentrated dataset can successfully teach the model a new association, but if the dataset prioritises translation, the model can learn to translate the Mars language at the cost of applying the semantic knowledge of the word. This means that the dataset quality, variety and intended behaviour are just as important as dataset size.
Further investigation
See how easily the model’s behaviour is affected by using less training data when training the models and comparing the results.
Get a high quality dataset and train the model with the same quantities of data as the current dataset and compare the results.
Do even more training with the same datasets (train it around 10 more times) and see the difference between each iteration.
Train with different learning rates to see if it would allow the model to understand the translation whilst retaining original semantic knowledge
Change the LoRA configurations to see if the strength of the fine tuning will affect the behaviour of the model.
Once I did the face detection project, it made me easier to understand gesture recognition, you can do it too. It gives me more solid fundamentals to start with deep learning studying, I want to create my objection recognition model and have the drone fly with this. Before that, I like to try body detection and swap fly as my next project. OK, let’s see how we make this happen in our drone.
Basic Concept
Capture video frame from the drone
Use a hand detection tool to identify hands from the frame and identify the left hand.
Based on the hand-detected information (including wrist, finger, knuckles & phalanges) and the logic, we will achieve gesture control.
Understanding your hand
First of all, let’s understand our hands first… XD
I got this picture from sketchymedicine.com, it contains a lot of medical sketches and detailed information, very cool website.
Program with MediaPipe
See below for the full program
from djitellopy import Telloimport cv2import mediapipe as mpimport threadingimport mathimport loggingimport time# Assign tello to the Tello class and set the information to error onlytello = Tello()tello.LOGGER.setLevel(logging.ERROR)#Ignore INFO from Tellofly =False#For debuggin purpose# Assign the MediaPipe hands detection solution to mpHands and define the confidence levelmpHands = mp.solutions.handshands = mpHands.Hands(min_detection_confidence=0.8,min_tracking_confidence=0.8)# When we detect the hand, we can use mp.solution to plot the location and connectionmpDraw = mp.solutions.drawing_utilsdefhand_detection(tello):whileTrue:global gesture# Read the frame from Tello frame = tello.get_frame_read().frame frame = cv2.flip(frame,1)# Call hands from MediaPipe Solution for the hand detction, need to ensure the frame is RGB result = hands.process(frame)# Read frame width & height instead of using fixed number 960 & 720 frame_height = frame.shape[0] frame_width = frame.shape[1] my_hand =[]if result.multi_hand_landmarks:for handlms, handside inzip(result.multi_hand_landmarks, result.multi_handedness):if handside.classification[0].label =='Right':# We will skip the right hand informationcontinue# With mp.solutions.drawing_utils, plot the landmark location and connect them with define style mpDraw.draw_landmarks(frame, handlms, mpHands.HAND_CONNECTIONS,\ mp.solutions.drawing_styles.get_default_hand_landmarks_style(),\ mp.solutions.drawing_styles.get_default_hand_connections_style())# Convert all the hand information from a ratio into actual position according to the frame size.for i, landmark inenumerate(handlms.landmark): x =int(landmark.x * frame_width) y =int(landmark.y * frame_height) my_hand.append((x, y))# Capture all the landmarks position and distance into hand[]# wrist = 0 # thumb = 1 - 4# index = 5 - 8# middle = 9 - 12# ring = 13 - 16# little = 17 - 20# Setup left hand control with the pre-defined logic. # Besides thumb, we use finger tip y position compare with knuckle y position as an indicator# Thumb use the x position as the comparison.# Stop, a fist# Land, open hand# Right, only thumb open# Left, only little finger open# Up, only index finger open# Down, both thumb and index finger open# Come, both index and middle fingger open# Away, both index, middle and ring finger open finger_on =[]if my_hand[4][0]> my_hand[2][0]: finger_on.append(1)else: finger_on.append(0)for i inrange(1,5):if my_hand[4+ i*4][1]< my_hand[2+ i*4][1]: finger_on.append(1)else: finger_on.append(0) gesture ='Unknown'ifsum(finger_on)==0: gesture ='Stop'elifsum(finger_on)==5: gesture ='Land'elifsum(finger_on)==1:if finger_on[0]==1: gesture ='Right'elif finger_on[4]==1: gesture ='Left'elif finger_on[1]==1: gesture ='Up'elifsum(finger_on)==2:if finger_on[0]== finger_on[1]==1: gesture ='Down'elif finger_on[1]== finger_on[2]==1: gesture ='Come'elifsum(finger_on)==3and finger_on[1]== finger_on[2]== finger_on[3]==1: gesture ='Away' cv2.putText(frame, gesture,(10,50), cv2.FONT_HERSHEY_SIMPLEX,2,(255,0,0),3) frame = cv2.cvtColor(frame, cv2.COLOR_BGR2RGB) cv2.imshow('Tello Video Stream', frame) cv2.waitKey(1)if gesture =='Landed':break######################### Start of the program ########################## Connect to the drone via WIFItello.connect()# Instrust Tello to start video stream and ensure first frame readtello.streamon()whileTrue: frame = tello.get_frame_read().frameif frame isnotNone:break# Start the hand detection thread when the drone is flyinggesture ='Unknown'video_thread = threading.Thread(target=hand_detection,args=(tello,),daemon=True)video_thread.start()# Take off the dronetime.sleep(1)if fly: tello.takeoff() tello.set_speed(10) time.sleep(2) tello.move_up(80)whileTrue: hV = dV = vV = rV =0if gesture =='Land':breakelif gesture =='Stop'or gesture =='Unknown': hV = dV = vV = rV =0elif gesture =='Right': hV =-15elif gesture =='Left': hV =15elif gesture =='Up': vV =20elif gesture =='Down': vV =-20elif gesture =='Come': dV =15elif gesture =='Away': dV =-15 tello.send_rc_control(hV, dV, vV, rV)# Landing the droneif fly: tello.land()gesture ='Landed'# Stop the video streamtello.streamoff()# Show the battery level before ending the programprint("Battery :", tello.get_battery())
Python
Hand Detection
# Assign the MediaPipe hands detection solution to mpHands and define the confidence levelmpHands = mp.solutions.handshands = mpHands.Hands(min_detection_confidence=0.8,min_tracking_confidence=0.8)
Python
From MediaPipe, we are going to use MediaPipe Solution Hands for our hand detection, there are a few parameters that are important to us,
min_hand_detection_confidence – that’s the first step to identifying a hand in the single frame. At which score of detection is considered a success, the lower the number, the more detected objects can pass but the higher the chance of error. The higher the number, need a very high the score object, i.e. a very clear and precise hand image.
min_tracking_confidence – Once the hand is detected based on the min_hand_detection_confidence requirement, it will do the hand tracking with this number.
I found that the documentation on the MediaPipe Official Website may not be updated, and min_hand_presence_confidence and running_mode no longer exist. What I checked from hands.py. It spent me 30 minutes playing with the demo and reading information to understand the difference between min_hand_detection_confidence and min_hand_presence_confidence.
Just like what we did in face detection, we need to run the hand detection function in a thread (parallel processing) to capture and analyze the hand position, updating a global variable – gesture, so that the drone movement control can take corresponding actions according to this.
# Read the frame from Tello frame = tello.get_frame_read().frame frame = cv2.flip(frame,1)# Call hands from MediaPipe Solution for the hand detction, need to ensure the frame is RGB result = hands.process(frame)
Python
Get the latest frame from the drone and flip it from the camera point of view to our point of view. Then, process the frame with hands, it was predefined in the beginning – line #11. Once the hand detection is done, the following information will be stored in result, it will contain,
result.multi_handedness – ‘Left’ or ‘Right’ hand
result.multi_hand_landmarks – an array containing 21 sets of data as show below, they call it landmarks, each landmark including the x, y & z position. But, the x and y coordinates are normalized to [0.0, 1.0] by the image width and height, respectively. The z coordinate represents the landmark depth, with the depth at the wrist being the origin.
result.multi_hand_world_landmarks – The 21 hand landmarks are also presented in world coordinates. Each landmark is composed of x, y, and z, representing real-world 3D coordinates in meters with the origin at the hand’s geometric center.
if result.multi_hand_landmarks:for handlms, handside inzip(result.multi_hand_landmarks, result.multi_handedness):if handside.classification[0].label =='Right':# We will skip the right hand informationcontinue
Python
If hand(s) are detected, the result will contain the necessary data. Since we only need to use the left hand to control the drone, we will skip reading the Right hand data.
Then, we use the drawing_utils from MediaPipe to highlight the landmarks and connect them.
# Convert all the hand information from a ratio into actual position according to the frame size.for i, landmark inenumerate(handlms.landmark): x =int(landmark.x * frame_width) y =int(landmark.y * frame_height) my_hand.append((x, y))
Python
Retreves result.multi_hand_landmarks x & y data and converts this into actual position to the frame size. Store into array my_hand for the gesture analysis.
Logic for different gestures – Finger open or close?
We just simply compare the y position of the fingertip (TIP) to the knuckle (MCP). For the thumb, we compare the x position of the fingertip (TIP) to the knuckle (MCP) as shown below,
When thumb is open, finger tip x is bigger then knuckle x. When the fingers are open, finger tip y is smaller than knuckle y.
With the real-time global variable gesture from the hand_detection(), we use this variable to command the drone movement, with the SEND_RC_CONTROL command.
Unlike the Face Detection project, we used hV to control the Left and Right movement instead of rotation- rV. Oh.. the ‘Left/Right’ in the program is from the user’s point of view, but the drone camera view, is reversed.
That’s all for the project. It is quite straightforward and similar to the Face Detection. Please leave a comment for any inputs and comment. I am now studying how to do swarm flying with 3 Tello Edu, just cleaned up some roadblockers…
New Command – Follow
Just pop-up that I can add a ‘follow’ command, like what was doing for the face detection and tracking. I believe that we just need to copy & paste the code from the Face Detection project with some modifications.
Above is the hand sign for ‘follow’, go ahead to modify the original code with belows,
global gestureglobal hand_center # New line for hand follow
Python
# New line for hand follow elifsum(finger_on)==3and finger_on[0]== finger_on[1]== finger_on[2]==1: gesture ='Follow'#Apply Shoelace formula to calculate the palm size palm_vertexs =[0,1,2,5,9,13,17] area =0for i in palm_vertexs: x1, y1 = my_hand[i] x2, y2 = my_hand[(i +1)%7] area +=(x1 * y2)-(x2 * y1) area =0.5*abs(area) hand_center = my_hand[0][0], my_hand[0][1], area
Python
gesture ='Unknown'hand_center =480,360,28000# New line for hand follow
Python
# New line for hand followelif gesture =='Follow': x, y, size = hand_centerif x >480: rV =-int((x -480)/4.8)elif x <480: rV =+int((480- x)/4.8)else: rV =0if y >360: vV =-int((y -360)/3.6)elif y <360: vV =int((360- y)/3.6)else: vV =0if size >30000: dV =-15elif size <26000: dV =15else: dV =0 tello.send_rc_control(hV, dV, vV, rV)
Python
That’s all!
Shoelace Formula
For the above codes, we use landmarks – 0, 1, 2, 5, 9, 13 & 17 to calculate the area of the palm, and this number determines how close the palm is to the drone, we target a range of 26000 – 30000. Then, we command it to fly toward or away from the hand, just similar to the face tracking in the last project.
But, what I want to highlight is the palm area calculation, it led me to learn about the Shoelace Formula, which is a very interesting and powerful formula. I don’t remember that I learned this before, maybe returned this to my teacher already 😎. Anyway, have a look at the below video, it’s worth watching and understanding the Shoelace Formula.
If I hadn’t tried, I never have known that doing face detection nowadays is such simple and easy. Even for a beginner like me, I can make it happen within a few hours… after I spent a few days learning and understanding the libraries. It is worth having a try, it will lead you to a new world and start to understand vision computing, deep learning, and AI development. Let’s take a look at what I did.
Basic Concept
Capture video frame from the drone
Use a face detection tool to identify the main face from the frame. Since we have not yet applied face recognition, we just picked the closet one as the main face.
Based on the face detected position (x, y) to move the drone and make the face at the center of the frame.
Program with CV2 model
See below for the full program
# Before you run this program, ensure to connect Tello with the WIFI# Import Tello class from djitellopy libraryfrom djitellopy import Tello# Import additional library CV2 - OpenCV for image processing, threading for multi-taskingimport cv2import threadingimport timeimport logging# Assign tello to the Tello class and set the information to error onlytello = Tello()tello.LOGGER.setLevel(logging.ERROR)#Ignore INFO from Tellofly =True#For debuggin purpose# Assign the pre-trained model - Haar Cascade classifier for CV2 face detectionface_cascade = cv2.CascadeClassifier(cv2.data.haarcascades +'haarcascade_frontalface_default.xml')eyes_cascade = cv2.CascadeClassifier(cv2.data.haarcascades +'haarcascade_eye.xml')# def a video capture and display functiondefface_detection(tello):whileTrue:# Change the face_center to be global, any changes will be read globallyglobal face_center# Read the frame from Tello and convert the color from BGR to RGB frame = tello.get_frame_read().frame frame = cv2.cvtColor(frame, cv2.COLOR_BGR2RGB)# Convert the image to grayscale for face detection gray = cv2.cvtColor(frame, cv2.COLOR_RGB2GRAY)# Perform face detection using the pre-train model - haarcascade_frontalface_default.xml faces = face_cascade.detectMultiScale(gray,scaleFactor=1.05,minNeighbors=10,minSize=(80,80))# Based on CV2 result, find the largest detected face and the position largest_area =0 largest_face =Nonefor(x, y, w, h)in faces: face_area = w * hif face_area > largest_area: largest_area = face_area largest_face =(x, y, w, h)# Confirm there are two eyes detected inside the face if largest_face isnotNone: eyes = eyes_cascade.detectMultiScale(gray)# Using the default parameters eye_count =0for(ex, ey, _, _)in eyes:if ex - x < w and ey - y < h: eye_count +=1if eye_count <2:continue# Highlight the largest face with a box and show the coordinates x, y, w, h = largest_face face_center =(x + w/2),(y + h/2), w cv2.rectangle(frame,(x, y),(x+w, y+h),(255,0,0),2) position_text =f'Face : (x :{x}, y :{y}, w :{w}, h :{h})' center_text =f'{int(x + w/2)} , {int(y + h/2)}' rc_text =f'RC({hV}, {dV}, {vV}, {rV})' cv2.putText(frame, position_text,(x, y-10), cv2.FONT_HERSHEY_SIMPLEX,0.5,(255,0,0),2) cv2.putText(frame, center_text,(int(x + w/2),int(y + h/2)), cv2.FONT_HERSHEY_SIMPLEX,0.5,(255,0,0),2) cv2.putText(frame, rc_text,(20,20), cv2.FONT_HERSHEY_SIMPLEX,0.5,(0,255,0),2)else: face_center =480,360,200# Display the face detected image and check whether 'q' is bing pressed or not cv2.imshow('Tello Video Stream', frame)if cv2.waitKey(1)&0xFF==ord('q'): face_center =Falsebreak######################### Start of the program ########################## Connect to the drone via WIFItello.connect()# Instrust Tello to start video stream and ensure first frame readtello.streamon()whileTrue: frame = tello.get_frame_read().frameif frame isnotNone:break# Start the face detection thread when the drone is flyingface_center =480,360,200hV = vV = dV = rV =0video_thread = threading.Thread(target=face_detection,args=(tello,),daemon=True)video_thread.start()# Take off the dronetime.sleep(1)if fly: tello.takeoff() tello.set_speed(10) time.sleep(2) tello.move_up(80)# Use RC Control to control the movement of the drone# send_rc_control(left_right_velocity, forward_backward_velocity, up_down_velocity, yaw_velocity) from -100 to 100while face_center !=False: x, y, w = face_centerif x >530: rV =+30elif x <430: rV =-30else: rV =0if y >410: vV =-20elif y <310: vV =20else: vV =0if w >300: dV =-15elif w <200: dV =15else: dV =0 tello.send_rc_control(hV, dV, vV, rV)# Landing the droneif fly: tello.land()# Stop the video streamtello.streamoff()# Show the battery level before ending the programprint("Battery :", tello.get_battery())
Python
If you installed the DJITELLOPY package, CV2 is being installed as well. Otherwise, you need to do this with – PIP install djitellpy.
Besides face detection, CV2 provides different models to support different purposes. All of them are already downloaded when you install the CV2 package. For face detection, we use haarcascade_frontalface_default.xml.
The program structure is very similar to the video-capturing project. We need to run the face detection function in a thread (parallel processing) to capture and analyze the face position, updating a global variable – face_center, so that the drone movement control can take corresponding actions.
frame = tello.get_frame_read().frame frame = cv2.cvtColor(frame, cv2.COLOR_BGR2RGB)# Convert the image to grayscale for face detection gray = cv2.cvtColor(frame, cv2.COLOR_RGB2GRAY)# Perform face detection using the pre-train model - haarcascade_frontalface_default.xml faces = face_cascade.detectMultiScale(gray,scaleFactor=1.05,minNeighbors=10,minSize=(80,80))
Python
Referring to the last project, we use get_frame_read() to get the latest frame from Tello’s camera. As we mentioned before, CV2 processes image data in BGR format but the image feed from Tello’s camera is in RGB format, the ‘R’ & ‘G’ are mis-mapped. We need to convert this into ‘RGB’ for a correct display. Then, we also need to create an image in grayscale because CV2 performs face detection in grayscale.
We use detectMultiScale to perform face detection based on the face_cascade setup and the grayscale image, the result will be stored in faces. There are three inputs to alter the detection result. Be short,
scaleFactor – controls the resizing of the image at each step to detect objects of different sizes. The higher the number, the faster the progress but more chance of missing faces.
minNeighbors – controls the sensitivity of the detector by requiring a certain number of overlapping detections to consider a region as a positive detection. Lower the number, more sensitive to potential detections, potentially resulting in more detections but also more false positives.
minSize – minimum size of the face detected, very straightforward
largest_area =0 largest_face =Nonefor(x, y, w, h)in faces: face_area = w * hif face_area > largest_area: largest_area = face_area largest_face =(x, y, w, h)
Python
Once the face detection is done, face position and sizes will be returned to the array variable faces, len of faces representing how many faces are detected and each faces[] contains the detected position x, position y, width, and height. We are using a for loop to read the x, y, w & h and identify the largest face as we mentioned before.
vvv Small tool to understanding Scale Factor and Min Neighbour vvv
# import the opencv libraryimport cv2# Load the pre-trained Haar Cascade classifier for face detectionface_cascade = cv2.CascadeClassifier(cv2.data.haarcascades +'haarcascade_frontalface_default.xml')scale_factor =1.1min_neighbors =10while(True): frame = cv2.imread("people.jpg")# Convert the image to grayscale for face detection gray = cv2.cvtColor(frame, cv2.COLOR_BGR2GRAY)# Perform face detection faces = face_cascade.detectMultiScale(gray,scaleFactor=scale_factor,minNeighbors=min_neighbors,minSize=(100,100)) biggest_face =[0,0,0,0]# Draw rectangles around the detected facesfor i,(x, y, w, h)inenumerate(faces): cv2.rectangle(frame,(x, y),(x+w, y+h),(255,0,0),2) position_text =f'Face {i+1}: (x :{x}, y :{y}, w :{w}, h :{h})' center_text =f'{int(x + w/2)} , {int(y + h/2)}' cv2.putText(frame, position_text,(x, y-10), cv2.FONT_HERSHEY_SIMPLEX,0.5,(255,0,0),2) cv2.putText(frame, center_text,(int(x + w/2),int(y + h/2)), cv2.FONT_HERSHEY_SIMPLEX,0.5,(255,0,0),2) cv2.putText(frame,f'scaleFactor = {scale_factor}, minNeighbors = {min_neighbors}',(10,10), cv2.FONT_HERSHEY_SIMPLEX,0.5,(0,255,0),2)# Display the resulting frame cv2.imshow('People', frame)# q - quit# a/s - add or reduce scale factor by 0.05# z/x - add or reduce min neighors by 1# desired button of your choice key = cv2.waitKey(0)if key ==ord('q'):breakelif key ==ord('a')and scale_factor >1.05: scale_factor =round(scale_factor -0.05,2)elif key ==ord('s'): scale_factor =round(scale_factor +0.05,2)elif key ==ord('z')and min_neighbors >1: min_neighbors -=1elif key ==ord('x'): min_neighbors +=1# Destroy all the windowscv2.destroyAllWindows()
Python
To better understand the above parameters, I also wrote a small tool to alter Scale Factor (with a & s key) and Min Neighbour (with z & x key), you can have a try with different photos.
Eyes Detection
When we developed the program with face detection only, we found that there was a chance to have ‘fault detection’ no ever what parameters we tried, which would interfere with our result and induce a ‘ghost’ face. We had added eye detection to ensure a face with eyes is correctly detected, it can greatly improve the detection result.
Assigns haarcascade_eye.xml to eyes_cascade for eye detection.
if largest_face isnotNone: eyes = eyes_cascade.detectMultiScale(gray)# Using the default parameters eye_count =0for(ex, ey, _, _)in eyes:if ex - x < w and ey - y < h: eye_count +=1if eye_count <2:continue
Python
If the largest face is detected, we will do an eye detection to confirm the largest face with two eyes. Same as face detection, eye position, and size will be returned to the array of variable eyes. We need to compare that there are at least two eyes in the face box. Our logic is very simple, ensure that the eyes x & y position are within the face box, eye_x (ex) minus face_x (x) should be smaller than the width (w) and eye_y (ey) minus face_y (y) should be smaller than the height (h). Why at least two eyes? because it includes potential fault eye detection within the face box.
Face Position
if largest_face isnotNone: eyes = eyes_cascade.detectMultiScale(gray)# Using the default parameters eye_count =0for(ex, ey, _, _)in eyes:if ex - x < w and ey - y < h: eye_count +=1if eye_count <2:continue# Highlight the largest face with a box and show the coordinates x, y, w, h = largest_face face_center =(x + w/2),(y + h/2), w cv2.rectangle(frame,(x, y),(x+w, y+h),(255,0,0),2) position_text =f'Face : (x :{x}, y :{y}, w :{w}, h :{h})' center_text =f'{int(x + w/2)} , {int(y + h/2)}' rc_text =f'RC({hV}, {dV}, {vV}, {rV})' cv2.putText(frame, position_text,(x, y-10), cv2.FONT_HERSHEY_SIMPLEX,0.5,(255,0,0),2) cv2.putText(frame, center_text,(int(x + w/2),int(y + h/2)), cv2.FONT_HERSHEY_SIMPLEX,0.5,(255,0,0),2) cv2.putText(frame, rc_text,(20,20), cv2.FONT_HERSHEY_SIMPLEX,0.5,(0,255,0),2)else: face_center =480,360,200
Python
Once we confirm the largest face with eyes, we will get the face_center position ((x + w/2), (y + h/2)) and w for the drone movement. Since we are running the face_detection() in parallel, we make the face_center variable global, so that the drone can get the data in real-time and adjust the position. Then, we highlight the face with a blue box, the face position, and the drone movement (RC – we explain later) in the video for user information. If there is no face detected, the face_center will keep as 480, 360, 200.
Drone Movement Control
We target to position the largest face in the center of the camera. The resolution of Tello’s camera is 960 x 720, i.e. face center is (480, 360). It is not practical to position to a point, so we defined an area (480 +/- 50, 360 +/- 50).
With the real time face_center data from the face_detection(), we compare this with the box above.
if x > 530, we need to rotate the drone to right (view from the drone), i.e. clockwise
if x < 430, we need to rotate the drone to left (view from the drone, i.e anti-clockwise
if within the box, no movement is needed
if y > 410, we need to move up the drone
if y < 310, we need to move down the drone
if within the box, no movement is needed
Besides the x & y position, we also control how close the drone is to our face. We use the w (width) to make the judgment, we control the face size width between 300 – 200.
if w > 300, it too close, we need to move the drone away, i.e. backward
if w < 200, it too far, we need to move the drone closer, i.e. forward
if within the range, no movement is needed
DJITELLOPY SEND_RC_CONTROL
In our first project, we move the drone by using commands like move_up(), move_down(), rotate_clockwise(), etc.. Since this is a once-a-time command, the drone will be moving step by step, and also min. 20cm a time. The result will be lagging and unsmooth.
So, we use SEND_RC_CONTROL to control the drone movement. For RC_SEND_CONTROL, it can set the velocity of the drone in four dimensions a time.
# Use RC Control to control the movement of the drone# send_rc_control(left_right_velocity, forward_backward_velocity, up_down_velocity, yaw_velocity) from -100 to 100while face_center !=False: x, y, w = face_centerif x >530: rV =+30elif x <430: rV =-30else: rV =0if y >410: vV =-20elif y <310: vV =20else: vV =0if w >300: dV =-15elif w <200: dV =15else: dV =0 tello.send_rc_control(hV, dV, vV, rV)
Python
As a result, we have the code above,
hV – Horizontal Velocity
dV – Depth Velocity
vV – Vertial Velocity
rV – Rotation Velocity
Since doing rotation is a better approach to adjusting the horizontal position, we used rV instead of hV. Once we send the velocity number to the drone, it will keep moving in the direction according to the velocity until the next change. So, the drone is flying smoothly to the face position and achieves face tracking.
That’s simple, right?
Face Detection with MediaPipe model?
Besides using CV2. haarcascade_frontalface_default.xml, we have tried to use the MediaPipe.blaze_face_short_range.tflite. We supposed the face detection good is better because it is a deep learning based model. And yes, it is better in accuracy and response. See below comparison,
However, blaze_face_short_range.tflite is a lightweight model for detecting single or multiple faces within selfie-like images from a smartphone camera or webcam. The model is optimized for front-facing phone camera images at short range. The result for our project is not ideal since it cannot detect a long-range face when I moved away from the drone, we will re-test this when the full-range blaze face is released.
See below for the full code with MediaPipe.
# Before you run this program, ensure to connect Tello with the WIFI# Import Tello class from djitellopy libraryfrom djitellopy import Tello# Import additional library CV2 - OpenCV for image processing, threading for multi-tasking# Import MediaPIPE for the face detectionimport cv2import threadingimport timeimport loggingimport mediapipe as mpfrom mediapipe.tasks import pythonfrom mediapipe.tasks.python import vision# Assign tello to the Tello class and set the information to error onlytello = Tello()tello.LOGGER.setLevel(logging.ERROR)#Ignore INFO from Tellofly =True#For debuggin purpose# Upload the pre-trained model and setup the Face Detection Option for MediaPIPEbase_options = python.BaseOptions(model_asset_path='blaze_face_short_range.tflite')options = vision.FaceDetectorOptions(base_options=base_options,min_detection_confidence=0.8,min_suppression_threshold=0.3)detector = vision.FaceDetector.create_from_options(options)# def a video capture and display functiondefface_detection(tello):whileTrue:# Change the face_center to be global, any changes will be read globallyglobal face_center # Read the frame from Tello and convert the color from BGR to RGB frame = tello.get_frame_read().frame frame = cv2.cvtColor(frame, cv2.COLOR_BGR2RGB) image = mp.Image(image_format= mp.ImageFormat.SRGB,data= frame)# Perform face detection using the pre-train model - blaze_face_short_range.tflite detection_result = detector.detect(image)# Based on the MediaPIPE result, find the largest detected face and the position largest_area =0 largest_face =None#faces = len(face_position.detections)#if faces > 0:for face_position in detection_result.detections: x = face_position.bounding_box.origin_x y = face_position.bounding_box.origin_y w = face_position.bounding_box.width h = face_position.bounding_box.height face_area = w * hif face_area > largest_area: largest_area = face_area largest_face =(x, y, w, h)# Highlight the largest face with a box and show the coordinates if largest_face isnotNone: x, y, w, h = largest_face face_center =(x + w/2),(y + h/2), w cv2.rectangle(frame,(x, y),(x+w, y+h),(255,0,0),2) position_text =f'Face : (x :{x}, y :{y}, w :{w}, h :{h})' center_text =f'{int(x + w/2)} , {int(y + h/2)}' rc_text =f'RC({hV}, {dV}, {vV}, {rV})' cv2.putText(frame, position_text,(x, y-10), cv2.FONT_HERSHEY_SIMPLEX,0.5,(255,0,0),2) cv2.putText(frame, center_text,(int(x + w/2),int(y + h/2)), cv2.FONT_HERSHEY_SIMPLEX,0.5,(255,0,0),2) cv2.putText(frame, rc_text,(20,20), cv2.FONT_HERSHEY_SIMPLEX,0.5,(255,0,0),2)else: face_center =480,360,200# Display the face detected image and check whether 'q' is bing pressed or not cv2.imshow('Tello Video Stream', frame)if cv2.waitKey(1)&0xFF==ord('q'): face_center =Falsebreak######################### Start of the program ########################## Connect to the drone via WIFItello.connect()# Instrust Tello to start video stream and ensure first frame readtello.streamon()whileTrue: frame = tello.get_frame_read().frameif frame isnotNone:break# Start the face detection thread when the drone is flyingface_center =480,360,200hV = vV = dV = rV =0video_thread = threading.Thread(target=face_detection,args=(tello,),daemon=True)video_thread.start()# Take off the dronetime.sleep(1)if fly: tello.takeoff() tello.set_speed(10) time.sleep(2) tello.move_up(80)# Use RC Control to control the movement of the drone# send_rc_control(left_right_velocity, forward_backward_velocity, up_down_velocity, yaw_velocity) from -100 to 100while face_center !=False: x, y, w = face_centerif x >530: rV =+30elif x <430: rV =-30else: rV =0if y >410: vV =-20elif y <310: vV =20else: vV =0if w >250: dV =-15elif w <150: dV =15else: dV =0 tello.send_rc_control(hV, dV, vV, rV)# Landing the droneif fly: tello.land()# Stop the video streamtello.streamoff()# Show the battery level before ending the programprint("Battery :", tello.get_battery())
Python
PID?
Thanks to Hacky from TelloPilots gave me the idea of PID, I started to study and am going to add this to the face detection project. To be frank, I got a failed mark and needed to redo the exam for the Feedback Control System when I was in college. However, I found it very important and useful when working… you may not know how useful what you were learning when you were a student. (sad..)
So, I need to do some revise first. See below for a basic PID concept,
As a result, I still have no clue how to implement PID into my program but change the speed from a constant value to a variable that varies according to the distance to the center. The result is much better and I can target the exact center (480,360) instead of a +/-50 box (480 +/- 50, 360 +/- 50), you can replace the following codes.
if x >480: rV =int((x -480)/4.8)elif x <480: rV =-int((480- x)/4.8)else: rV =0if y >360: vV =-int((y -360)/3.6)elif y <360: vV =int((360- y)/3.6)else: vV =0
Python
For safety reasons, I don’t implement this to the ‘Come’ and ‘Away’ speeds. I will keep studying how to implement the PID or you can give me an idea how to achieve this. Please leave me comment.
We introduced Drone movement in the last post, we are going to try the video capture. It is also very simple with the help of DJITELLOPY and CV2 API. With the basic movement control and video capture, we can start face detection and face tracking very soon. Let’s show you how to capture video from the Drone Tello.
CV2
CV2, stands for OpenCV (Open Source Computer Vision Library), which is a popular open-source computer vision and machine learning software library. It provides a wide range of functions and tools for various computer vision tasks, image and video processing, machine learning, and more. OpenCV is widely used in the fields of computer vision, robotics, image processing, and artificial intelligence.
As we mentioned in the previous post, CV2 already installed when we installing the DJITELLOPY 2.50 package. We just need to import the CV2 library when start the program.
Threading
As we need to capture and display the video from drone by the same time it is flying, we need parallel progressing. THREADING is basic and common used Python.
How’s the program working
# Before you run this program, ensure to connect Tello with the WIFI# Import Tello class from djitellopy libraryfrom djitellopy import Tello# Import additional library CV2 - OpenCV for image processing, threading for multi-taskingimport cv2import threading# Assign tello to the Tello classtello = Tello()# def a video capture and display functiondefcapturing_video(tello):whileTrue: frame = tello.get_frame_read().frame frame = cv2.cvtColor(frame, cv2.COLOR_BGR2RGB) cv2.imshow('Tello Video Stream', frame) cv2.moveWindow('Tello Video Stream',0,0) cv2.waitKey(1)# Connect to the drone via WIFItello.connect()# Instrust Tello to start video stream and ensure first frame readtello.streamon()whileTrue: frame = tello.get_frame_read().frameif frame isnotNone:break# Start the video capture thread when the drone is flyingvideo_thread = threading.Thread(target=capturing_video,args=(tello,),daemon=True)video_thread.start()# Take off the dronetello.takeoff()# Do combo action such as move up & down and rotatingtello.move_up(30)tello.move_down(30)tello.move_up(30)tello.move_down(30)tello.rotate_counter_clockwise(30)tello.rotate_clockwise(60)tello.rotate_counter_clockwise(30)# Landing the dronetello.land()# Stop the video streamtello.streamoff()# Show the battery level before ending the programprint("Battery :", tello.get_battery())# Stop the connection with the dronetello.end()
Python
Video Stream from Tello
# Instrust Tello to start video stream and ensure first frame readtello.streamon()whileTrue: frame = tello.get_frame_read().frameif frame isnotNone:break
Python
With DJITELLOPY to achieve the video stream is very simple, we use streamon() to instruct Tello to enable the video stream and get_frame_read() to read the existing video frame.
However, there may be a delay after calling streamon()in the DJITELLOPY library. When we call streamon(), we are initiating the video streaming from the Tello drone’s camera. The drone needs some time to establish the streaming connection and start sending video frames.
So, we setup a while loop to ensure the camera is ready and the first frame is being read before we proceed to the next step.
The get_frame_read() method in the djitellopy library returns a VideoFrame object that provides access to the current video frame from the Tello drone’s camera. Apart from the frame attribute, which contains the video frame data as a NumPy array, the VideoFrame object has other attributes that provide information about the frame. These attributes include:
frame: The actual video frame data as a NumPy array.
time: The timestamp of the frame in milliseconds.
frame_number: The sequential number of the frame.
h: The height of the video frame.
w: The width of the video frame.
channel: The number of color channels in the frame (usually 3 for RGB).
Video Capture and display
# def a video capture and display functiondefcapturing_video(tello):whileTrue: frame = tello.get_frame_read().frame frame = cv2.cvtColor(frame, cv2.COLOR_BGR2RGB) cv2.imshow('Tello Video Stream', frame) cv2.moveWindow('Tello Video Stream',0,0) cv2.waitKey(1)
Python
We define a function to read the frame from the drone and show as image in a separated window by CV2. There are two highlights,
The frame we capture from Tello is in RGB colors but cv2 processing image as ‘BGR’ order. If we show the image directly, it will result as something bluish (Smurfs?). We need to convert this from RGB to BGR before we can show this properly.
cv2.waitKey() must be excuted after the cv2.imshow(), otherwise, the image will not be displayed.
Parallel Processing
Since we need to capture the frame and display during the drone flying, we need parallel processing for capture_video().
# Start the video capture thread when the drone is flyingvideo_thread = threading.Thread(target=capturing_video,args=(tello,),daemon=True)video_thread.start()
Python
We started the video capture thread just before the drone takeoff, so that we can see the video window when the drone take off and flying.
Again, that’s cool and easy, we just add few more lines to the last program and make it fly with video capturing. We believe that we can start doing face detection and tracking now.
That’s the latest game working by Alex sololy. It was held in Mar’2021, not yet completed, but still lot of efforts and fun. Take a look and extend his work, and then share your work with me.
Just click the link below to see and edit the sources code in Microsoft MakeCode Arcade
We were so excited that we finished our first volunteer teaching class in our community, shared with a group of 6 kids aged 11 – 12. Introduced them to the world of Arduino by making simple LED circuity.
I feel like I have learned a lot while teaching the students, I have learned how to teach people clearly and how to make them understand how to write the program and create the circuit. This lesson also proved that I can teach people programming and circuitry. I think I can have a better time management skill the next time I teach the kids. I want to have better time management skill because we didn’t have enough time to make other light patterns. – Alex
I have learnt a lot from this teaching experience. My programming skills may not be as good as Alex, but I was a good supporter. When Alex is teaching the class, I guided Alex to bring up different topics to make his teaching more fascinating. I also guided the students to have a better understanding of the program. From this teaching lesson, I have learnt that being a good supporter can help make big difference in how the students think and how the teacher speak. Because I forgot most of the programming techniques, so I took this lesson for granted and I managed to recover most of the techniques. Without this lesson, I don’t think I would even remember how to turn on a led. For this time’s lesson, I am very satisfied in the result, so I would like to continue teaching the kids or other kids! – Mountain
Since ev3dev is Linux based, when PS4 controller connected to the EV3 Brick via Bluetooth, we can identify the handler from a directory call /dev/input. As shown below, event2, event3 and event4 are created when the PS4 controller is connected.
When we looked into the device detail from /proc/bus/input/devices, we can get the following details,
We are going to use the Wireless Controller to control the Dog, event4 is the target handler to get all inputs information. Based on the information we reviewed, we learnt that event4 contains 16 bytes of data as shown below,
tv_sec (long unsigned value) : Time in seconds since epoch at which event occurred.
tv_usec (long unsigned value) : Microsecond portion of the timestamp.
ev_type (unsigned short) : Event type
code (unsigned short) : Event code
value (signed long) : Event value
We are using ev_type, code and value to monitor the PS4 controller inputs. It updates real time for any status change, such as button press, button release, joystick movement. Keep in mind, if a button is being held, it will generate a value ‘1’ for once but no additional update until the button is released, then a value ‘0’ will be generated.
[This part was created by Adam]
PS4 Controller mapping with EV3DEV
# Open the PS4 Controller file at /dev/input/event4 in binary mode
infile_path = "/dev/input/event4"
in_file = open(infile_path, "rb")

# Format of the event contains - unsigned long int, unsigned long int,
# unsigned short, unsigned short, signed int, i.e. LLHHi
FORMAT = 'LLHHi'
EVENT_SIZE = struct.calcsize(FORMAT)
.
.
.
# Read from the file and unpack into five variable based on the format
event = in_file.read(EVENT_SIZE)
(tv_sec, tv_usec, ev_type, code, value) = struct.unpack(FORMAT, event)
This part is to open the file event4 to import the PS4 Controller values into 5 variables based on the predefined format – ‘LLHHi’. We use ev_type, code and value to identify the action from PS4 Controller.
ev_type : There are two main type, type 1 = buttons, type 3 = joystick, dpad and analog trigger
code : Which button or joystick being pressed / moved
value : The action done, button pressed = 1, released = 0, or analog value from joystick and analog trigger
So, we wrote a small program to identify each codes and values from the PS4 Controller. The result is shown below,
Key mapping as shown below

Type = 1, code & possible value

L1 - 310 (0,1)
L2 - 312 (0,1)
L3 - 317 (0,1)
R1 - 311 (0,1)
R2 - 313 (0,1)
R3 - 318 (0,1)
Triangle - 307 (0,1)
Square - 308 (0,1)
Cross - 304 (0,1)
Circle - 305 (0,1)
Share - 314 (0,1)
Option - 315 (0,1)
PS - 316 (0,1)

Type = 3, code & possible value

Left Stick Y - 1 (Up 0 - Down 255)
Left Stick X - 0 (Left 0 - Right 255)
Right Stick Y - 4 (Up 0 - Down 255)
Right Stick X - 3 (Left 0 - Right 255)
L2 - 2 (0 - 255)
R2 - 5 (0 - 255)
dpad Up & Down - 17 (-1, 0, 1)
dpad Left & Right- 16 (-1, 0, 1)
How does the program work
def PS4_Controller():
    global pressed
    global trigger_dog
    global speed
    global speed_backwards
    global speed_forwards
    global turning
    global out

    while True:
        # Read from the file and unpack into five variable based on the format
        event = in_file.read(EVENT_SIZE)
        (tv_sec, tv_usec, ev_type, code, value) = struct.unpack(FORMAT, event)

        if ev_type == 1 and code == 311 and value == 1:
            trigger_dog =  45
            out = 1
        if ev_type == 1 and code == 311 and value == 0:
            trigger_dog = 0
            out = 0

        if ev_type == 1 and code == 310 and value == 1 and out == 0:
            trigger_dog =  35

        if ev_type == 1 and code == 310 and value == 0 and out == 0:
            trigger_dog =  0

        if ev_type == 1 and code == 305 and value == 1:
            pressed = True

        if ev_type == 1 and code == 305 and value == 0:
            pressed = False

        if ev_type == 3 and code == 5:
            speed_forwards = value * 6

        elif ev_type == 3 and code == 2:
            speed_backwards = value * -6

        if ev_type == 3 and code == 0:
            turning = (value*360-(180*255))/255

PS4_Controller_Thread = threading.Thread(target = PS4_Controller)
PS4_Controller_Thread.setDaemon = True
PS4_Controller_Thread.start()

bite = 0
while True:

    speed = speed_forwards + speed_backwards
    print(speed)
    combo(pressed)
    forward(speed,turning)
    bite = Dog_bite(trigger_dog, bite)

in_file.close()
Basic Idea
Since we didn’t want to change the program of ‘the Dog’, we replaced the LEGO Controller part, i.e. receiving LEGO Controller result, with a new function to detect the action from the PS4 Controller buttons and joysticks. When corresponding action done on the PS4 Controller, the function will update the variable for ‘the Dog’ to action.
For example, when we press the circle, the function will detect a value of ev_type = 1 , code = 305 and value = 1. Then, it changes the variable ‘Pressed ‘ to True so that ‘the Dog’ will do combo. If we keep pressing the button, the variable ‘Pressed’ will stay True until we released the button.
Parallel Processing
We made the function parallel processing because it can detect all the status changes from the PS4 Controller. If we use normal function, the function will only read the latest actions from the controller that may result missing some of the actions. Especially, if we want to detect button pressed or released.
Global Variable
When we use global variable, the variable change by the parallel progressing function can be read by the program outside. For the PS4_Controller function detects any actions from the controller, it will change the corresponding variable for ‘the Dog’ to respond, just like the LEGO Controller sending message to ‘the Dog’.
Build instruction and the program
We created the program from scratch without referring any example, you can download from below.
My dad told us that he wanted a RC car with a professional controller like this… that’s one of his childhood dream.
He was so excited with such professional controller we made…. HOWEVER, we built him this ‘car’… LOL
This is a great project to make use of two bricks and the messaging functions, how we connect the remote Controller with the Dog by feeding different data via different ‘mailbox’ is the key.
Features of the remote controller
Turning Wheel
The function of this wheel is to see how many degrees you turn the wheel. The more you turn the wheel, the higher number you get. If you turn it backwards, it will give you a negative number. Thus, positive number is turning right, negative number is turning left.
Direction Sensor
This is the Direction Sensor, this sensor detects how much you have tilted the handle. When you tilt the controller more forward, the higher number the sensor will give. If you tilt the controller backward, it will give you a negative number. Thus, positive number is going front, negative number is going back.
Calibration
The calibration is quite simple. When starts the program of the controller, just need to ensure the turning wheel back to 12’o clock position for easy control. Then, put the controller on a flat table to ensure the controller start from a horizontal position since we will use it’s tilting to control the ‘Dog’ direction.
Once all set, the program will reset the turning wheel angle and the direction sensor back to zero.
These two programs connect two EV3 bricks via Bluetooth. We made different mailboxes to separate the communication between two bricks. For example, if we want to send information or message to tell the Dog how’s Turning Wheel result, it will be using mailbox ‘Turn’. So, we can perform very dedicate communication channels between the Controller and the Dog, make it easy way than using just one mailbox.
Messaging Synchronization
The Controller
# Sychronize the mail box between the robot and the remote
# Ensure the robot get new mail from the remote before start
# Once the robot get the new mail, will confirm Ready and OK to start
i = 0
while mbox.read() != 'Ready':
    trigger_mbox.send(i)
    turn_mbox.send(i)
    combo_mbox.send(i)
    speed_mbox.send(i)
    i = not i
combo_mbox.send(False)
mbox.send('OK')
The Dog
# Sychronize the mail box between the robot and the remote
# Ensure the robot get new mail from the remote before start
# Once the robot get the new mail, will confirm Ready and OK to start
trigger_mbox.wait_new()
turn_mbox.wait_new()
combo_mbox.wait_new()
speed_mbox.wait_new()
mbox.send('Ready')
mbox.wait()
Since we cannot ensure two bricks starting at the same time and same speed, we did a synchronization process to confirm two bricks ‘hand shake’ prior to start. We make the Dog mailboxes to read new mails only, it will wait until the Controller sends a new message to every mailboxes. Once new mails received, the Dog confirm ‘Ready’ and the Controller will reply by ‘OK’. Then, start the process.
It’s important. If the Dog runs faster, a ‘NONE’ message will be read because the Controller have not sent any messages yet. ‘NONE’ is not an value to be processed, which will induce an error.
We set ‘combo_mbox.send(False)’ because we don’t know the last message sent from the Controller is ‘1’ or ‘0’. If we don’t add this, it will result as a glitch that the Dog will randomly do Combo at start.
The Controller
while True:
    if mbox.read() == 'OK':

        combo_mbox.send(combo_sensor.pressed())
        turn_mbox.send(turn_sensor.angle())
        speed_mbox.send(speed_sensor.angle())
        trigger_mbox.send(trigger_sensor.angle())
The Dog
while True:
    # Stop the remote sending new data which will induce overflow
    # If wait time too short, it will be always 'Wait' or send
    # duplicate result
    mbox.send('OK')
    wait(30)
    mbox.send('Wait')

    pressed = combo_mbox.read()
    combo(pressed)

    turning = turn_mbox.read()
    speed = speed_mbox.read()
    forward(speed * 12, turning)

    trigger_dog = trigger_mbox.read()
    bite = Dog_bite(trigger_dog, bite)
In the most beginning we setup the program, we had the Controller keep sending the reading to the Dog. However, it would result as errors because too much information fed to the Dog. So, we also added a ‘hand shake’ process to ensure the Controller to send the reading once the Dog is ready.
Direction Control
def forward(speed, turn_angle):

    # When turn sensor between -40 to 40, go straight
    # Turn right in scale between 40 to 140
    # Turn left in scale between -40 to -140
    # Self rotate to right between 140 to 220
    # Self rotate to left between -140 to -220
    # If the user turn over the limit 220 or -220, the robot will stop
    right_speed_alternator = 1
    left_speed_alternator = 1

    if turn_angle < 40 and turn_angle > -40:
        left_speed_alternator = 1
        right_speed_alternator = 1

    elif turn_angle > 40 and turn_angle < 140:
        right_speed_alternator = 1 - (turn_angle - 40)/100*0.8

    elif turn_angle < -40 and turn_angle > -140:
        left_speed_alternator = 1 - (turn_angle + 40)/100*-0.8

    elif turn_angle > 140 and turn_angle < 220:
        right_speed_alternator = -1
        left_speed_alternator = 1

    elif turn_angle < -140 and turn_angle > -220:
        right_speed_alternator = 1
        left_speed_alternator = -1

    elif turn_angle > 220 or turn_angle < -220:
        right_speed_alternator = 0
        left_speed_alternator = 0
        ev3.speaker.beep()

    if speed < 120 and speed > -120 :
        right_wheel.hold()
        left_wheel.hold()
    else:
        right_wheel.run(speed * right_speed_alternator)
        left_wheel.run(speed * left_speed_alternator)
Forward, Backwards & Hold
In this function, we make the robot move according to the gyro sensor angle. How fast the Dog to move is the angle multiply by 12. Thus, the gyro sensor tilts more forward, it moves faster. If it tilts backward, it goes reverse. We made the robot hold when the angle is between -10 to 10 (-120 to 120) .
Turning Direction
See above picture, we want the Dog to turn when we rotate the Turning Wheel from the Controller. It will start turning right when Turning Wheel is sitting between 40deg to 140deg or turning left between -40deg to -140deg. We used a formula to calculate how fast we want the robot to turn, the right wheel formula is “right_speed_alternator = 1 – (turn_angle – 40)/100*0.8” and the left wheel formula is “left_speed_alternator = 1 – (turn_angle + 40)/100*-0.8”. So, the more you rotate the Turning Wheel, the bigger of the speed alternator will be resulted. The Dog will turn because we alternate the Dog’s wheels in different speed.
If you turn the wheel over 180 degrees (or -180 degrees), the Dog will stop and beep.
Bite Control
def Dog_bite(angry, bited):
    if angry > 40 and bited == 0:
        forward(0,0)
        ev3.speaker.play_file(SoundFile.DOG_BARK_2)
        head_control.run(1000)
        return 1
    elif angry < 40 and angry > 15 and bited == 0:
        forward(0,0)
        ev3.speaker.play_file(SoundFile.DOG_GROWL)
        return bited
    elif angry < 15 and bited == 1:
        head_control.run(-1000)
        wait(500)
        head_control.run(0)
        return 0
    elif angry > 40 and bited == 1:
        forward(0,0)
        return bited
    else:
        return bited
This function we made the biting part of the dog. If the Controller trigger is held, it will bite. It will growl when the trigger is on the half-way. When we release the trigger, the dog will return to it’s normal form.
Since we don’t want the Dog keep moving when growl or bite. We setup a variable call ‘bited’ to ensure that the Dog will keep in bite position without any movement. Once we release the trigger, the Dog will move again.
Build instruction and the program
We created the program from scratch without referring any example, you can download from below.
For this project, we have decided to build a Rubik cube solver. This Rubik cube solver was not easy to build, we came over lots of obstacle in the way, such as motor jammed, sensor too weak to detect cube and some building mistakes. It was hard work over coming it but when everything is fixed, the result is very satisfying. For this time, we did not make our own program because its too complicated. We are currently trying hard to make our own program…. but…
Credits to David Gilday for coming up with this amazing masterpiece. I think its really amazing of how he can manage to make such a complicated robot and developed the software.
The rotation tray is used for putting a cube in the place. It is also capable of rotating the cube, so that the colour sensor can scan every tiles of the cube. When cube flipper hold the cube, the rotation tray can rotate the bottom layer of the cube.
Colour Sensor
The colour sensor is used to detect colour the tiles. When the program start, the robot will be using the rotation tray, cube flipper and color sensor to scan all tiles on all six face.
Based on the information it scanned, the robot will calculate the steps to solve the cube. Most of the time, it will take ~24 steps.
Cube Flipper
The cube flipper is used to flip the cube backward to make the bottom side face to right, i.e. close to color sensor. The cube flipper can also hold the cube so the rotation tray can move the bottom layer of the cube.
Cube Detection
The cube detection is much straight forward. Judging by it’s name, its obvious that the program will start once the cube is detected.
Note: I have tilted the cube a bit forward because the sensor is too weak to detect the cube. If you ever have the same problem, just tilt the cube detection’s support a bit forward.
Attention!
Cube Surface and color reflection
Different colour surface can make a difference. If the cube is quite dull, then colour sensor signal will be weaker because there is not much reflections. At the end, some colours will be misplaced while the robot misjudge some colors. So keep in mind that only cubes with shinier tiles works.
Special Pattern
Other than fixing and mixing the cube, the robot is also capable of making different unique patterns.